Warp and Blend
Warp and Blend is a powerful tool for modifying the output of our BX-4KU video playback modules to project your video content in any physical configuration.
This article details how to implement Warp and Blend on a BX-4KU housed in a BinloopX using WinScript Live.
Number of Outputs
Warp and Blend can only be applied to a single output on a BX-4KU. This output is defined in WinScript Live as Video Output 1.
This means you can apply Warp and Blend to either the whole output at 4K or a single output at 1080p mode. In addition, Warp and Blend can be applied to a custom resolution over the DisplayPort output.
Configure Script and Video Outputs
- Create a new script.
- In the Script Configuration dialog, in the General section, in the Project section, enter your project details (Name, Version, Authors, and Description).
-
In the Device section, in the Product field, select BinloopX from the drop-down menu, as shown in Figure 1.
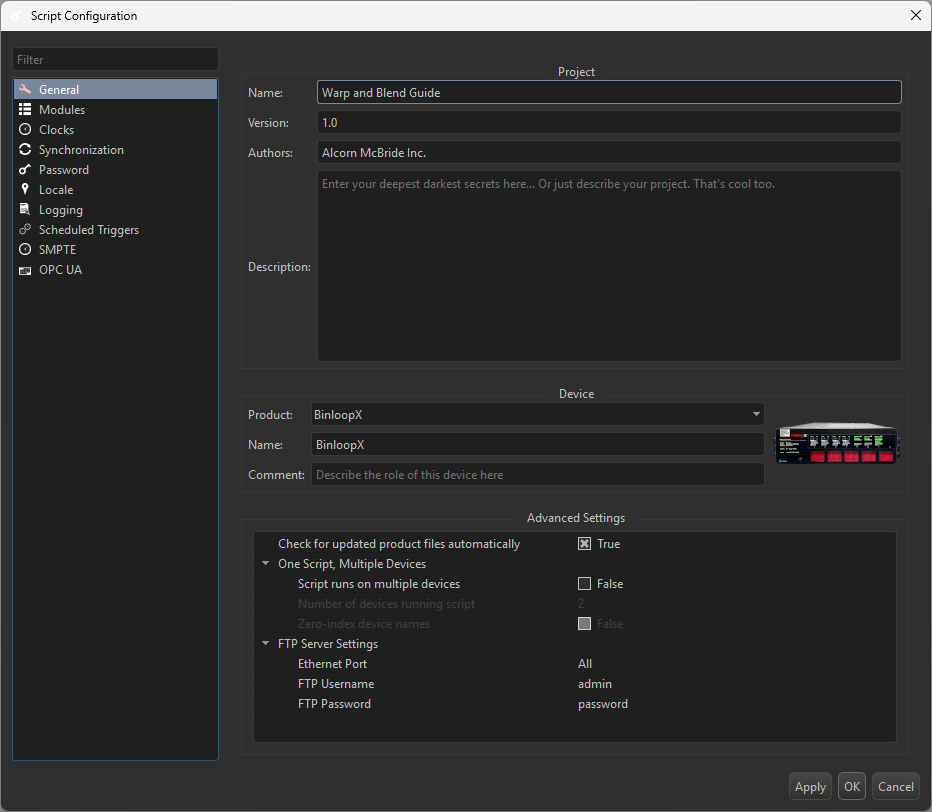
Figure 1 Script Configuration - General -
In the Modules section, in the drop-down menus beneath each slot you have populated on your BinloopX, select BX-4KU, as shown in Figure 2.
- In the section below the slots, expand the tree corresponding to the slot you wish to configure, then expand the Video Output section.
-
In the Resolution field, select the desired resolution, to a maximum of 4096x2160p.
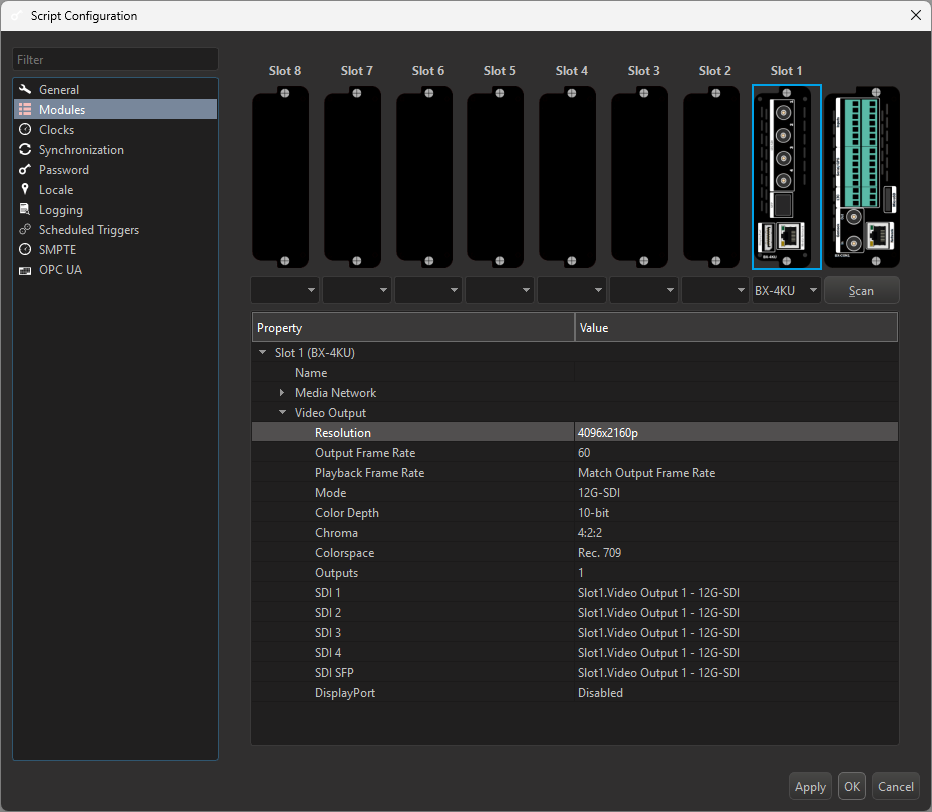
Figure 2 Script Configuration - Modules -
Select OK.
Open Warp and Blend Dialog
- In the WinScript Live main menu, select Resources > Video Outputs. This will open the Video Outputs resource view.
- In the top left of this view, there is a drop-down that defaults to Slot1. In this dropdown, select the slot for which you want to configure Warp and Blend.
-
Double-click in either the # column or the Warp & Blend column on the row corresponding to the video output you wish to configure, shown in the red circles in Figure 3 below. This will open the Warp and Blend dialog.
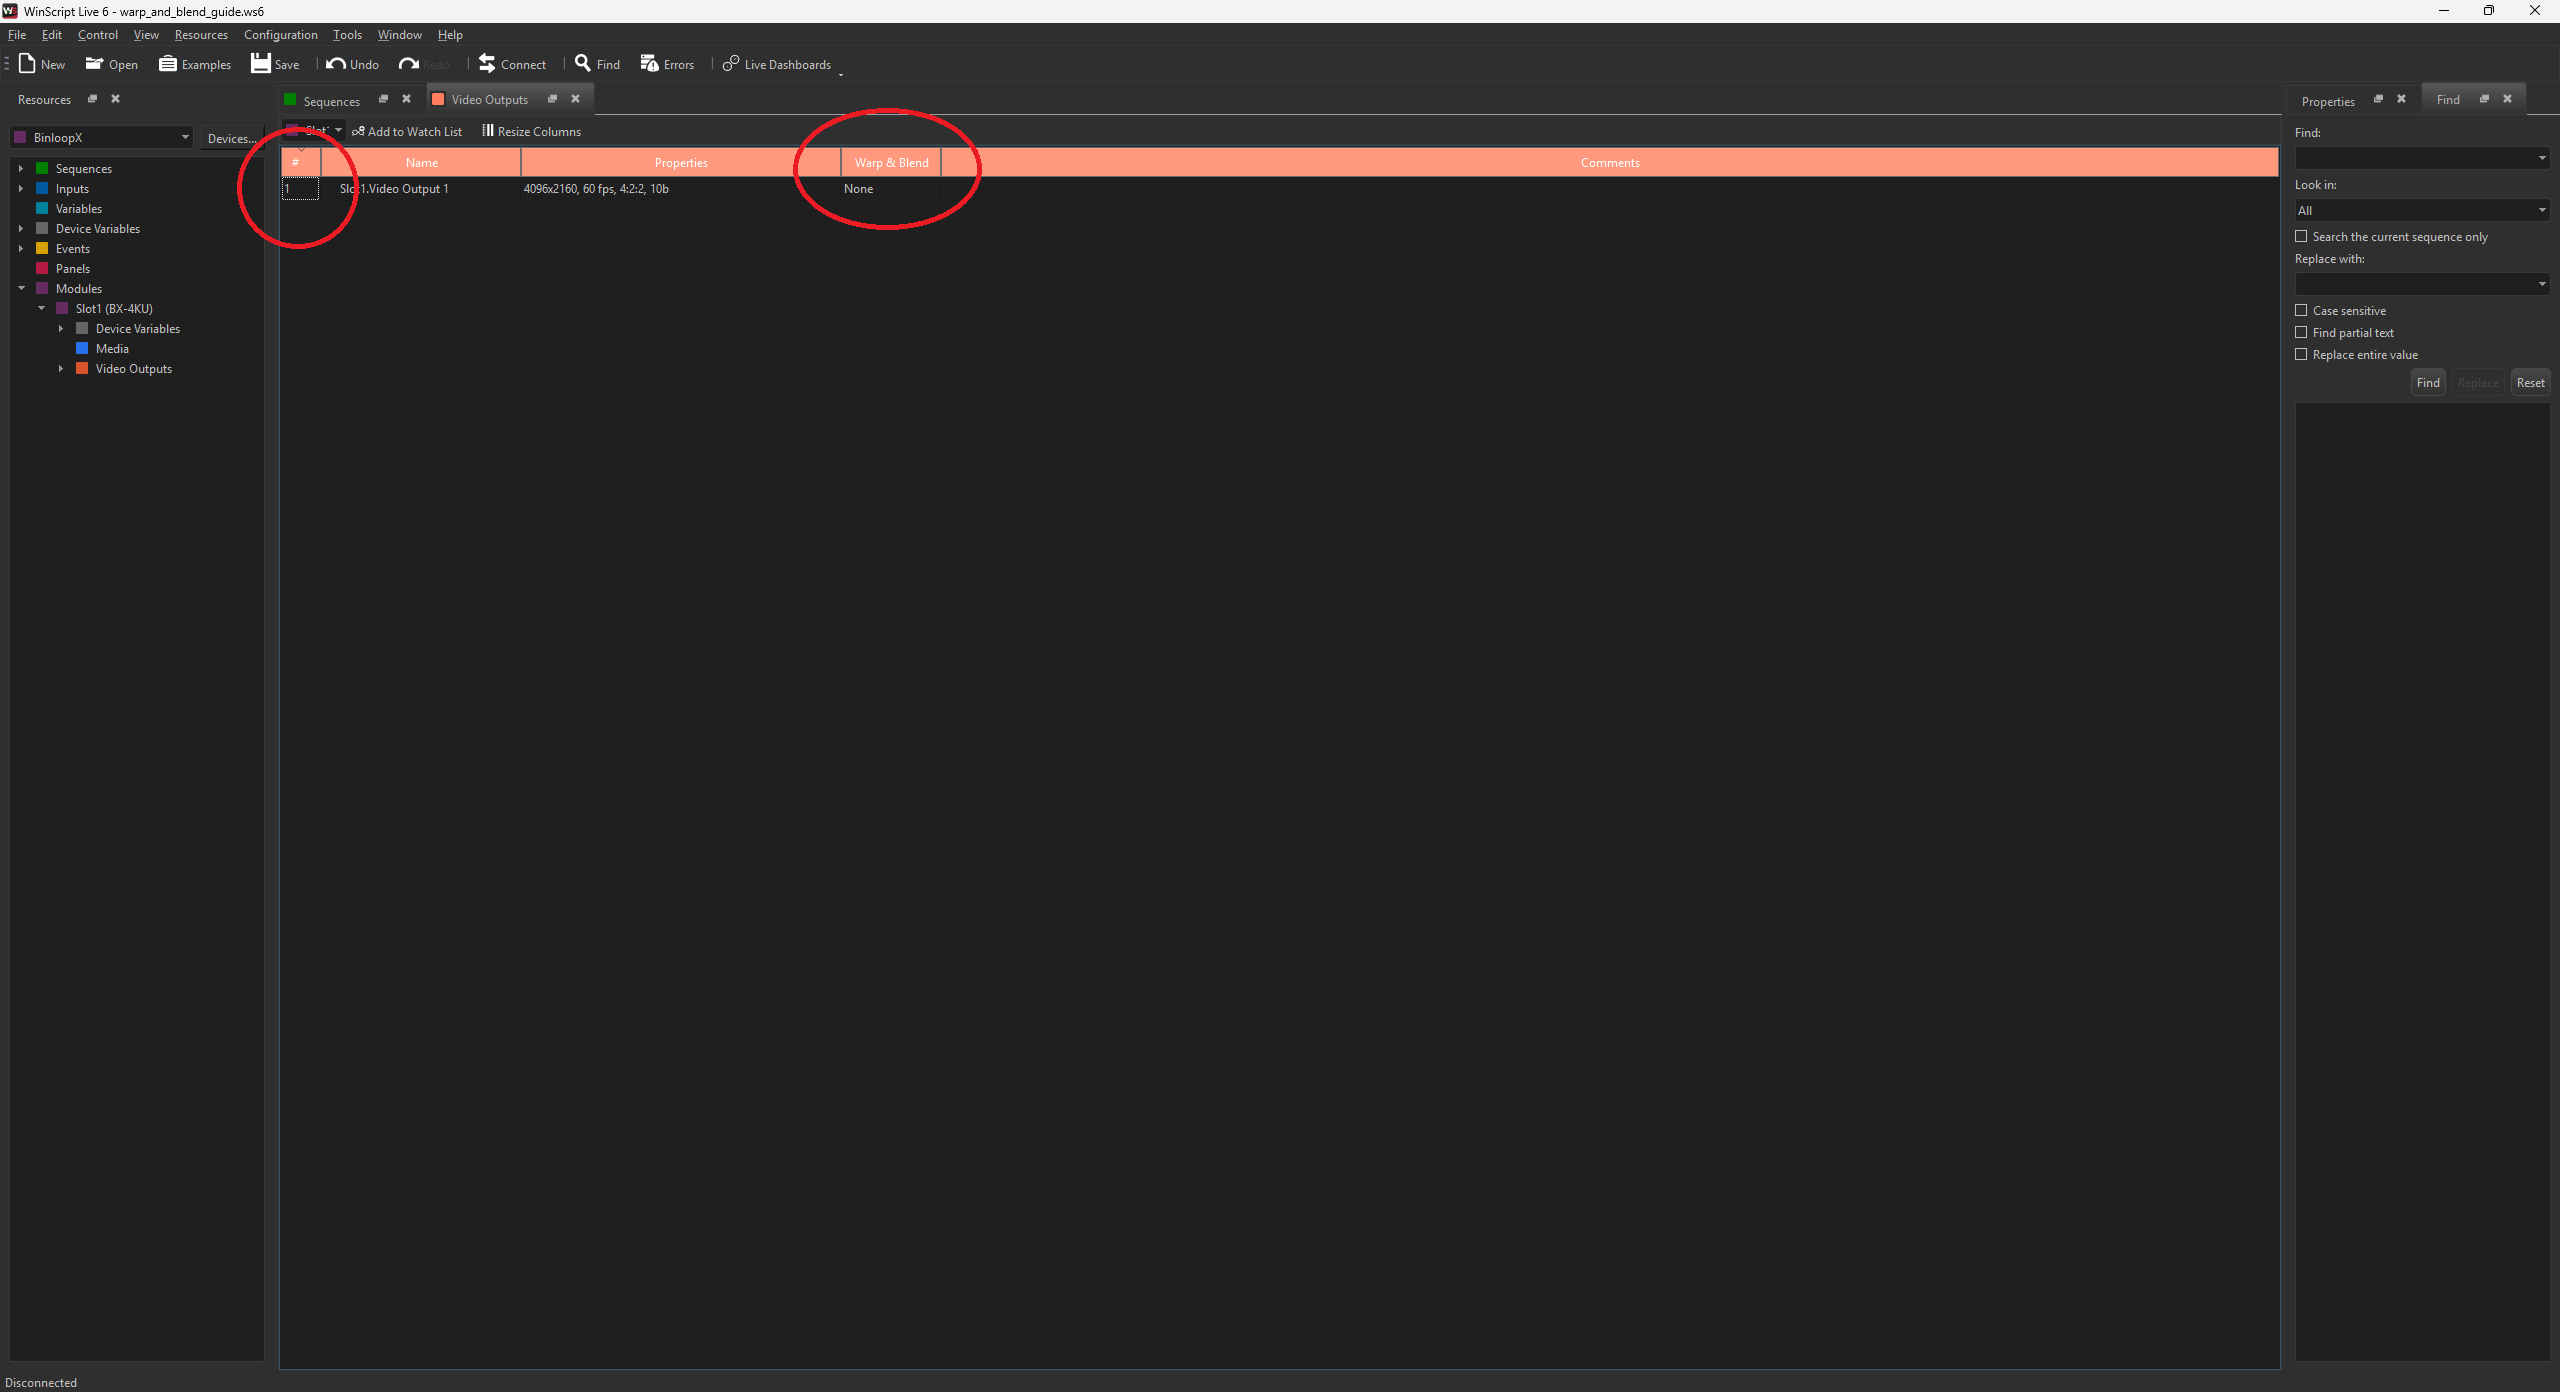
Figure 3 Open Warp and Blend Dialog
Warp and Blend Dialog
The Warp and Blend dialog is shown in Figure 4 below.
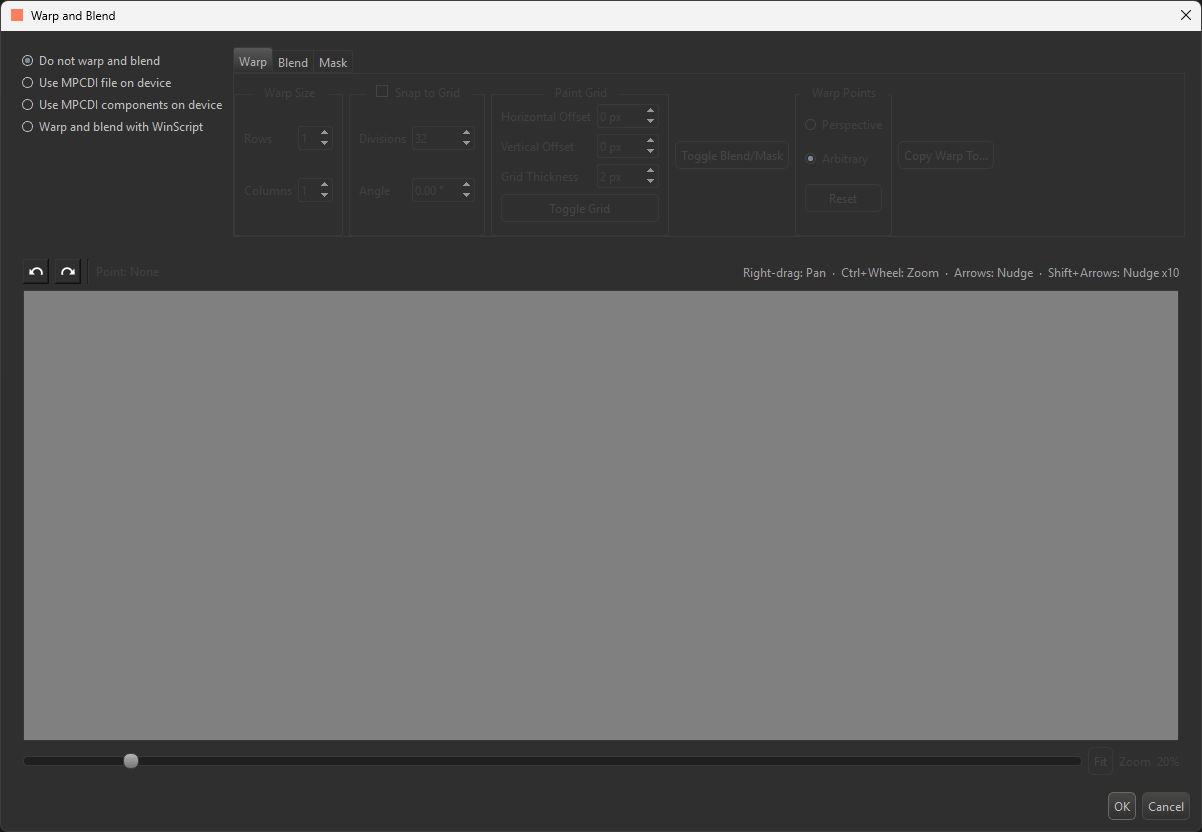
At the top of the dialog, four different options are shown:
- Do not warp and blend (default)
- Use MPCDI file on device
- Use MPCDI components on device
- Warp and blend with WinScript
The options are mutually exclusive.
Warning
If your MPCDI or PFM file contains invalid points (NaN), the BinloopX warp engine will extrapolate points to maintain a smooth blend through those points. If you intend for those points to show as black pixels, they should be included in the alpha blend/mask file.
Do Not Warp and Blend
This feature is the default, and does not apply any warp or blend to the Video Output when selected.
Use MPCDI File on Device
This feature allows you to use an existing MPCDI file, as shown in Figure 5.
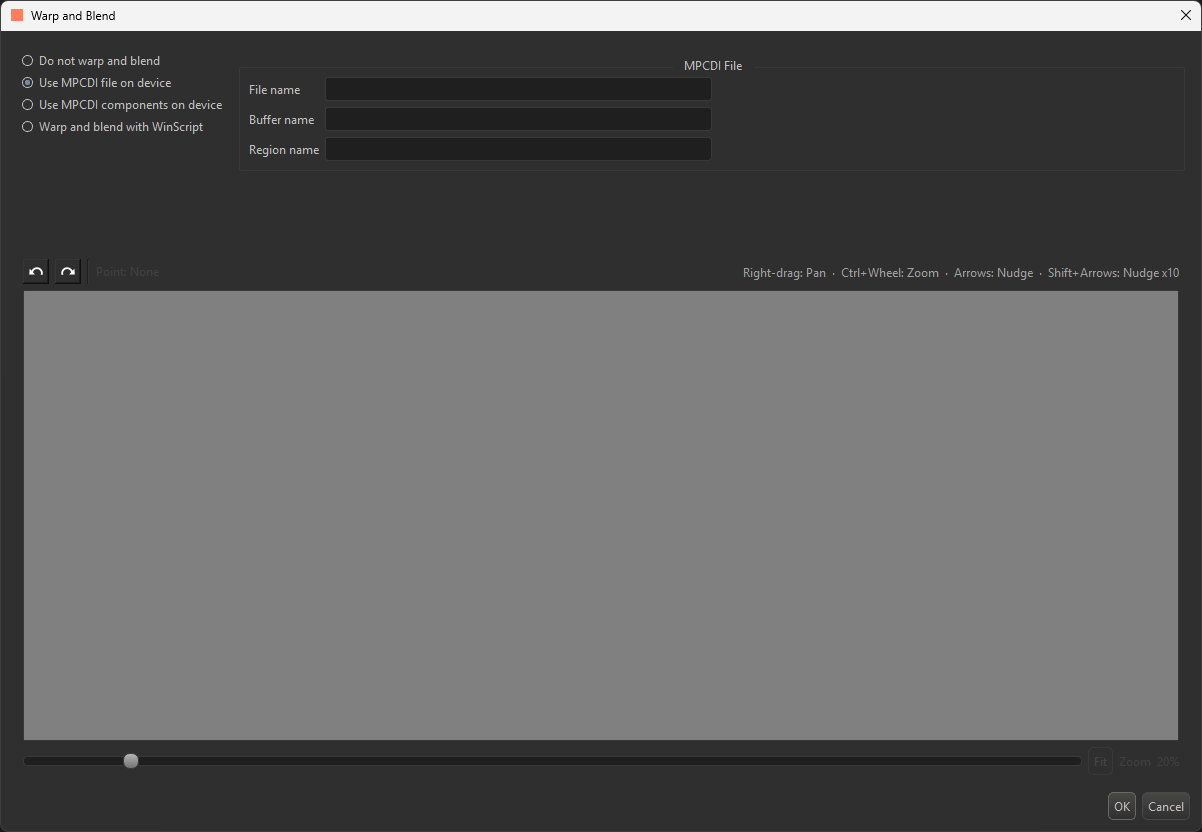
- File name: file name of your MPCDI file
- Buffer name: name of the buffer you wish to use
- Region name: name of the region you wish to output on this Video Output
Note
MPCDI files should be stored in the "warp" directory of the BX-4KU.
For output resolutions of 3840x2160 and below, PFMs will be scaled to an 8x8 subsampled mesh of the output resolution. For resolutions higher than 3840x2160, they will be scaled to a mesh of 16x16 blocks. When the PFMs are scaled, the default behavior is to assume that the texel values in the PFM correspond to the corners of the mesh blocks.
To change this assumption and make PFM values correspond to the centers of the mesh blocks, the “texelValues” XML tag can be configured as a child of “geometryWarpFile” in the mpcdi XML file like this:
<geometryWarpFile>
  <path>test_warp.pfm</path>
  <texelValues>center</texelValues>
</geometryWarpFile>
Use MPCDI Components on Device
This feature allows you to use specific components of an existing MPCDI file, as shown in Figure 6.
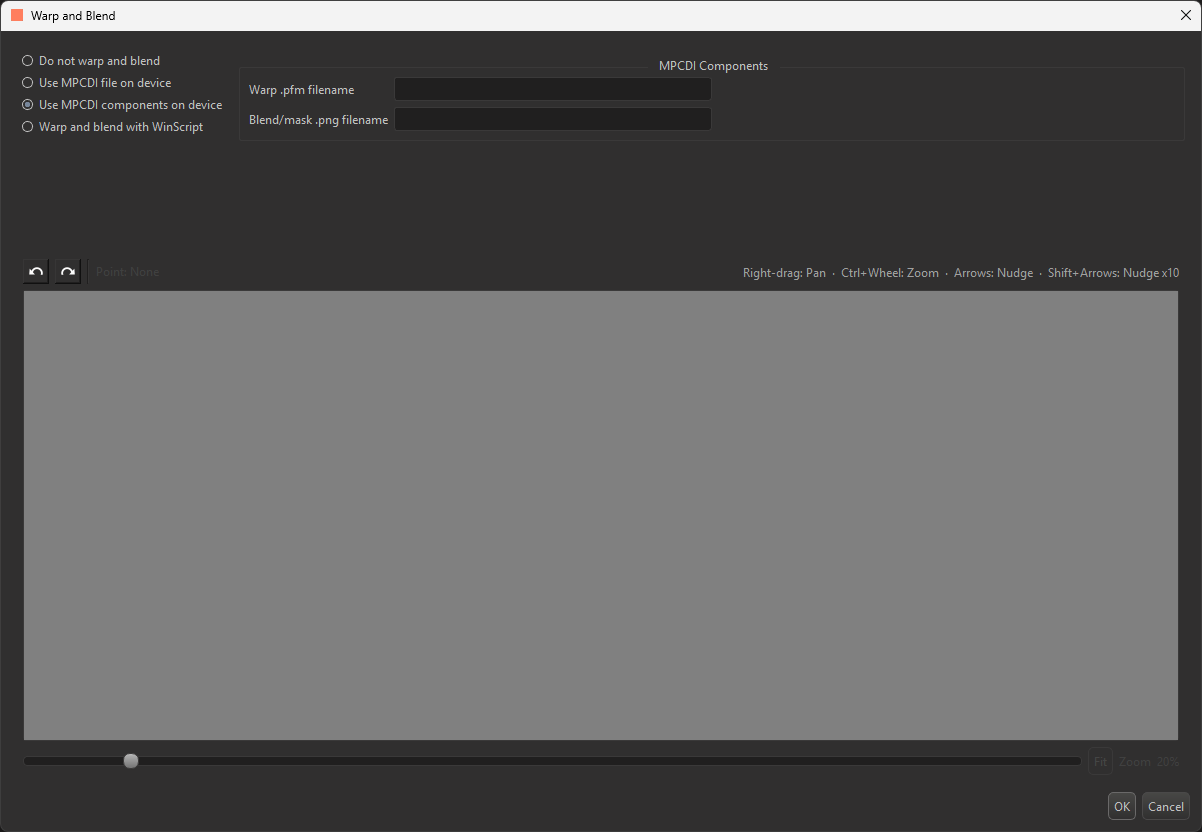
- Warp .pfm filename: file name of your .pfm file
- Blend/mask .png: file name of the blend/mask file
- Region name: name of the region you wish to output on this Video Output
Note
PFM and PNG files should be stored in the "warp" directory of the BX-4KU.
Warp and Blend with WinScript
This feature allows you to create a warp mesh, set blend strengths and directions, and mask off portions of the video output within WinScript Live.
Figure 7 below shows the features of Warp and Blend with WinScript Live.
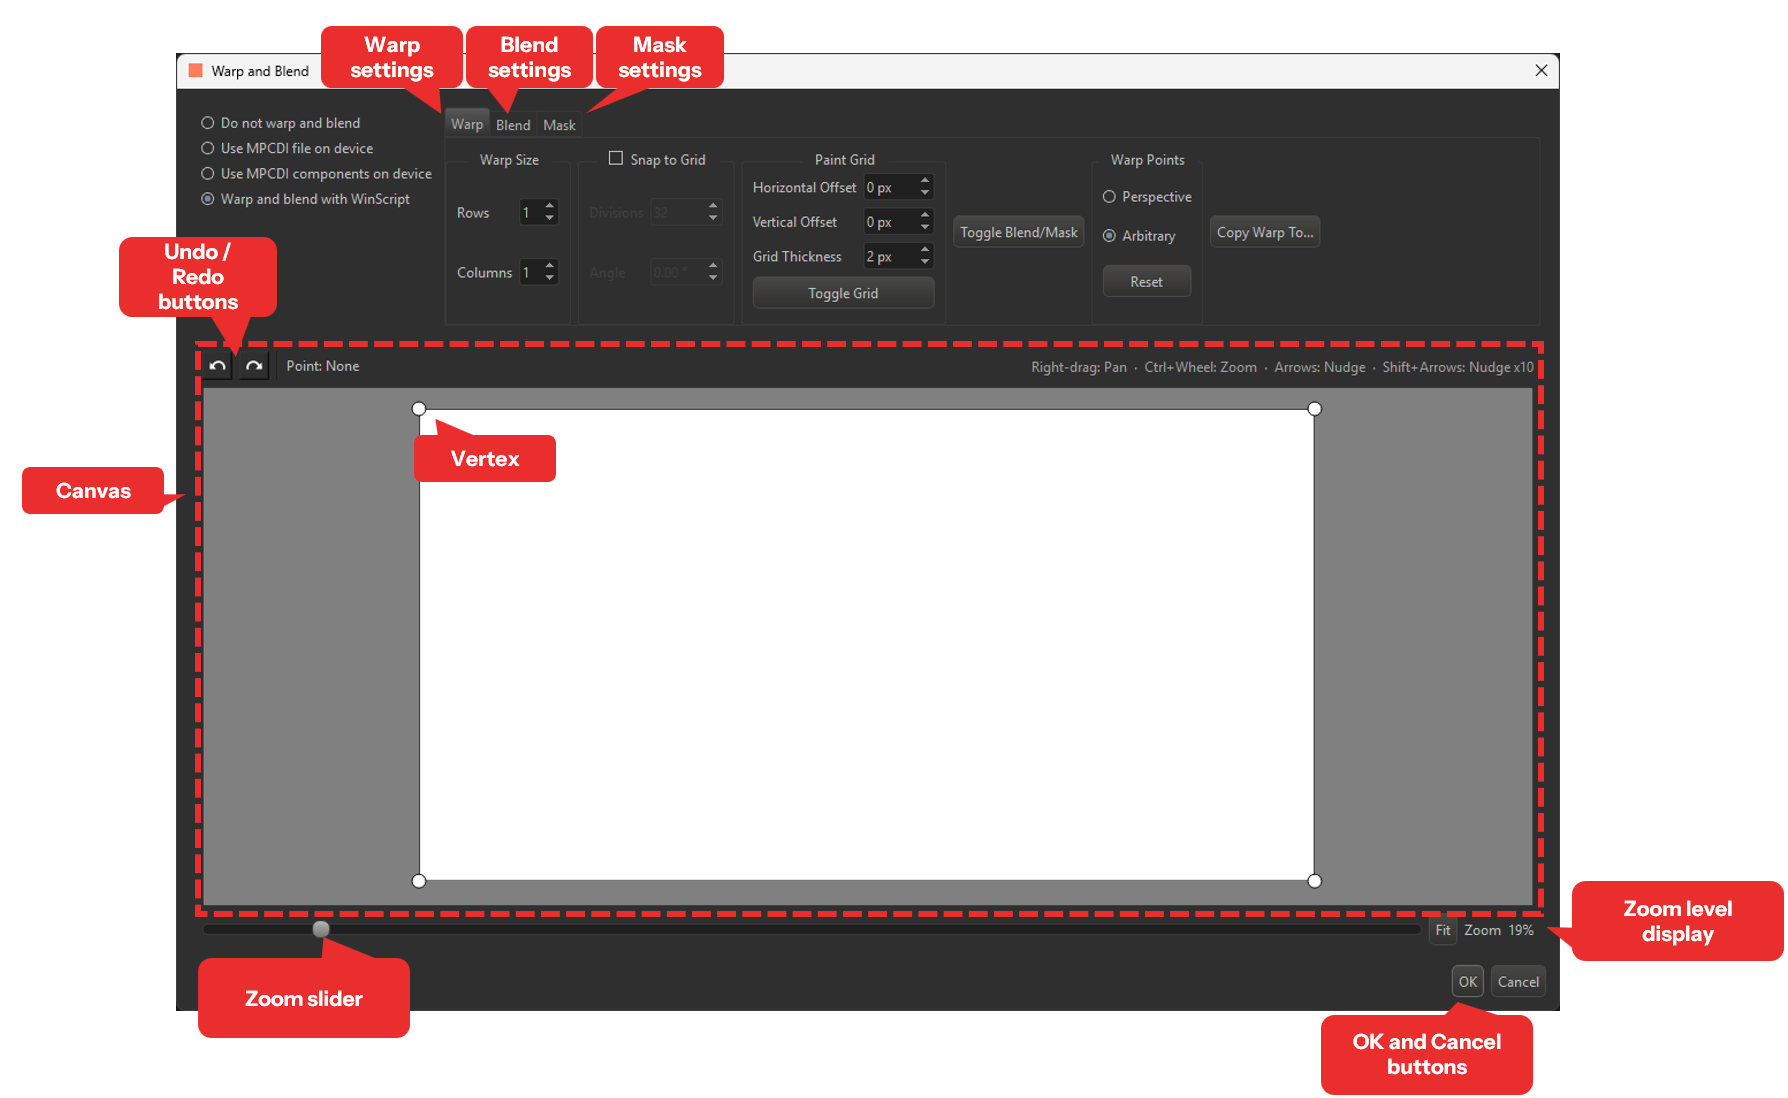
- Warp settings: warp size, snap grid, gridlines, and warp points options for warp
- Blend settings: gamma, smoothness, and left, right, top and bottom settings for blend
- Mask settings: units, and left, right, top and bottom settings for mask
- Undo / Redo buttons: undo and redo any setting changes or vertex positioning
- Canvas: area where you will define your warp mesh, blend regions, and mask edges
- Vertices inside the Canvas while on warp settings
- Zoom slider, Fit button, and Zoom Level display
- OK and Cancel buttons: select OK to save your settings, and Cancel to discard any changes
The following sections go into more detail about each of these features.
Warp
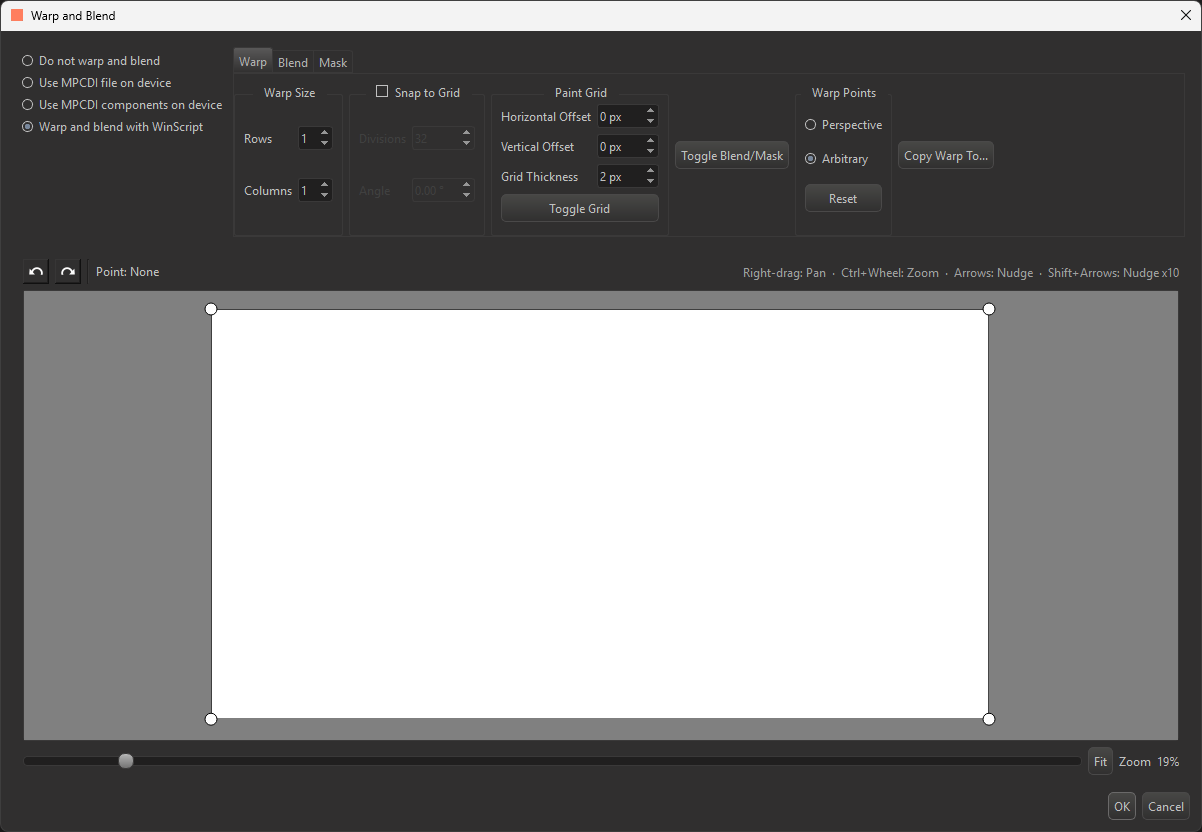
This feature allows you to reposition vertices to create a warp that changes how the video output is displayed, with options as shown in Figure 8.
Warp Points
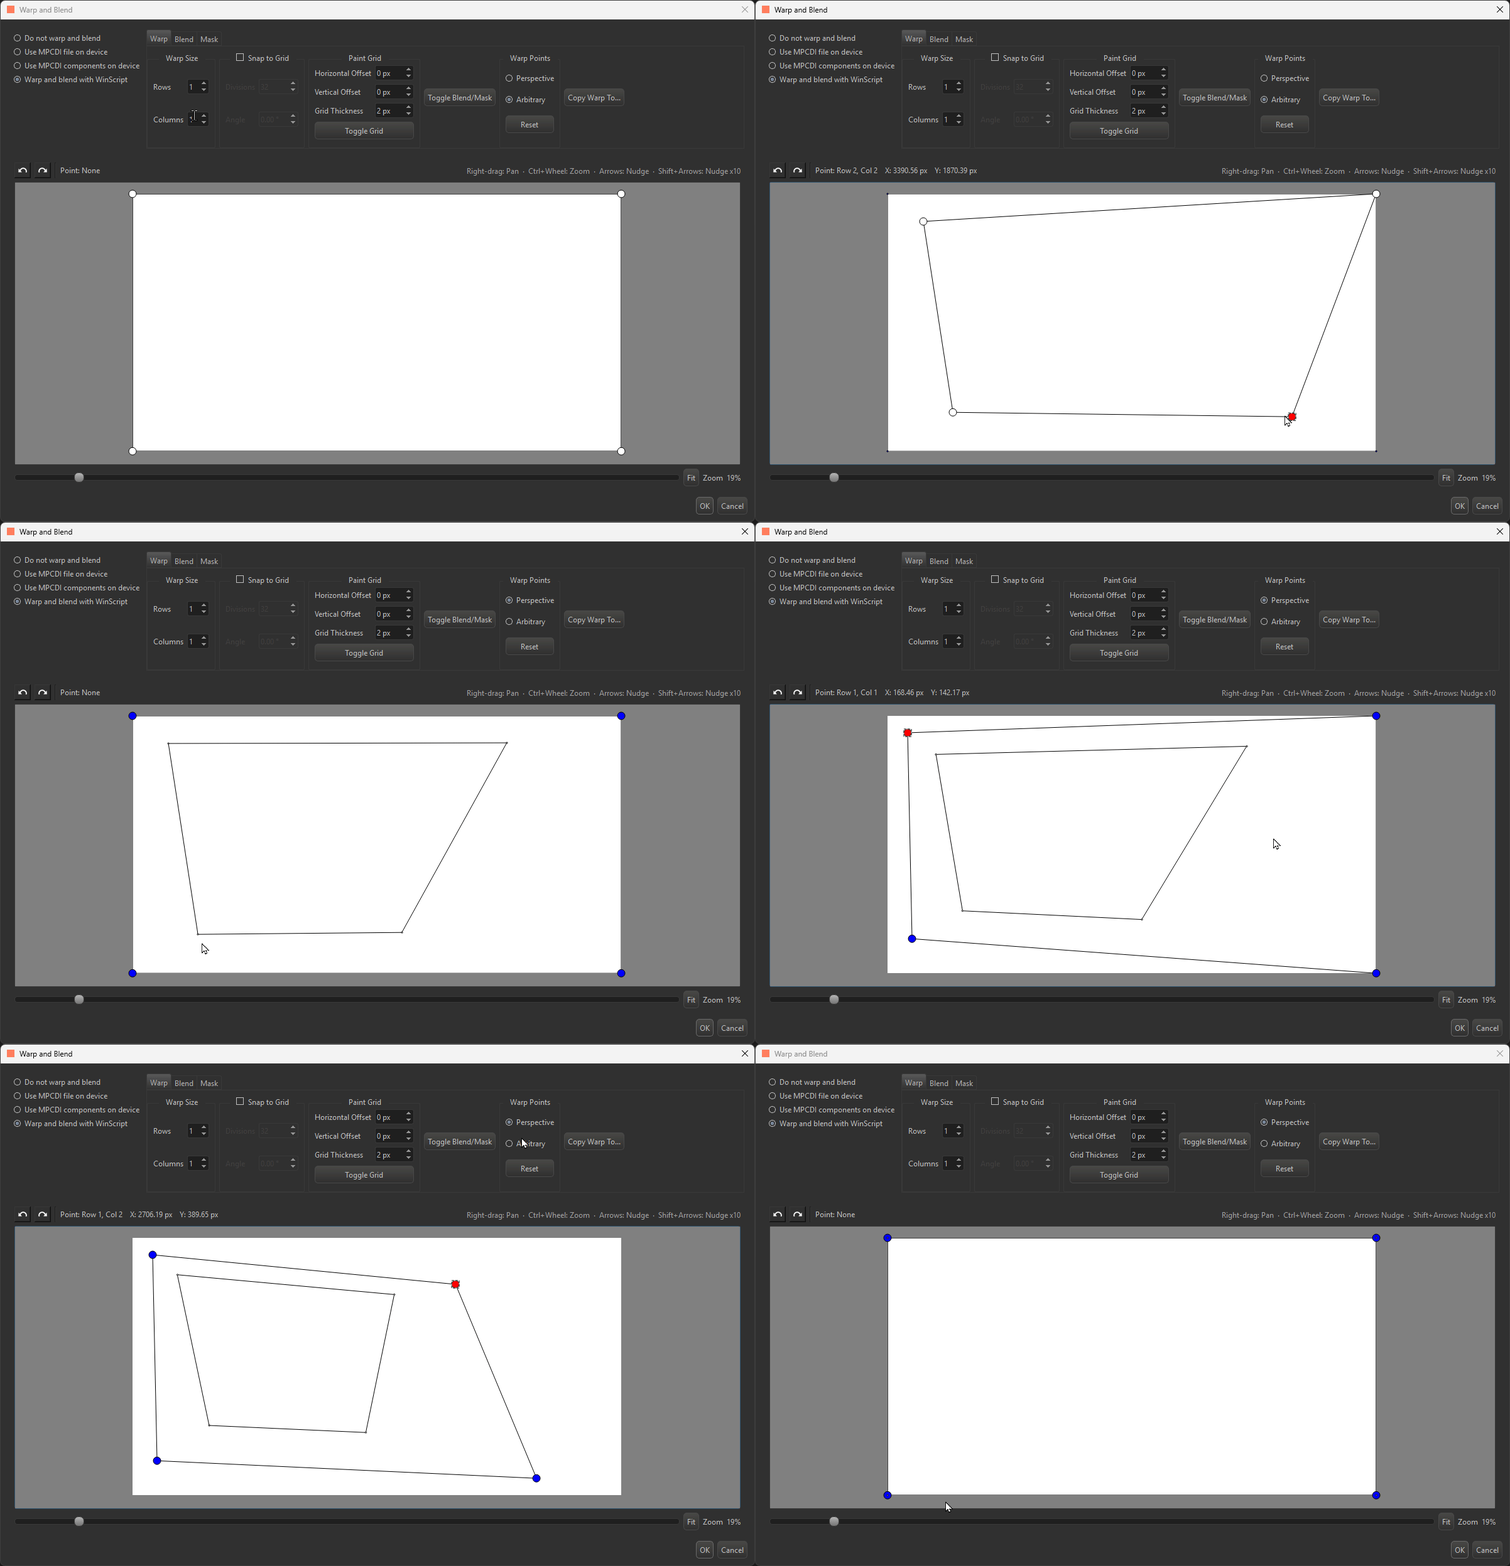
There are two kinds of warps: Arbitrary and Perspective, and the radio buttons in the Warp Points section select between the two. By default, the Arbitrary warp is selected.
An Arbitrary warp allows you to create a complex mesh of vertices that move independently to stretch local areas of the video output independent of one another for projecting onto an uneven or heavily themed surface.
A Perspective warp allows you to apply a single global shift across the output to transform the overall video output to compensate for projecting onto a flat surface at an angle. When Perspective warp is selected, four blue vertices at the corners of the canvas appear, and changes to the Perspective warp also apply to the Arbitrary warp.
In either warp, you can left-click and hold to drag vertices around one by one to edit your warps. When a single point is selected, that point's Row and Column, along with its X and Y coordinates, is displayed at the top left of the canvas. You can clear selected points by selecting the Esc key. Lines between the vertices are bilinearly interpolated.
You can use Ctrl + Z or Ctrl + Y to undo or redo vertex positioning. You can also use the Undo and Redo arrows. In addition, you can select multiple vertices at once by dragging a box around them using the left mouse button, or by using Ctrl + left-click to select them. Clicking again anywhere in the dialog box will deselect the vertices. Additionally, you can use the arrow keys on your keyboard to move selected vertices one pixel at a time. You can move the vertices outside the white resolution area into the grey area as well. This effectively discards those pixels from the final output.
The Reset button below the two Warp Points options will reset the warp for the currently selected option.
Warp Size
The Warp Size section allows you to configure how many Rows and Columns your Arbitrary warp mesh contains. Adding Rows and Columns will add a vertex at the midpoint between existing Rows and Columns.
The default grid is 1 Row by 1 Column and the maximum is 64 Rows by 64 Columns. Each incremental step is a power of 2 (2, 4, 8, 16, 32, 64). When you decrease the number of Rows or Columns, any vertex on a Row or Column that is removed is deleted, and its position is reset to default if you then create more Rows or Columns later.
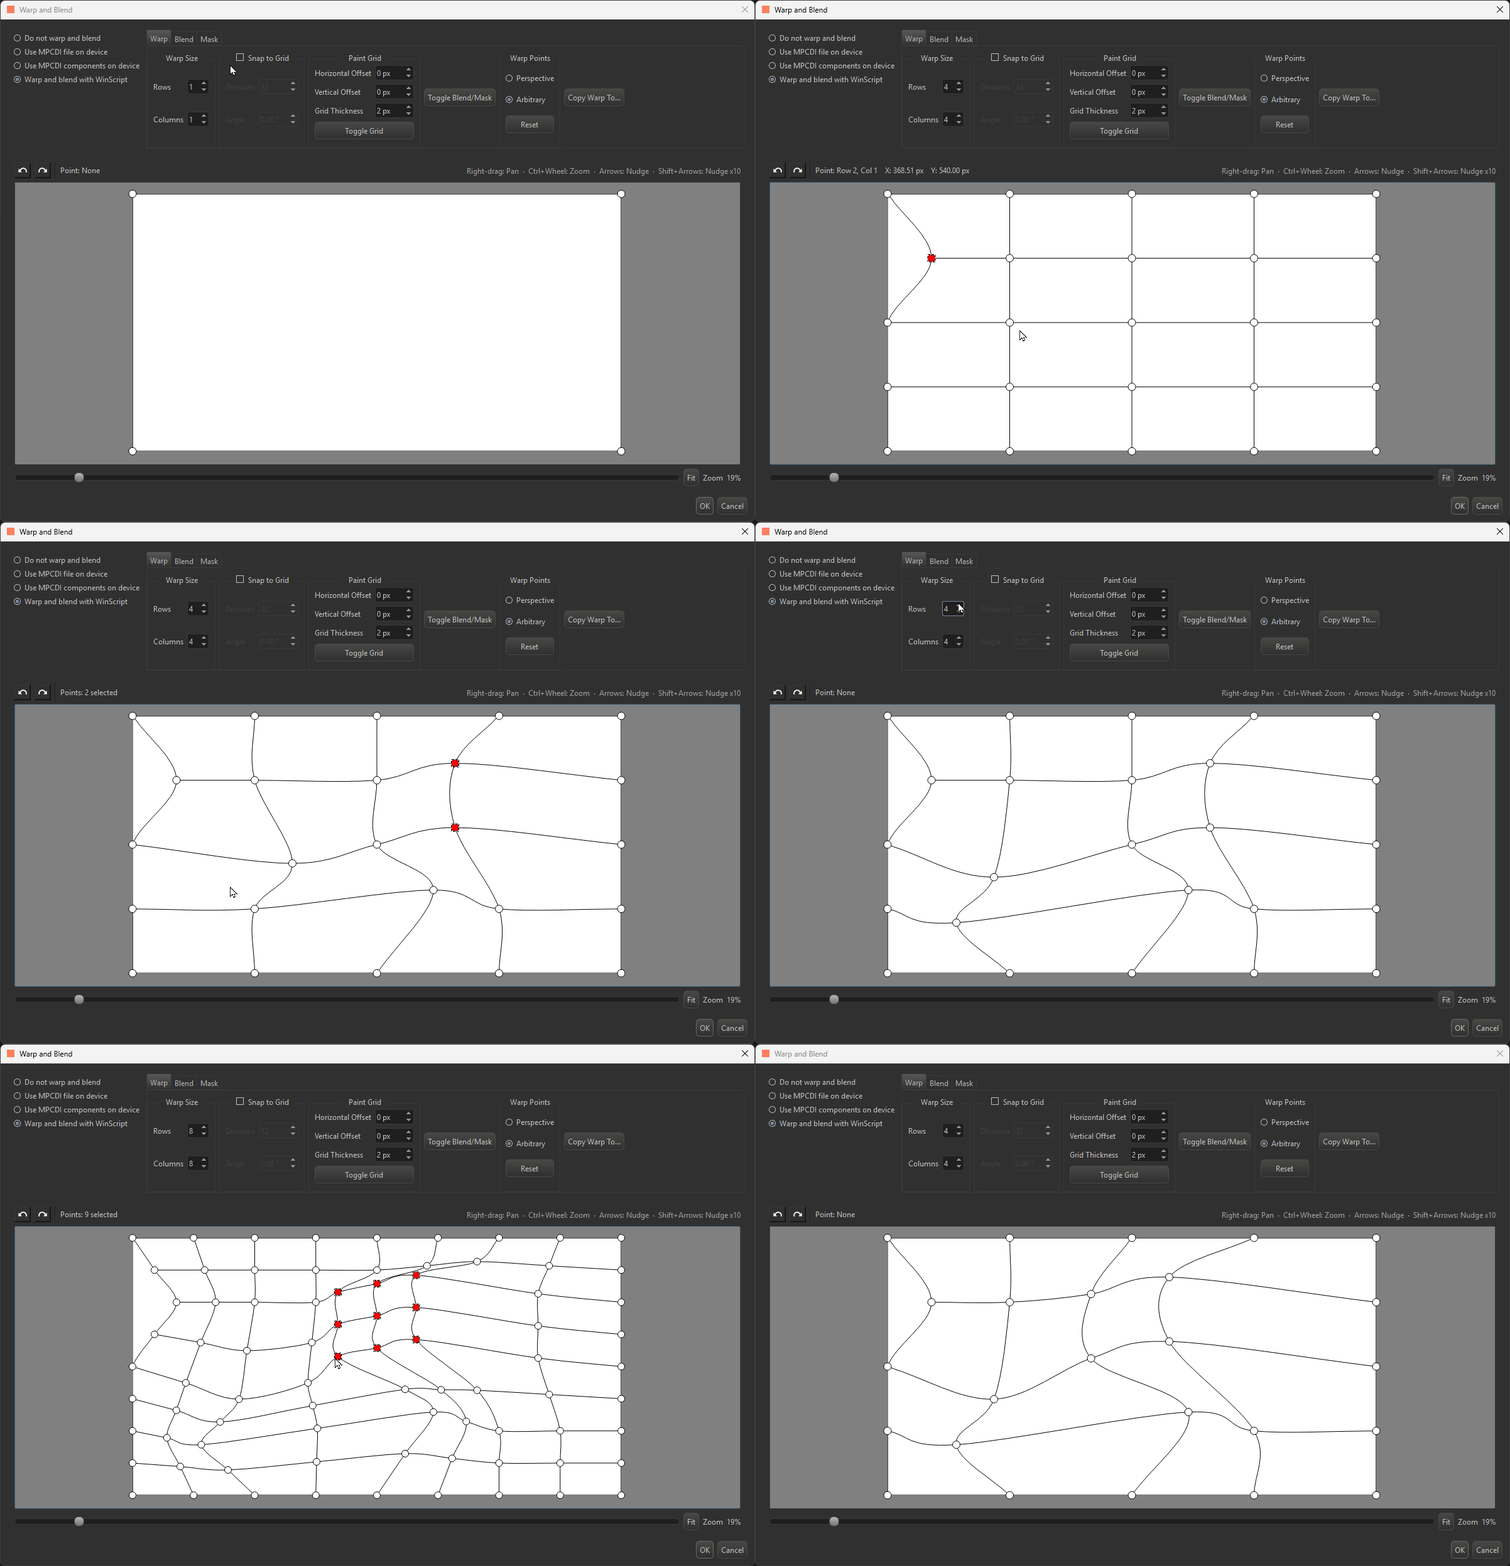
Note
More complicated warp meshes may take longer to apply when making changes in Live Mode.
Snap to Grid
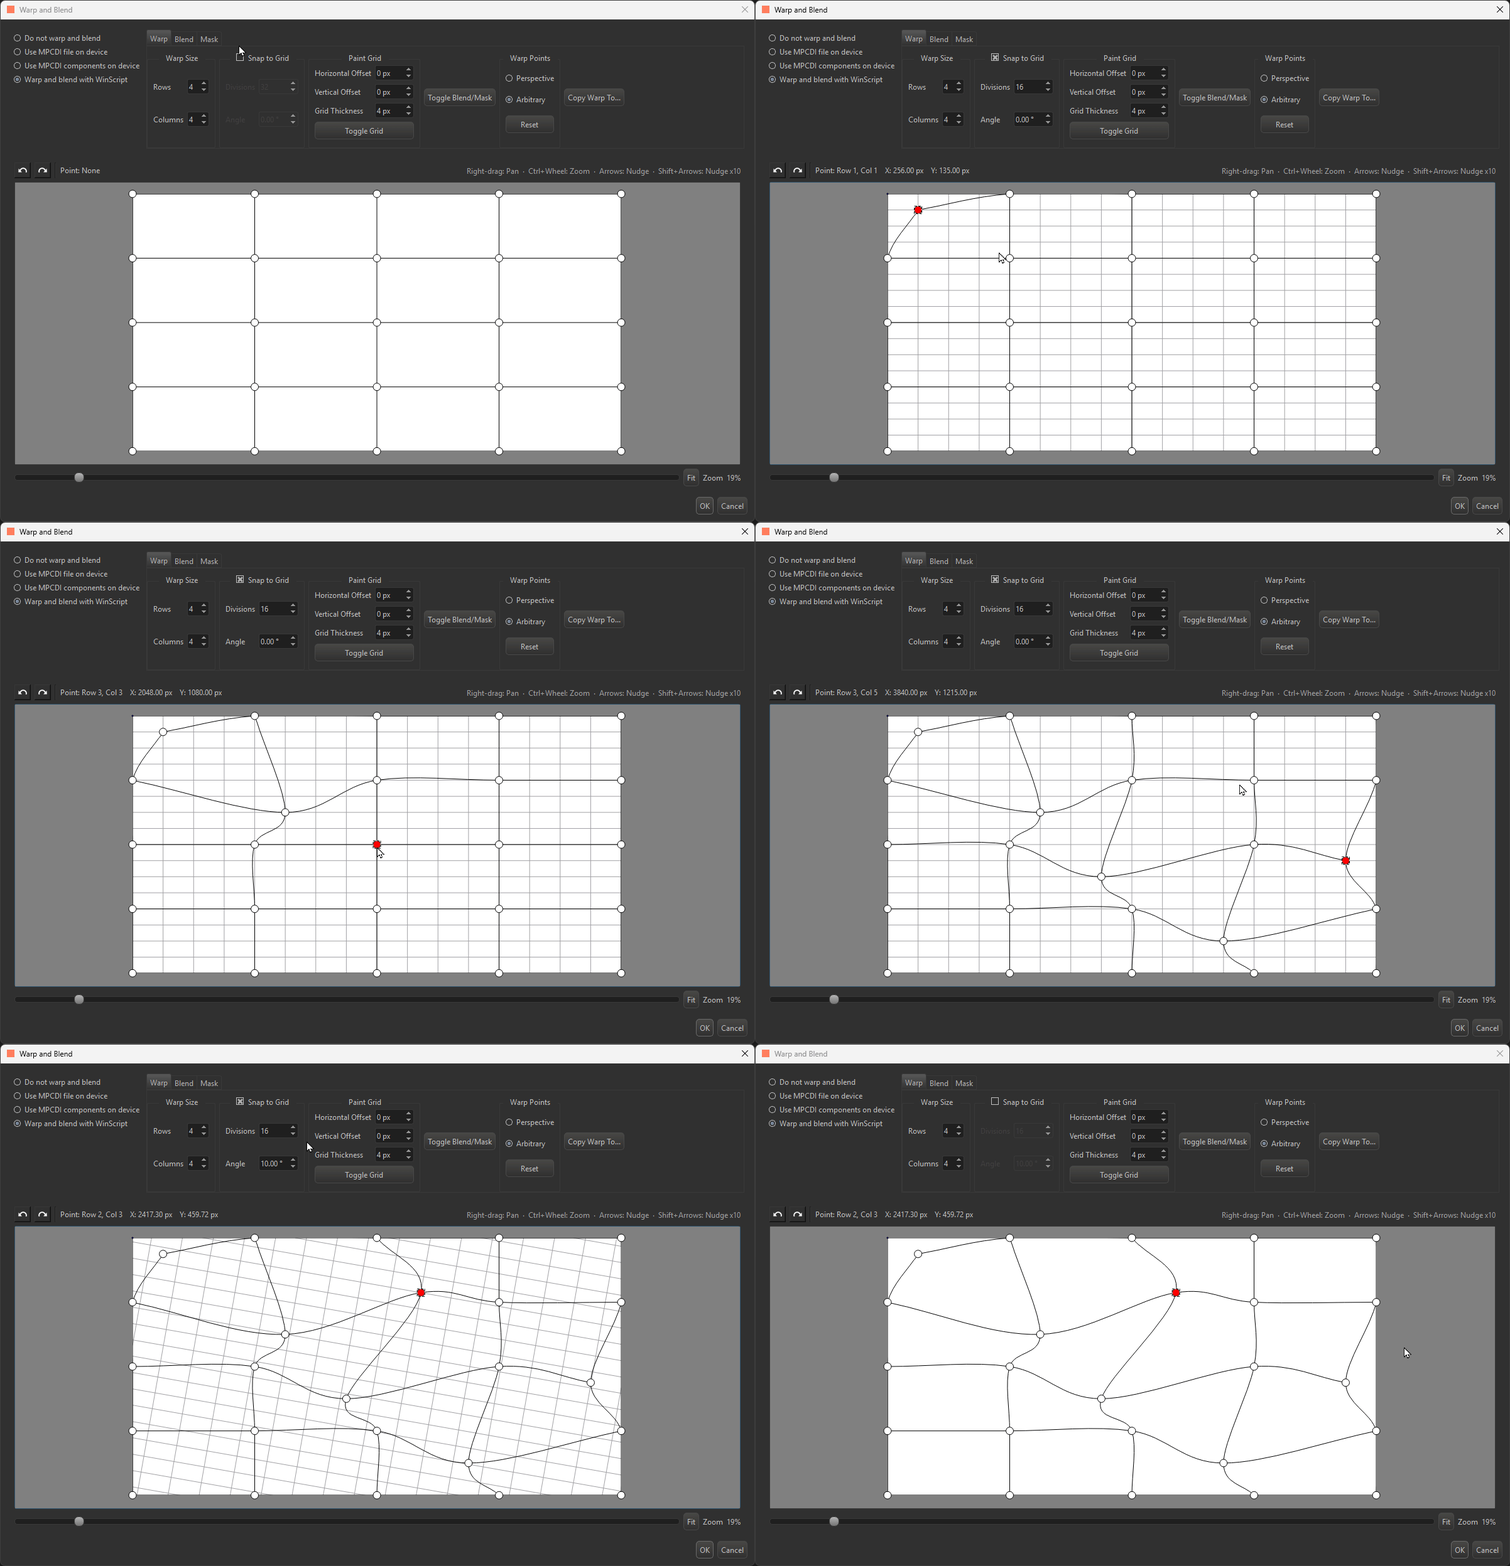
Selecting this setting will create a snap grid to which you can snap your vertices, as shown in Figure 11.
The Divisions setting determines how many divisions the snap grid uses to evenly divide the canvas. The default is 32, and using the up and down arrows will increase or decrease the number of divisions to the nearest power of 2 from a minimum of 2 to a maximum of 256. Alternatively, a number can be manually entered into the Divisions field. The greater the number of Divisions, the more dense the snap grid is, and vice versa.
The Angle setting will allow you to rotate the snap grid. You can change the angle by using the up and down arrows to increment and decrement the angle by 5°, or you can enter the desired angle. The range of angles you can use is -90° to +90°.
Lastly, if you uncheck the Snap to Grid option, the previous Divisions and Angle settings are preserved, and each vertex of your warp mesh will retain its position.
Paint Grid
This option allows you to display gridlines on top of your video output in real time for easier positioning of your warps, as shown in Figure 12. In addition, this option will highlight which vertex or vertices you have selected in red for easier manual positioning.
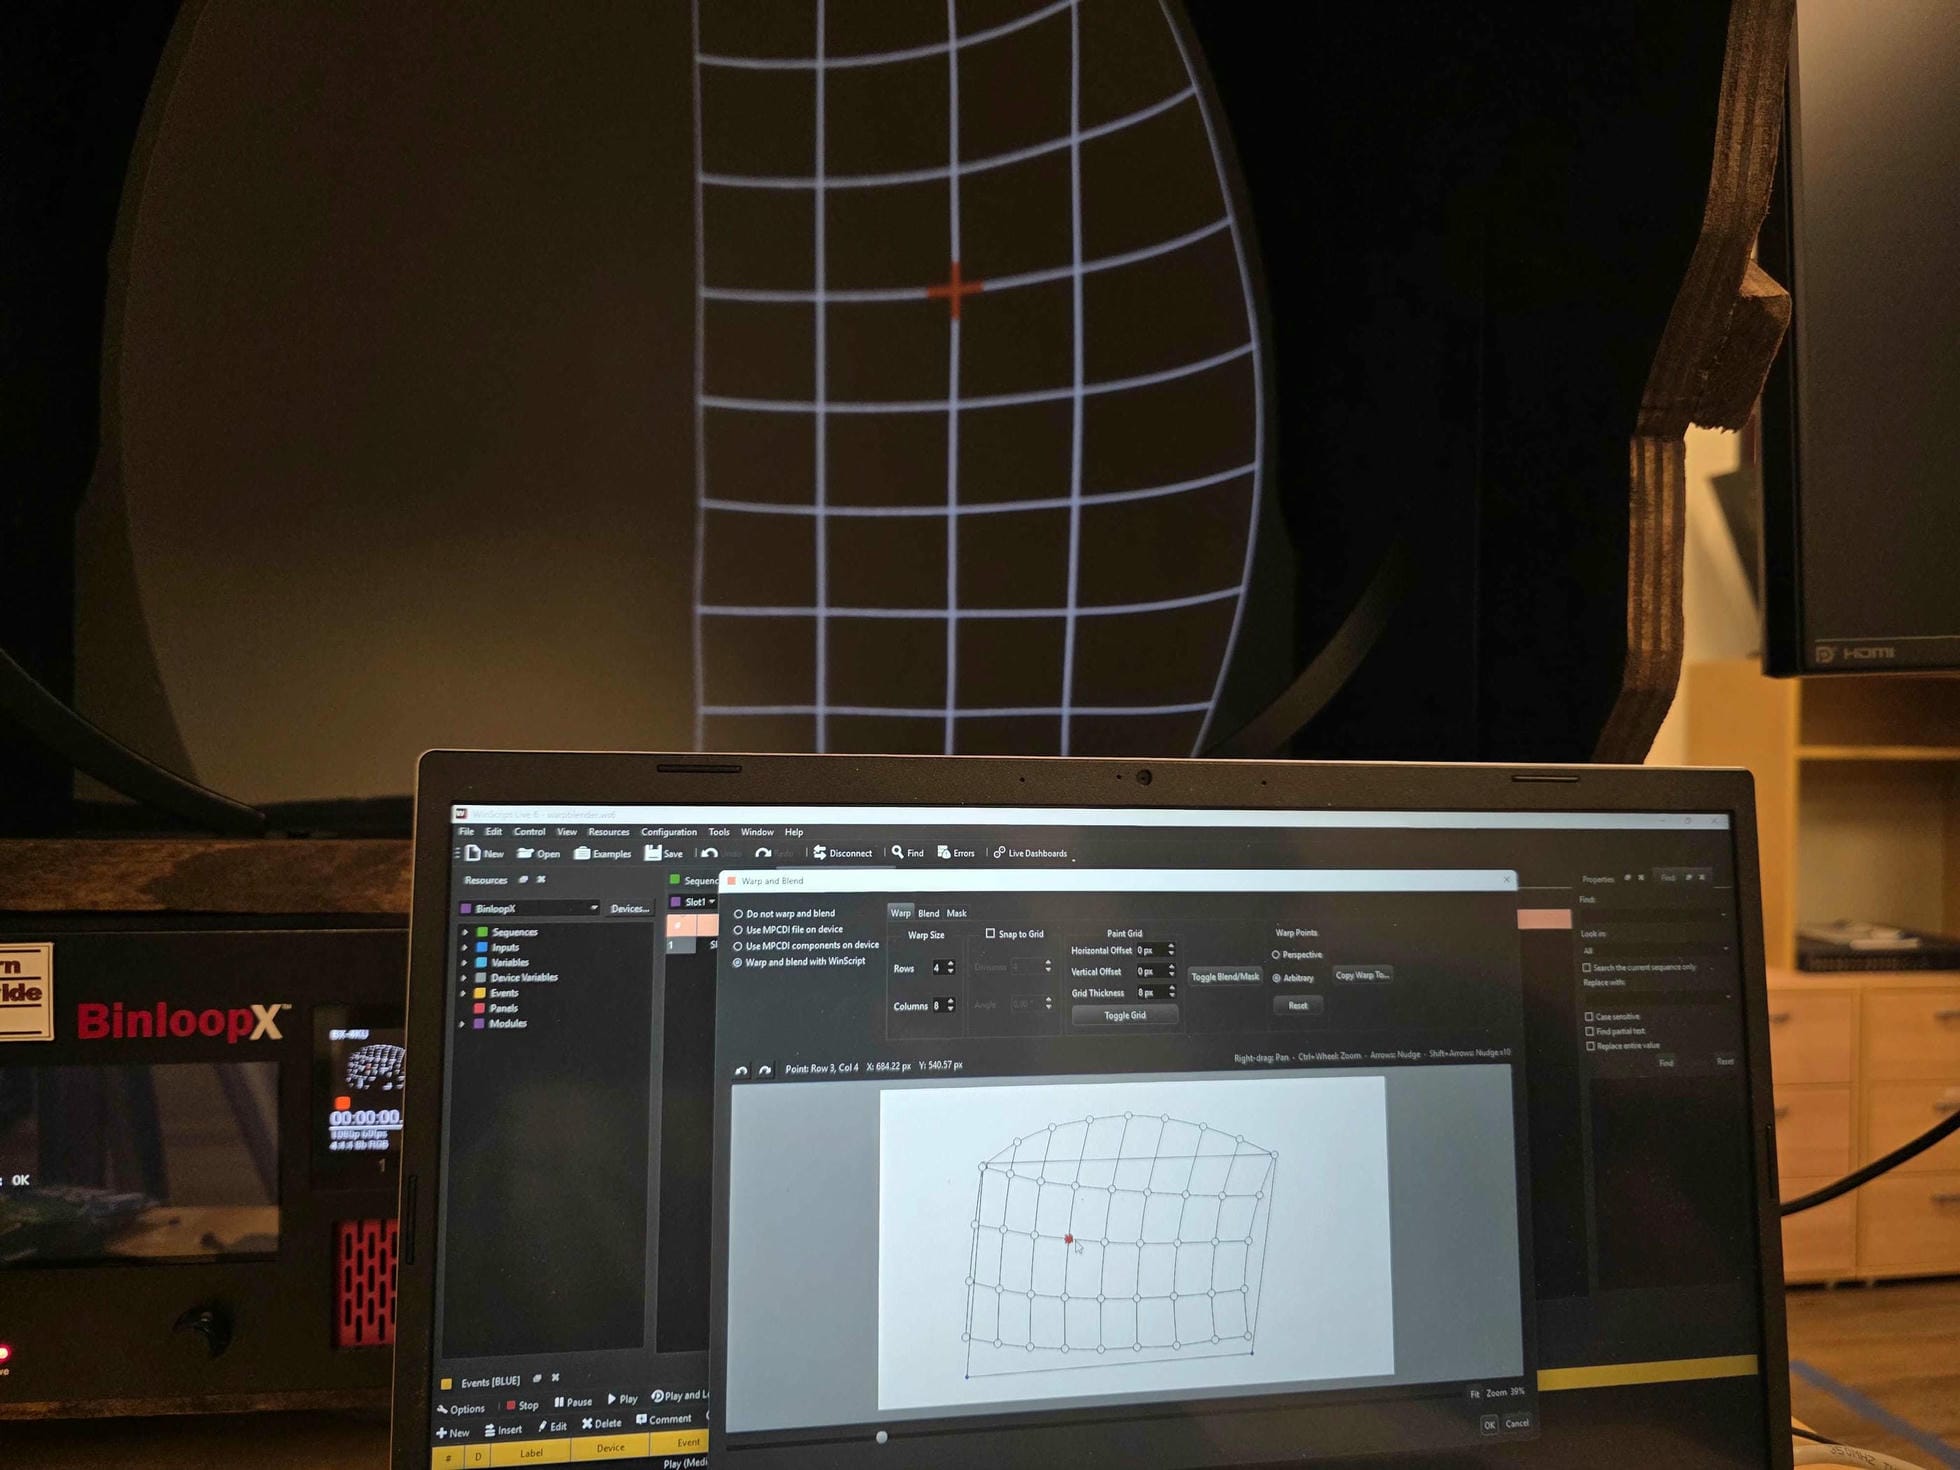
- Horizontal offset: horizontal offset, in pixels (default 0 px)
- Vertical offset: vertical offset, in pixels (default 0 px)
- Grid thickness: thickness of grid, in pixels (default 4 px)
- Toggle Grid button: selecting this button will toggle the gridlines on and off the live video output
Toggle Blend/Mask
The Toggle Blend/Mask button allows you to toggle your blend and mask on or off for ease in editing your warps in Live Mode.
Copy Warp To...
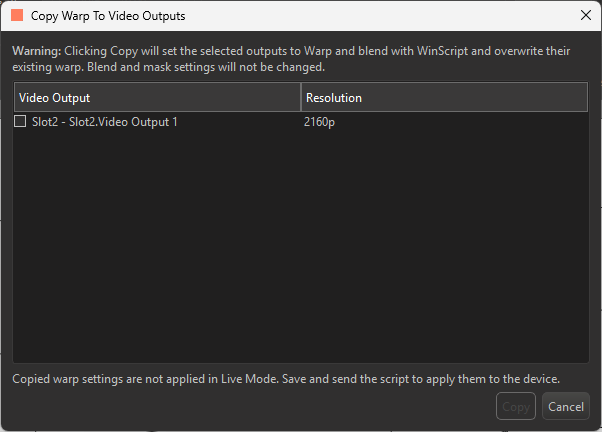
Selecting the Copy Warp To... button allows you to copy your manual warp settings to another output, as shown in Figure 13. This does not copy the blend or mask settings.
Other Details
The Warp engine in BinloopX applies warp meshes with vertices every 8 pixels (except for 4096x2160 output resolution, where vertices are every 16 pixels). Pixels in between vertices are bilinearly interpolated for a smooth output. Higher-resolution MPCDI or PFM files can be used, and they will be automatically resampled for compatibility with our warp engine. Lower-resolution warps are also fine, and will be upsampled automatically.
Blend
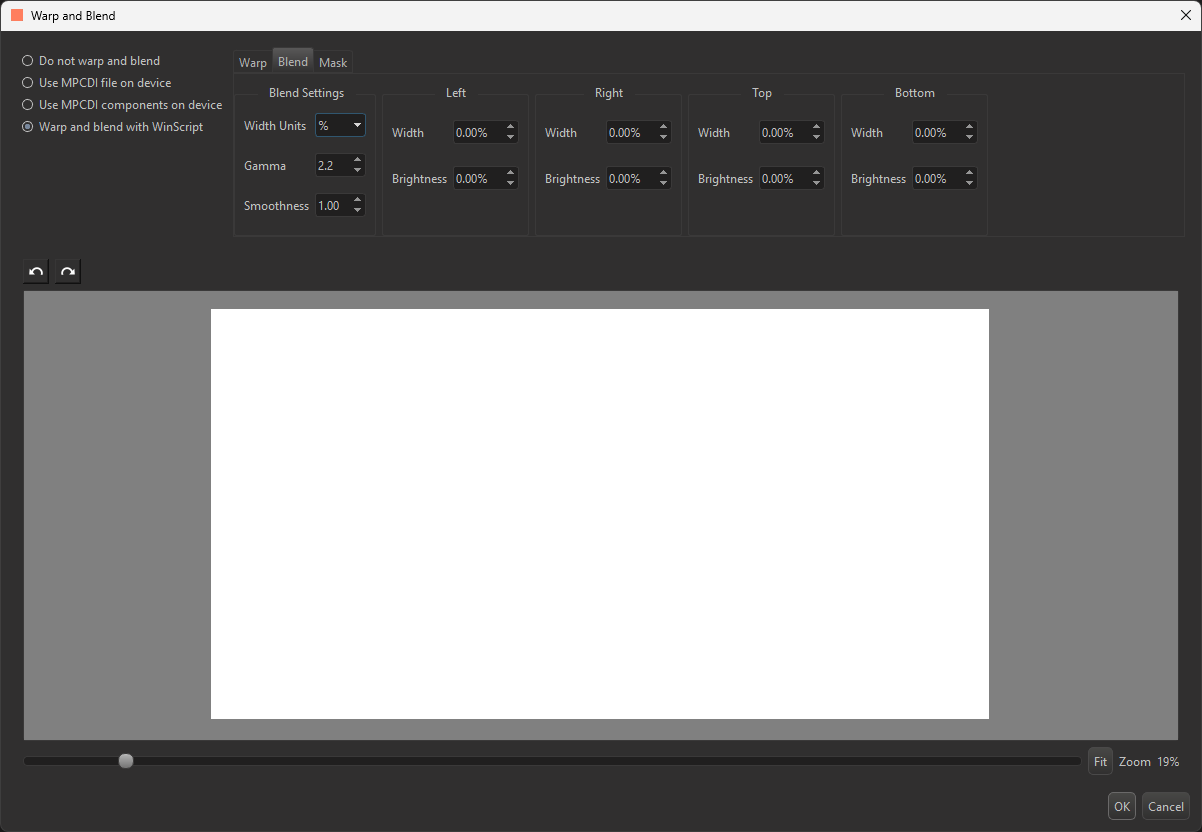
This feature allows you to define the Gamma, Smoothness, and directions of your blend applied to your output, as shown in Figure 14.
Left, Right, Top, Bottom
Each of these sections has a setting for Width and Brightness. The Width determines how far across the output the blend applies, starting from the edge in the section name. For example, setting the Width in the Right section to 50% will apply a blend starting from the right side of the output and extending halfway across it. The minimum is 0.00 %, representing no blend, and the maximum is 100.00 %, representing a blend across the entire output from that direction. Using the up and down arrows will increase and decrease the width by 5.00 % at a time, or you can enter a number into the field.
The Brightness setting determines the output brightness in the blend. 0.00 % represents the pixels in that region completely blended, with 100.00 % representing noblend. Using the up and down arrows will increase and decrease the width by 5.00 % at a time, or you can enter a number into the field.
The Width units setting can be either percentages (%) or pixels (px). This determines the units for the Width settings in the Left, Right, Top, and Bottom sections. Swapping between the two units will convert one to the other.
Blend Settings
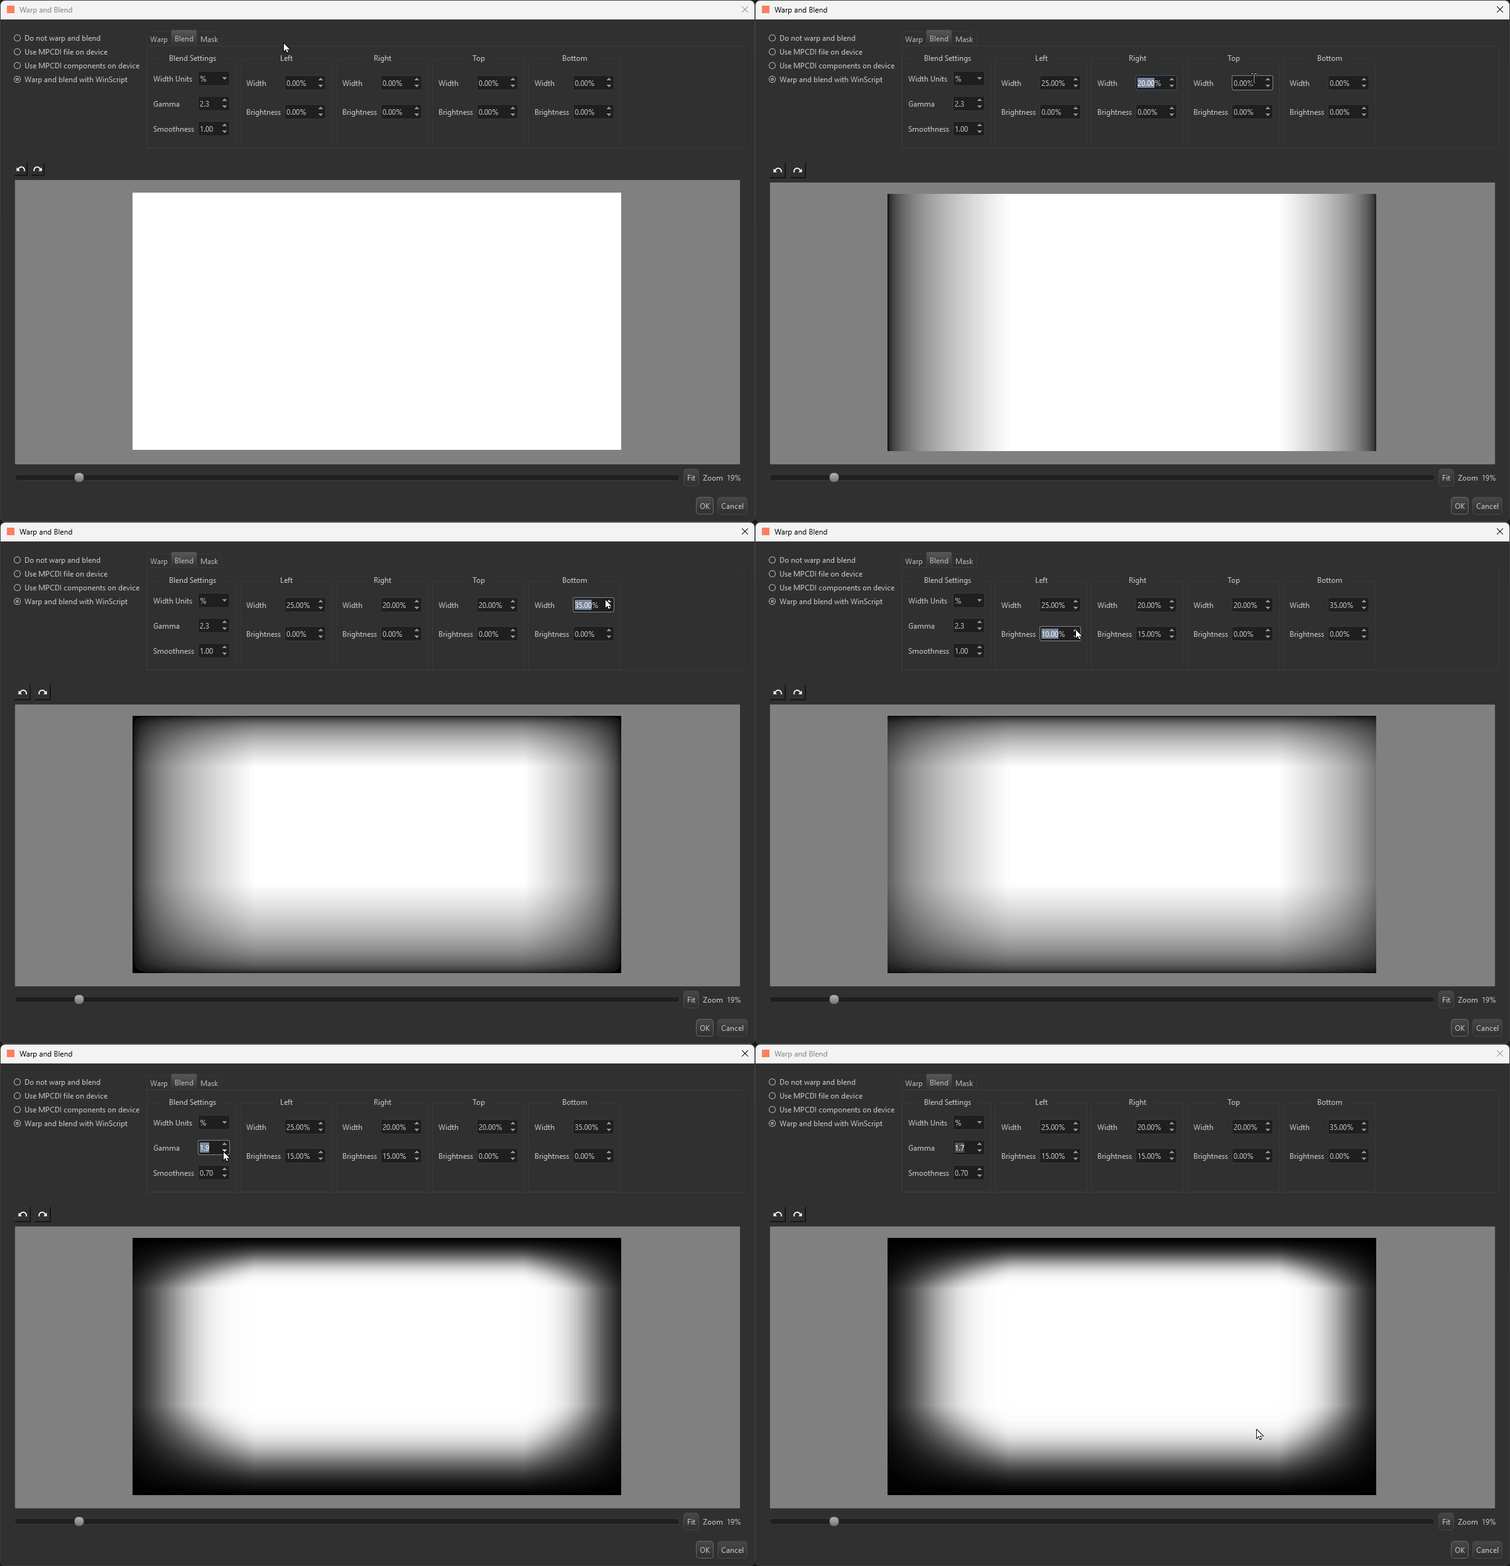
The Gamma setting determines the gamma curve of the Blend. Generally, you want this to match the gamma setting of your projector, though fine adjustments are usually needed to get a perfect blend. The default value is 2.2, with a minimum of 1 and a maximum of 3.0. The arrow keys increment and decrement the value by 0.1.
The Smoothness setting determines the gradient of the transition of the Blend. The lower the Smoothness value, the harsher the gradient; the higher the value, the smoother the gradient. The default Smoothness is 1.0 with a maximum of 1.00, and a minimum of 0.00.
Using these settings with the Left, Right, Top, and Bottom settings allows you to create a blend, as shown in Figure 15.
Mask
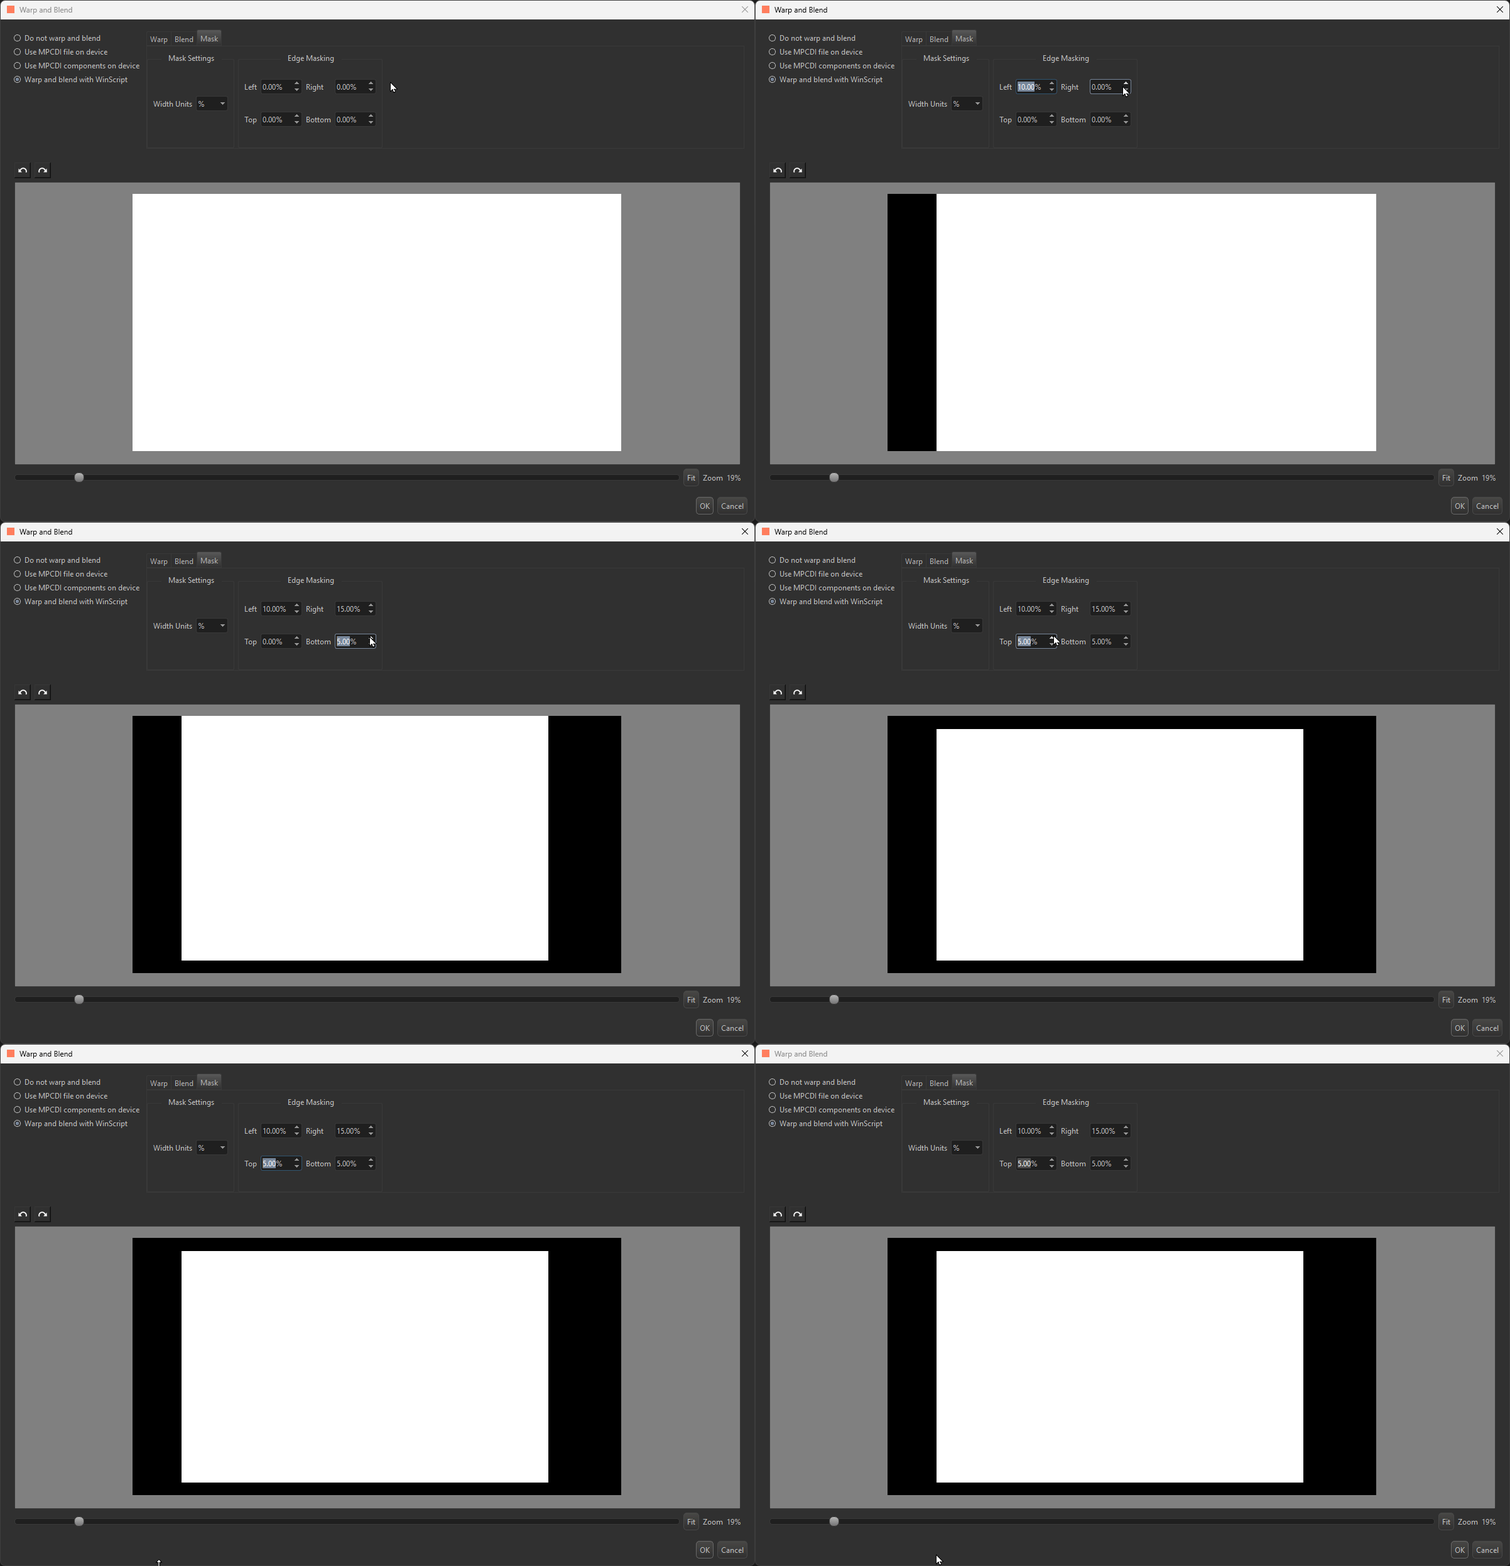
This feature allows you to define areas from each direction that are masked out of your output, as shown in Figure 16. This feature works much like the blend feature, but without gradients.
In the Edge Masking section, each setting (Left, Right, Top, and Bottom) determines how far into the output from that direction to mask. The values range from 0.00 %, corresponding to no masking from that direction, to 100.00 %, corresponding to a completely masked-out output.
The Width units setting can be either percentages (%) or pixels (px). This determines the units for the Width settings in the Left, Right, Top, and Bottom sections. Swapping between the two units will convert one to the other.
Other Features
Undo/Redo
Undo and Redo arrows are included to undo and redo all settings changes, including repositioning vertices in the warp mesh. Ctrl + Z and Ctrl + Y are also supported.
Zoom and View Controls
The slider below the Canvas allows you to zoom into and out of the view to enable more granular editing of the warp, blend, or mask. You can also use Ctrl + scroll wheel to zoom in and out. The Zoom % is displayed to the right of the slider. When you are zoomed in, scroll bars appear along the right and bottom of the Canvas. The minimum zoom level is 1 % and the maximum zoom level is 200 %.
You can also use the mouse scroll wheel to scroll vertically, and holding the Alt key will allow the mouse to scroll horizontally. Holding the Shift key when scrolling in either direction will scroll in larger increments.
Lastly, the Fit button allows you to resize the zoom to fit the canvas.
OK and Cancel
Selecting the OK button in the bottom right of the menu will save all your Warp and Blend changes temporarily; you will still need to save the script itself. Selecting the Cancel button will discard all changes since the last time the OK button was clicked.
Editing in Live Mode
While connected to your BinloopX in Live Mode, any changes made to the warp, blend, or mask settings will immediately apply to the output of your BX-4KU, meaning you can see all edits to your output in real time.
In addition, the Paint Grid and Toggle Blend/Mask functions work exclusively in Live Mode.
Editing Multiple Video Outputs
Each video output has its own set of Warp and Blend settings. To edit another Video Output, go back to the Video Outputs resource view and choose the video output you wish to edit.
Additionally, you can use the Copy Warp To... button to copy a warp from one output to another.