Product File Creator Tutorial
The Product File Creator Tool can be found under the "Tools" menu of WinScriptLive. It can be used to create custom product files that can be added to and used in WinScriptLive. In this example we will be creating a simple, limited product file for a Christie HD10K-M projector to allow it to be powered on and off from WinScriptLive and to allow for the online time of its lamps to be gathered into variables.
Getting Started
When launching Product File Creator, you will be presented with a splash screen allowing you to create a new product file or open an existing one. For convenience, a list at the bottom of the window also shows all compatible files in the “WinScript Live\My Product Files” subdirectory of your My Documents folder.
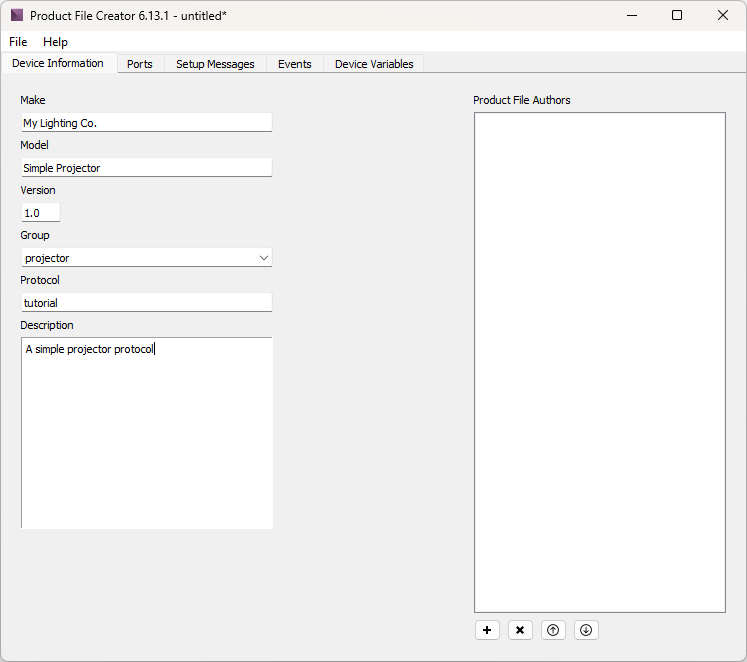
When creating or opening a product file, you will be asked to put in the Make, Model, and Version of the product file you are creating. This info is what WinScriptLive will use to identify and differentiate between different product files and will help us load the product file for our script later on. Since this is a demo, put in “My Lighting Co.” for the make, “Simple Projector” for the model, and use the default of “1.0” for the version number.
Select “projector” from the Group dropdown menu so that the device will be classified as a projector. You can create different protocols for the same device if you like, but for this example simply enter “tutorial” for the Protocol field.
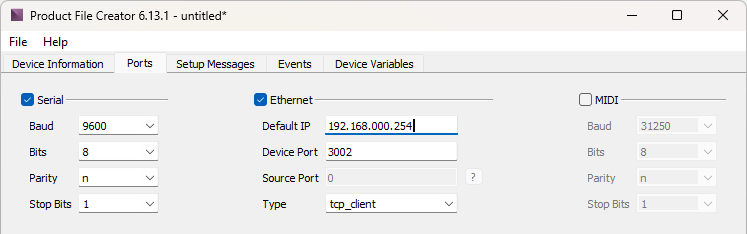
On the next tab, check that the device has a serial port. You will then see fields for specifiying the communication protocol information for the serial port, which can be edited depending on nature of the device you are trying to create a product file for. Leave the fields as their defaults, as the defaults outline accurately how the Christie HD10K-M commincates with its serial port.
There are also options for the Ethernet port. Here you can fill in the various port fields according to the hardware specifications of your device. For our purposes, fill in the Default IP with “192.168.0.254”, the Device Port as “3002”, and the Type as “tcp_client”. We choose “tcp_client” because our Show Controller will be initiating the TCP connection. Had we chosen “tcp_server”, we would be indicating that the external device would have to initiate the connection. The projector does not use MIDI so leave that option unchecked.
The next tab is “Setup Messages”. Some TCP protocols require a series of "login" messages to take place one time before the show controller can send commands to the device. These setup messages take place immediately after a TCP connection has been made. Telnet, for example, often specifies a username and password login process. We will skip this tab in this tutorial since a projector has no setup messages.
Adding Events
Next go to the Events tab. This tab is used to add the various events a device can execute. These events show up in the “Events” section of WinScript Live when specifying which action you want the device to perform. In this tutorial, we are going to add an “On” event, an “Off” event, and events to get information about how long the projector’s lamps have been on.
Click on the Add Event button and type “On” for the Name of the Event. Any description you add will be used in WinScriptLive alongside the Event name. According to Christie’s documentation, the Power On command can send an acknowledgement of success. This would be useful. Click the “Incoming Message” check box so that we can set up a filter for such a response.

Some Events in WinScriptLive have data parameters used to control the contents of an outgoing message (for example, the "Index Media” event in this sequence has a parameter called “Module”, represented by "Param1"):

If our Event had any parameters, they would be defined here. Our event does not have any parameters, so go on to the “Outgoing Message” section.
Outgoing Messages are sent from your Show Controller into the device being controlled. Some of these commands are complicated combinations of Device Variables, data parameters, and even unprintable characters. For this reason, the Outgoing Command section allows you to build a message as a combination of substrings. The substrings can be of type “constant”, “parameter”, “variable”, or “checksum”.
There are two main ways to add to substrings on this tab. You can either: 1) highlight parts of an example Incoming Response and specify what role those parts play in the final message; or 2) directly add substrings to the final message without using an example message. Luckily for us, the command to turn on our projector is relatively simple, so we will use the second method.
We will make a message from one substring of type “constant”. Click on the Add Substring button, select “constant” as the type of substring to add, and enter “($PWR1)” in the box labeled “Value”.
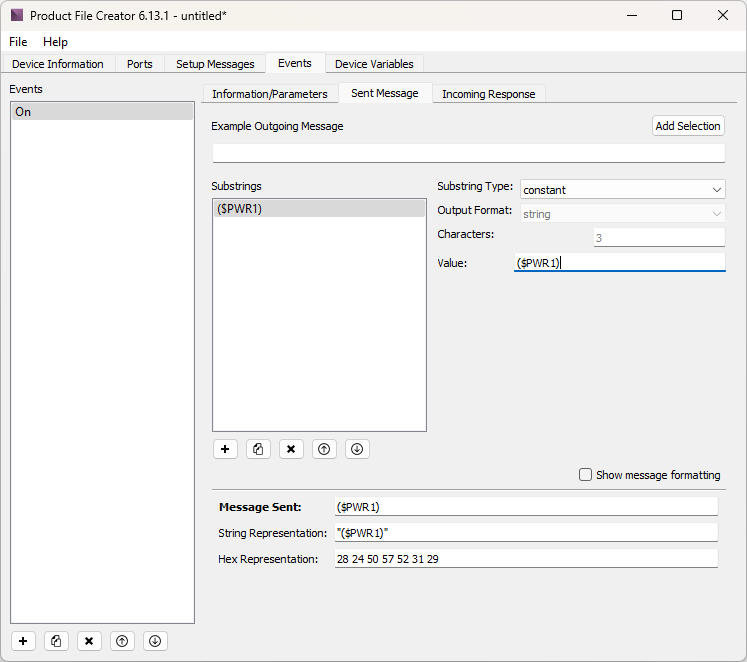
Simple, right? Notice that at the bottom of the window you see both the ASCII String representation and the Hex representation of the Outgoing Message. If our message had any unprintable or escape characters, you would be able to verify them there. Also, had our message contained substrings that used data parameters or variables, the Message Sent field would fill in example values to show a complete sample Outgoing Message. If you wanted to, you could click the “Show message formatting” box to manually edit the sprintf command that is generated for this command.
Now let’s specify the form that a valid Incoming Response to this message should take. Click on the Incoming Response tab. Like Outgoing Responses, you have the option of building up Incoming Responses as a series of substrings.
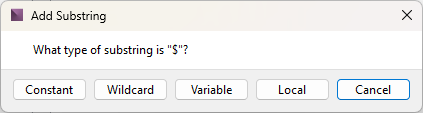
The expected Incoming Response to a Power On message to the Christie HD10K-M is simply a “$”. Type that into the Example Incoming Response box. Example Incoming Responses are usually more complicated than “$”, and the reason for having this box will become clearer later. For now, highlight the “$” you just typed and then click the “Add Selection” button to the right.
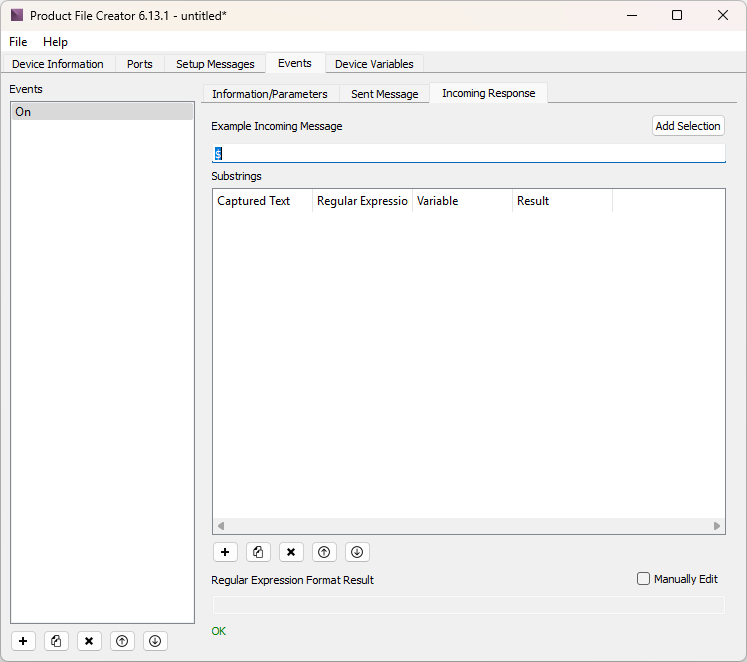
You will be asked what type of substring you are adding. Choose “Constant”.
At the bottom of the window, you should see “A Match!” underneath the Regular Expression Format Result. Incoming Responses are formatted as regular expressions (or “regexp_format”). We will explore this in more detail in a moment, but for now observe that the correct regexp_format was created: “\$”. If the Incoming Response from a device does not match the expected regexp_format, your Show Controller’s "error" light will come on and the it will attempt to send the outgoing message again.
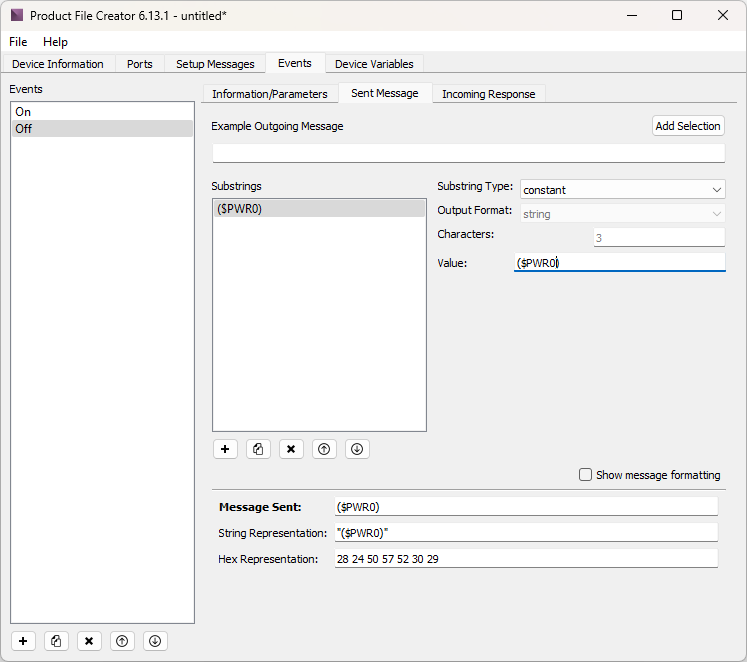
Now press the Duplicate (×) button underneath the list of events. Change the name and description of the newly created event from “On” to “Off”, and change the Outgoing Message from “($PWR1)” to “($PWR0)”. The Incoming Response will remain the same.