Getting Started
Alright, time to roll up your sleeves and get to work! This section will guide you through basic concepts that will help you get on your way with RideAmp-250Q.
Wiring and Connectivity
A few connections are required to experience the core functionality of RideAmp-250Q. If you’re the DIY-type that’s comfortable with purchasing and crimping your own connectors and pins, you’ll be happy to know that this product uses industry-standard connectors which are documented in detail in the Hardware Information section of this User’s Guide. For those looking for the path of least resistance, we strongly encourage you to order a RideAmp-250Q Development Kit covered in the Accessories section of this document. This kit provides a full set of pre-fabricated connectors and a power supply, so you spend less time crimping and get right to bench testing your RideAmp-250Q.
Power
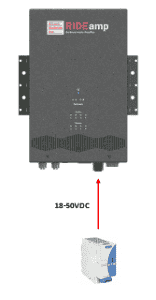
Our engineers are working around the clock to eliminate the need for those pesky Electrons. However, until they inevitably succeed, RideAmp needs power to work properly. You’ll want to start by connecting RideAmp's power input to DC power source like a battery, super-capacitor, or hefty power supply. You can use any voltage between 18 and 50VDC, but to get the most power out of this product, be sure to use a supply with adequate power capability (i.e., enough current output).
If you’re planning on annoying your neighbors by pumping your speaker cones with the maximum power that the RideAmp is capable of, you’ll need a power supply that can feed the beast. Depending on what voltage you’re planning on using, you’ll need something in the range of 20-40 Amps for full-power capability.

Audio Inputs
Audio inputs are fed into the RideAmp via the Dante/AES67 Network Audio interface, which means it needs to be connected to the same network as a device that can source network audio.
The Alcorn McBride RidePlayer is designed to be the ideal audio source for RideAmp.
You can easily interface them without any network switch hardware by connecting a
standard M12 X-Code patch cable between the Primary network audio port of RidePlayer
to network port A of RideAmp. Other audio source options could be your
computer (using Dante Virtual Sound Card) or a DSP core. Either way, the concept
is the same; RideAmp needs to be connected to the same audio network as the source device.
In addition to the physical network connection, Dante and AES67 network audio need to be configured for audio to route properly from RidePlayer to RideAmp. We’ll cover the details of that in a little bit but, for now, you will need to connect your computer to the audio network as well. This should be done by connecting an RJ45-M12 X-Coded cable or adapter between your computer and the Secondary port of RidePlayer or Port B of the RideAmp-250Q.

Speaker Output
In order to make great sound, we’re going to have to move some air! To do this, we recommend at least one 4-Ohm or 8-Ohm unpowered speaker. Keep in mind that the RideAmp-250Q can output up to 320W of power into 4 ohms from a single unbridged output, so choose your speaker wisely or you might accidentally let the smoke out of it!
The next step is pretty simple. Connect the positive (+) terminal of Speaker Output 1 to the positive (+) input of the speaker. Connect the negative (-) terminal of Speaker Output 1 to the (-) terminal of the speaker. Rinse and repeat for any other speakers that you wish to connect.
NOTE: NEVER CONNECT ANY OF THE SPEAKER OUTPUTS TO GROUND! THE AMPLIFIER WILL GO INTO A OVERCURRENT FAULT STATE.

Network Audio Configuration
The RideAmp supports the industry-standard Dante and AES67 protocols for audio distribution. If you’ve used other devices based on these standards, setting up the audio inputs of this amplifier will be a piece of cake.
All Alcorn McBride devices that support Dante are shipped with DHCP mode enabled by default. However, it’s strongly recommended to assign a static IP address to each device to prevent addressing issues the next time the amplifier is powered up.
Whether you use DHCP or static IP addresses, the goal is to get all your devices on the same subnet so that they can interface to one another. Once this is taken care of, you can follow these steps to patch RidePlayer (or another network audio transmitter) to the RideAmp-250Q.
-
Launch the Dante Controller application on your Windows or OS X computer.

-
Click on Device Info to view the current IP address, firmware version, and link speed.
If their IP addresses are configured properly, you should see both the RidePlayer and RideAmp in this list. -
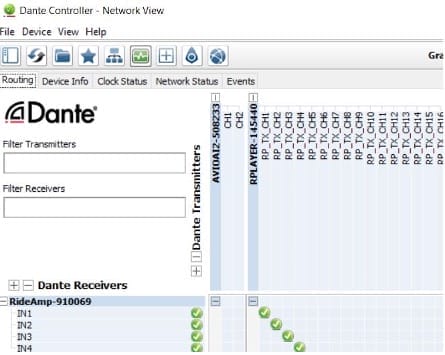
Click on Routing tab to make your first audio patch or subscription. Remember the Rideamp is capable of receiving 4 audio inputs. Let’s go ahead and patch the 4 audio inputs of RideAmp to the first 4 audio outputs of RidePlayer by clicking the grid intersection of these items.

-
You’re good to go! Both RidePlayer and RideAmp will retain these settings from now on.
There are many aspects to configuring a Dante or AES67 audio network, so be sure to refer to the Network Audio section of this guide for more helpful information.
If you are using RidePlayer as your source, we recommend following the Getting Started guide within the RidePlayer documentation for detailed instructions on implementing audio playback from the RidePlayer source.
RideAmp Utility Application
A PC application is available which allows you to configure and monitor the status of the RideAmp. All settings are saved to the RideAmp’s internal Flash memory and restored upon a power cycle or reboot. The connection between the PC and the RideAmp can be either via the USB-C interface or the UDP bridge using audio network IP.
This application can be obtained from the Software downloads page of the Alcorn McBride Website here: https://alcorn.com/support/software/
A screenshot of the UI is shown here:
