BX-4KU -- Video Module
Video Features
The BX-4KU video module provides phenomenal 4K60 uncompressed video playback from an incredibly compact and robust device that installs cleanly into an A/V module slot within the BinloopX. Each module provides either a single channel of 4K/UHD playback at up to 60fps, or up to four channels of 2K/HD playback. The removable internal U.2 SSD enables ultra-reliable low-latency playback of high-quality uncompressed DPX image sequences.
With multiple BX-4KU modules, a single BinloopX chassis can source up to 2 channels of 8K60, 4 channels of 4K120, 8 channels of 4K60, or 32 channels of 2K/HD. All playback can be scheduled and synchronized with frame-accurate precision.
- Uncompressed DPX Video Playback
- Frame-Accurate Synchronization
- Single Channel of 4K/UHD or Four Channels of 2K/HD
- Up to 120fps 4:4:4 10-bit Uncompressed DPX Video
- Rec.709 or Rec.2020
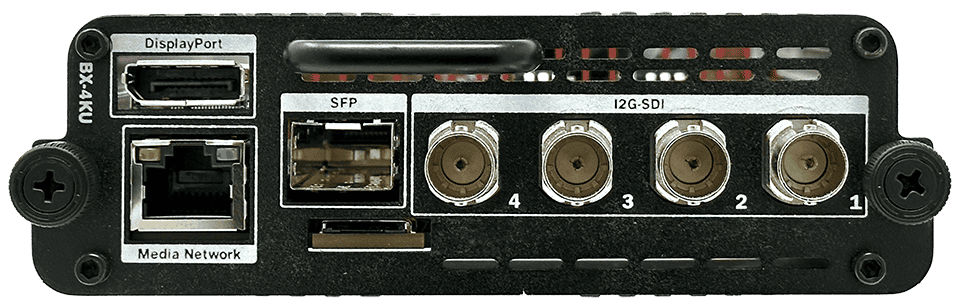
- 12G-SDI Coax, 12G-SDI SFP, and DisplayPort 1.4
- U.2 High-Performance Solid State Media
- Integrated 1.3" Confidence Monitor
- Media Update via Network Port
Connectors
SDI Coax
The BX-4KU is equipped with 4 SDI Coax outputs that can operate in either 3G, 6G, or 12G output modes. SDI Coax allows you to run cable distances up to 100m with no need for adapters or extenders. Many projectors, LED wall processors and display devices will accept this type of signal directly.
When the BX-4KU is operating in 4K/UHD mode, these outputs can be configured to source 4 redundant 12G-SDI signals or quad-link 3G-SDI.
When operating in 2K/HD mode, these outputs always operate in 3G-SDI mode to provide 4 individual 2K/HD sources.

Connector Information
| SDI Coax Connectors | |
|---|---|
| Connector Type | BNC Female |
| Mating Plug | BNC Male |
| Recommended Wire | Belden 1694A |
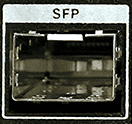
SDI SFP
The SDI SFP output enables the BX-4KU to source 12G-SDI incredibly long distances and/or in incredibly noisy electrical environments via a single-mode or multi-mode fiber optic connection.
The SFP is a single channel of SDI video, mirroring whichever output is active on SDI Coax Connector 1.
From the factory, the SFP socket is not populated. However, we do offer the option to order 12G-SDI SFP modules. If your end-point is MSA compatible, we strongly recommend ordering these in pairs so that you ensure compatibility between the BX-4KU output and the end-point device (projector, mini converter, etc.).
More information on this SFP module accessory can be found in the Accessories section.
DisplayPort
The BX-4KU has a single DisplayPort 1.4 connector that can source up to 4K60 RGB 4:4:4 10-bit quality video.

Connector Information
| SDI Coax Connectors | |
|---|---|
| Connector Type | DisplayPort Female |
| Mating Plug | DisplayPort Male |
Media Network
This optional network interface can provide direct access to the media storage device of the BX-4KU. While content can be transferred using the main Ethernet connector located on the BinloopX controller module, transfer rates will be reduced on this interface since it is shared with the entire chassis. This Media Network interface offers a direct transfer method to improve transfer speed to the BX-4KU. When this connection is in use, WinScript Live will automatically detect it and attempt to use this interface for all media file transfers.

Connector Information
| Media Network Connector | |
|---|---|
| Connector Type | RJ45 Female |
| Mating Plug | RJ45 Male |
Media
The BX-4KU module supports playback of uncompressed video content that is stored using the Digital Picture Exchange (DPX) file format. The folder and file naming conventions also play a role in playback behavior.
DPX Format
DPX is a very flexible image file based format that can store images with a variety of sizes, compression, and bit-depths that are not all supported by the BX-4KU. It's important to ensure that you adhere to the following DPX properties to ensure compatibility with this video playback module:
| Supported DPX Properties | |
|---|---|
| Resolutions | 4096 x 2160 (4K) |
| 3840 x 2160 (UHD – 2160p) | |
| 2048 x 1080 (2K) | |
| 1920 x 1080 (1080p) | |
| 1280 x 720 (720p) | |
| Frame Rates | 60, 59.94, 48, 47.952, 30, 29.97, 25, 24, 23.976 |
| Pixel Data Format | RGB (RGBA Alpha Layer Format not supported!) |
| Chroma Sampling | 4:4:4 |
| Pixel Bit Depth | 10-bit |
| 8-bit | |
| Compression | Uncompressed (RLE Compression not supported!) |
| Endianness | Big-Endian |
| Little-Endian |
File Naming
DPX is an image file based format, meaning that each frame is stored as an individual file with an associated frame number like so:
testClip_0000.dpx
testClip_0001.dpx
testClip_0002.dpx
The only thing that is important about these file names is that there is a numeric value before the .DPX extension. This numeric value represents the frame number, and therefore is necessary for the BX-4KU to play the frames in the correct order. You can have any number of digits in this frame number, and you can optionally enter any text prior to the frame number to give the files a more descriptive name. Typically, both this naming and file numbering are generated automatically by the production software that is used to create the DPX files.
These DPX frame files MUST be stored in a folder with a descriptive name like:
testClip
This folder name is how the entire clip is referenced when issuing playback commands to the BX-4KU, and it must be contained within the media folder located in the root of the BX-4KU media drive.
Just to highlight by example, here is a typical folder structure on the BX-4KU media drive:
This folder structure combined with DPX files contained within each user-named folder would result in the following media
clips being available for playback on the BX-4KU:
Typical Frame Playback Behavior
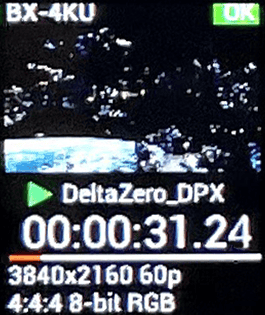
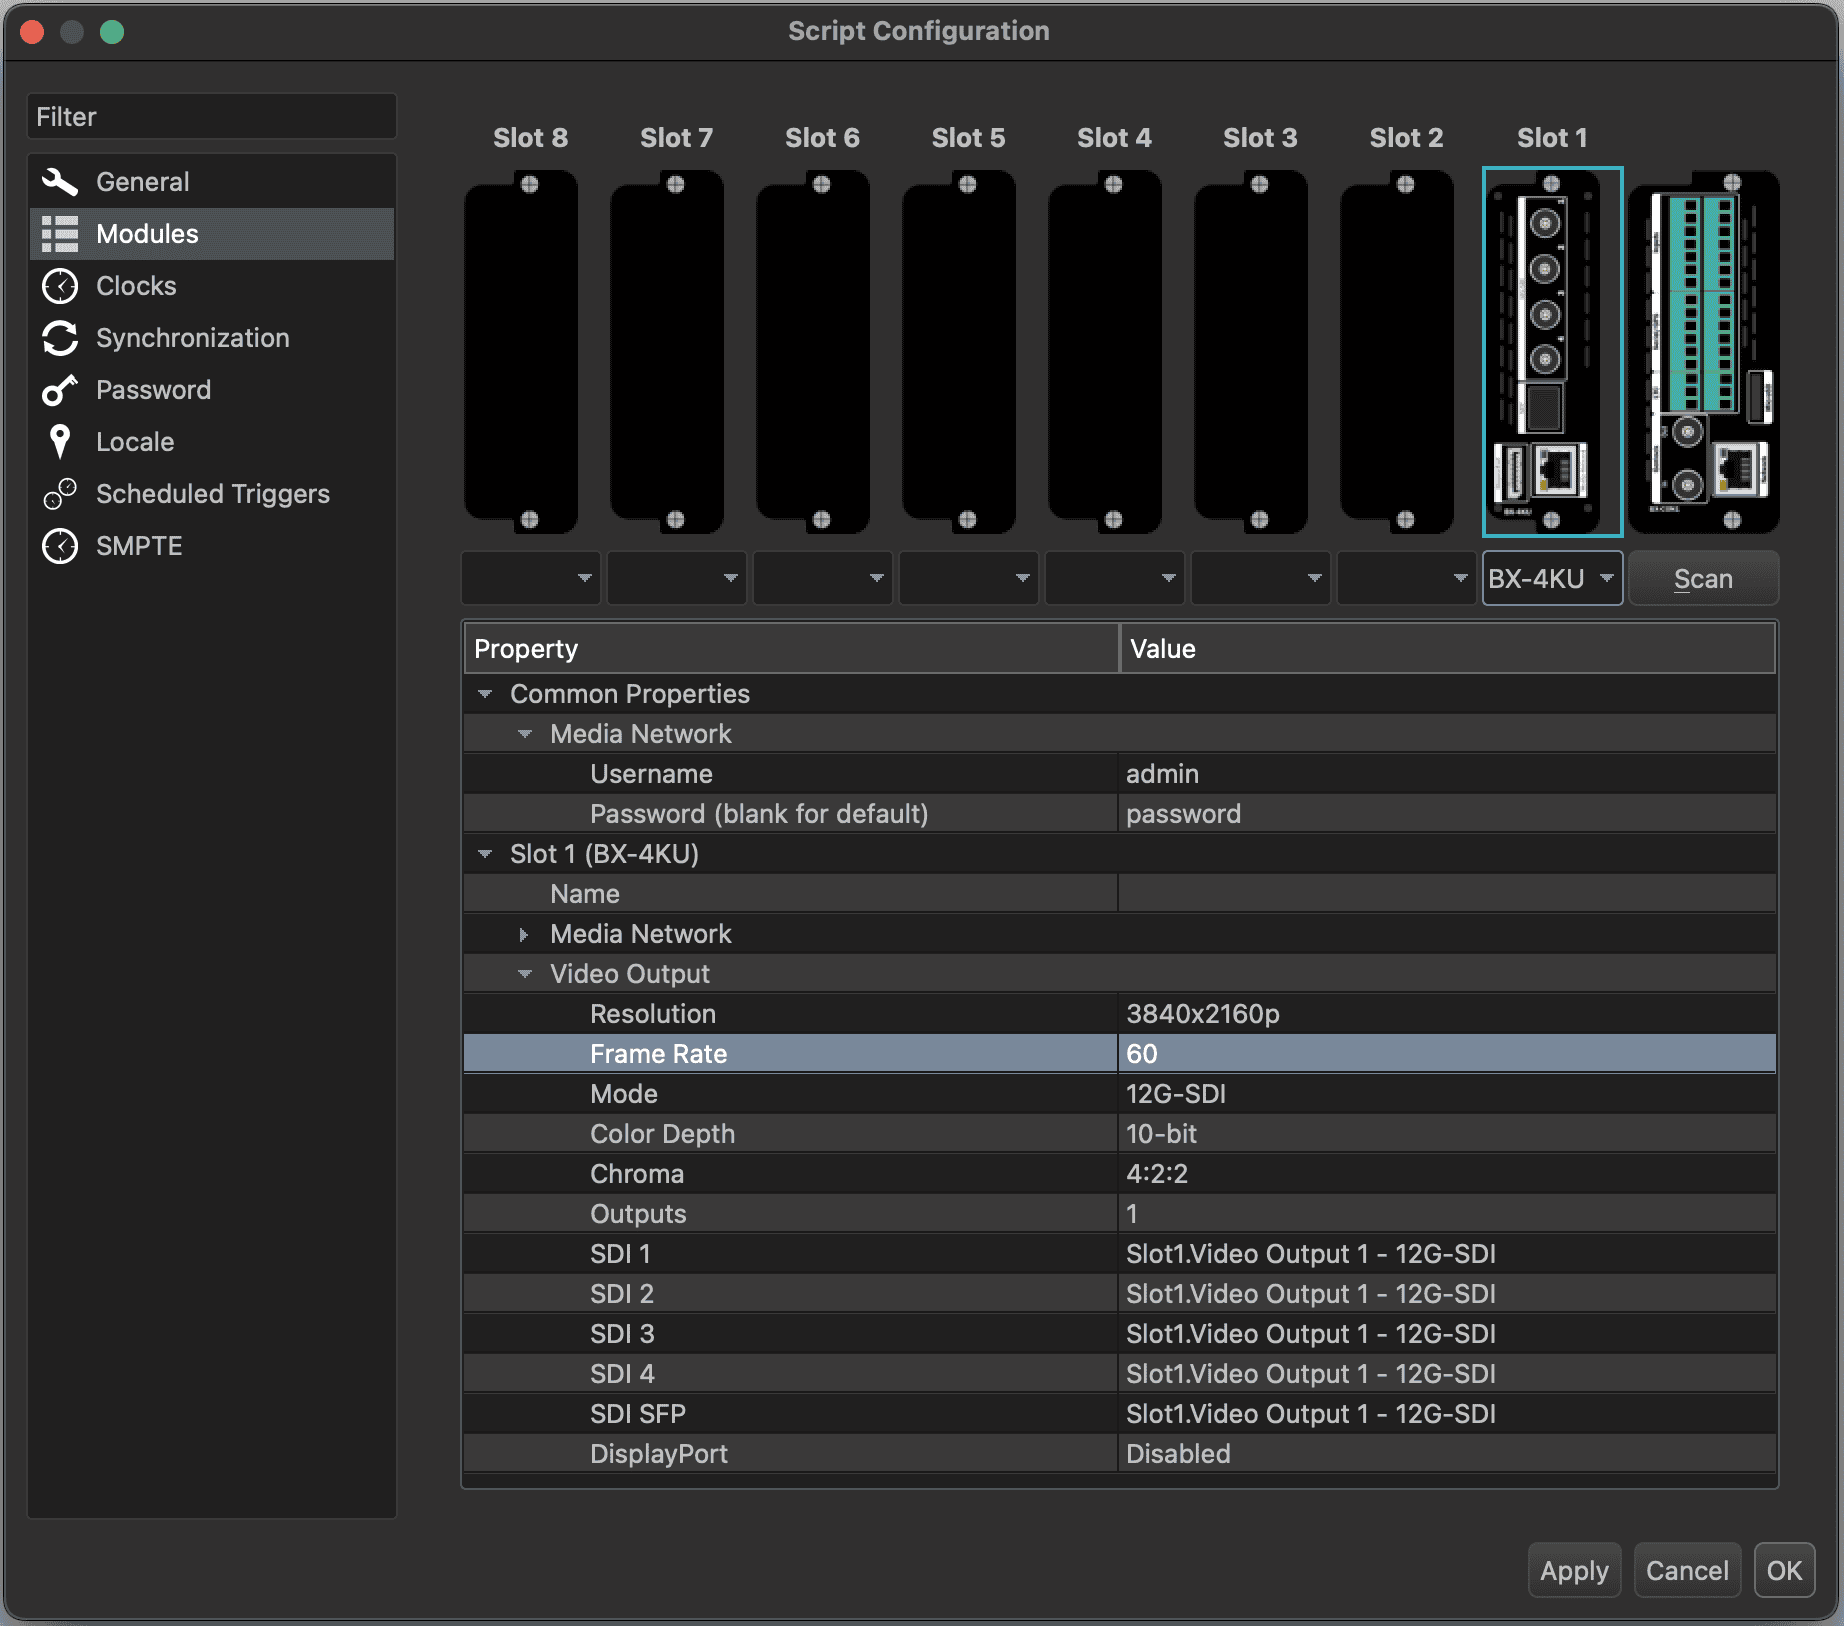
The BX-4KU will always playback DPX image file in numeric order and will always start with the lowest-numbered image file.
The rate in which the files are displayed is determined by the configured framerate of the BX-4KU module.
This framerate is part of the module configuration located in the Script Configuration of a WinScript project:
A typical contiguous frame sequence looks something like this:
testClip_0000.dpx
testClip_0001.dpx
testClip_0002.dpx
testClip_0003.dpx
testClip_0004.dpx
Story Board Frame Playback Behavior
Since rendering and transferring uncompressed DPX files involves a heavy workflow, the BX-4KU supports a very beneficial playback behavior that we call "Story Board" playback. This behavior occurs anytime frame numbers are skipped in the image file sequence. When these missing files are detected, the last displayed image will hold on-screen.
Just to illustrate by example, let's say you loaded these image files onto the BX-4KU module:
BabyBeluga_0001.dpx
BabyBeluga_0060.dpx
BabyBeluga_0120.dpx
BabyBeluga_0180.dpx
BabyBeluga_0240.dpx
Obviously, this does not result in smooth playback (hence the name "Story Board"), but this behavior can be incredibly useful during the production process to test segments of content, image quality, and timing before committing to rendering each and every frame of the final content.
Exporting DPX Files from Adobe Creative Suite
There are many production tools that are capable of exporting DPX image files, but Adobe Creative Suite applications such as Premiere, After Effects, and Media Encoder are certainly some of the most popular tools used for video workflow. This is a quick guide on how to export DPX files that are compatible with the BX-4KU.
The first step is to create a new project and edit your content as you see fit. The only recommendation for this phase of work is that you use a resolution and frame rate that is compatible with those listed is the DPX Format section.
Once you're ready to export, simply select the resource (i.e. Sequence) you wish to export and click on
the Export tab or select the File-->Export menu option. This screen will appear:
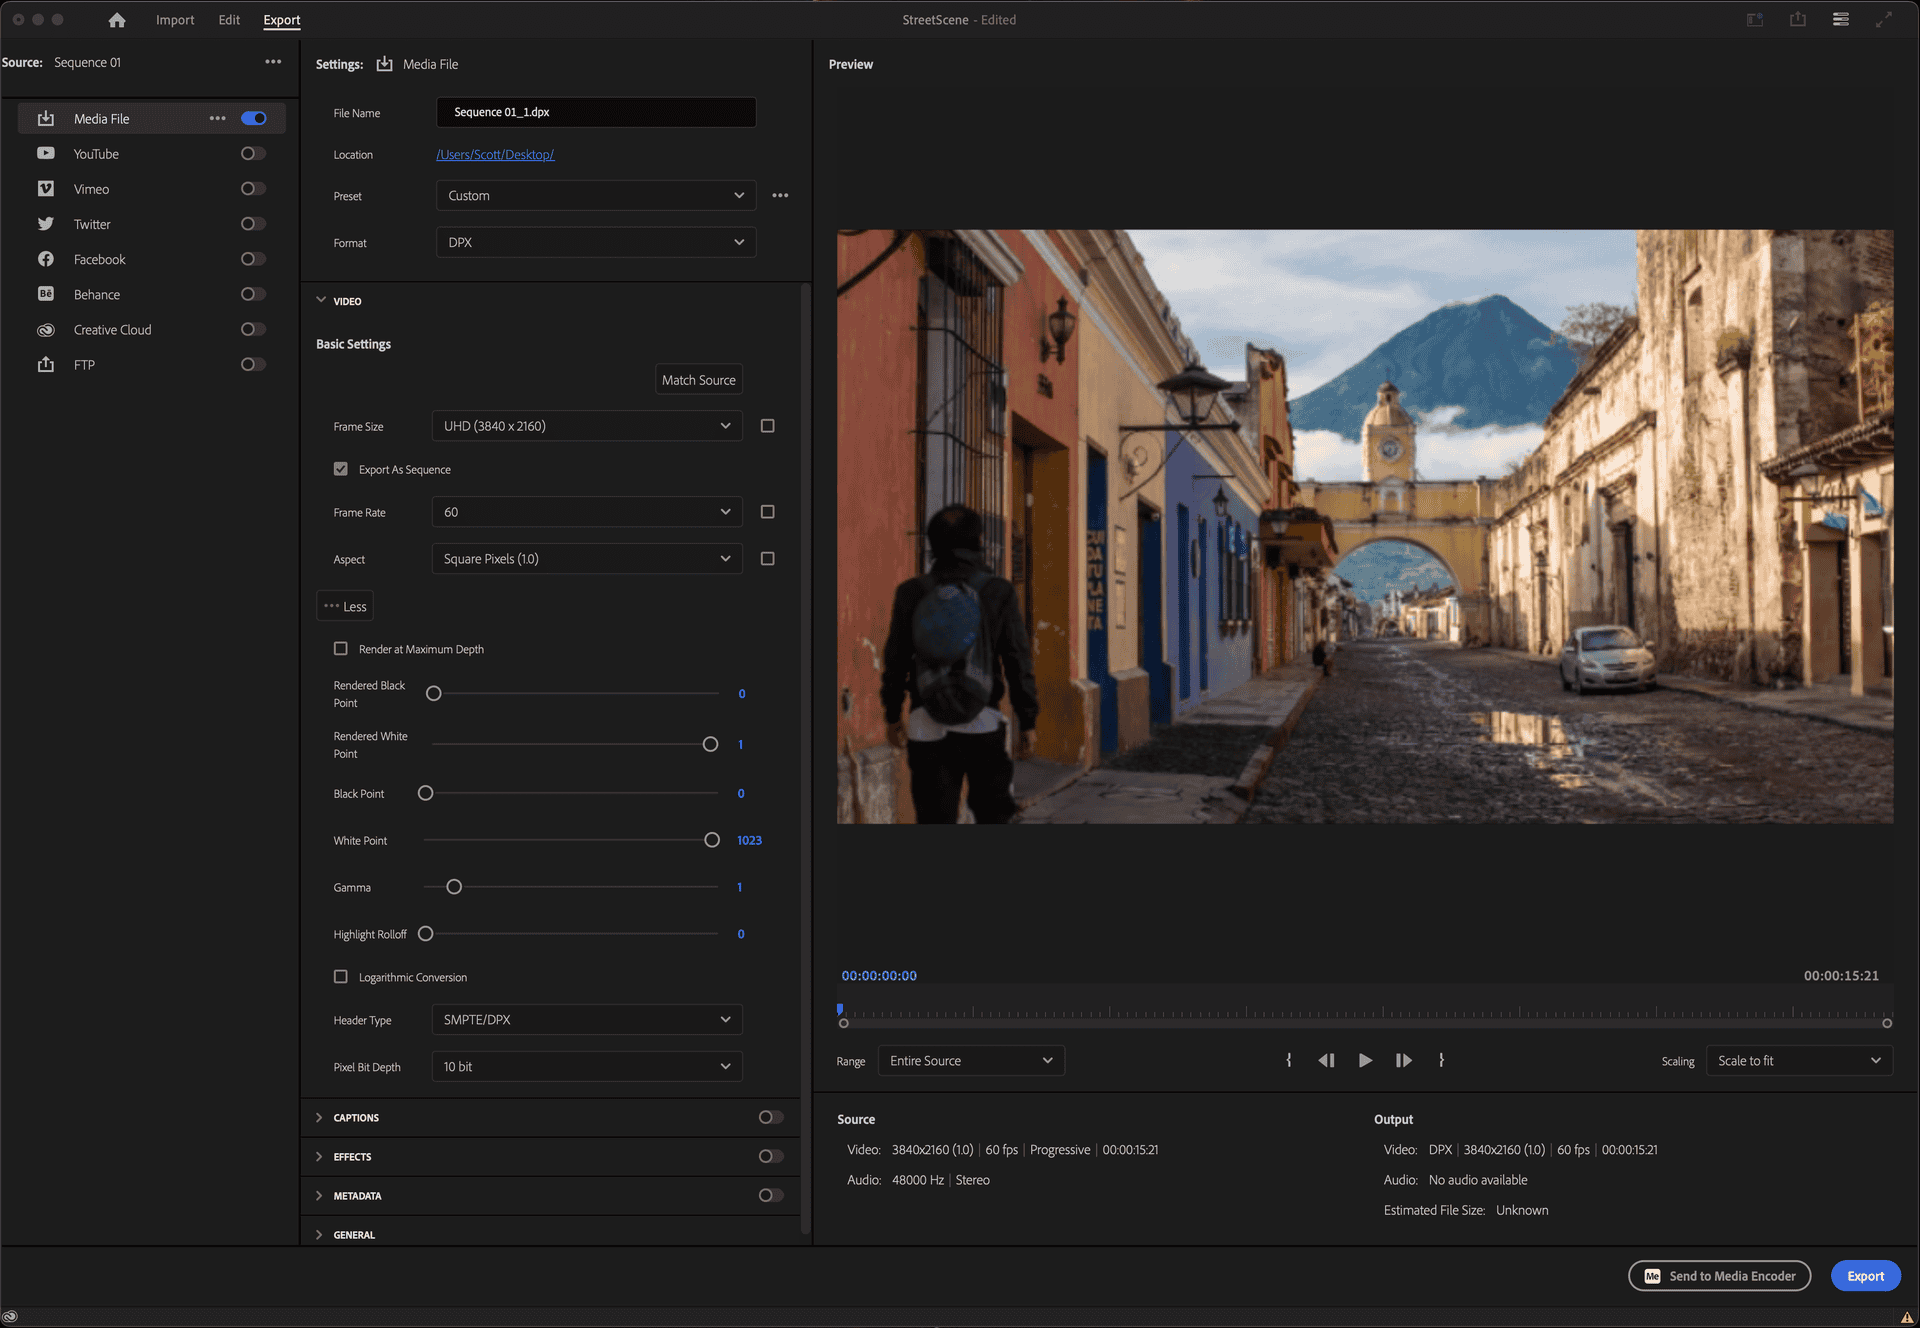
Configure the settings as follows:
| Adobe Export Settings | |
|---|---|
| File Name | Enter the name you wish to use for your DPX files and folder |
| Preset | Custom |
| Format | DPX |
| Frame Size | Ensure this matches a supported resolution for the BX-4KU |
| Frame Rate | Ensure this matches a supported frame rate for the BX-4KU |
| Aspect | Square Pixels (1.0) |
| Render at Maximum Bit Depth | Optional |
| Rendered Black Point | 0 |
| Rendered White Point | 1 |
| Black Point | 0 |
| White Point | 1023 |
| Gamma | 1 |
| Highlight Rolloff | 0 |
| Logarithmic Conversion | NO (Disabled) |
| Header Type | SMPTE/DPX |
| Pixel Bit Depth | 10-bit or 8-bit |
Transferring Media Files
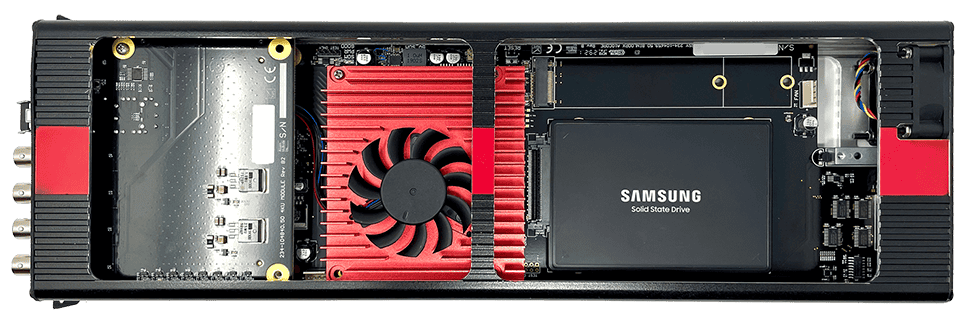
Each BX-4KU video module has a removable U.2 NVMe solid state drive that is dedicated to media storage. Loading DPX image files to this drive in the proper folder structure will make clips available for playback. There are 2 basic methods in which you can load these folders/files to the drive:
- Ethernet Interface (FTP)
- Direct Access (U.2 Dock)
This section walks you through the most common ways to transfer these files to the BX-4KU.
Transferring via WinScript Live
Aside from the ability to configure and program the BinloopX, WinScript Live also has the ability to manage and transfer content to the BinloopX modules via Ethernet. This transfer will occur over the main Network port on the BX-CON1 controller card or, optionally, over the Media Network port of the BX-4KU that you are transferring to. Although it requires an additional network connection, the advantage of using the Media Network port is faster transfer speeds...which can make quite a difference when you're transferring many large DPX files! WinScript will automatically check for this dedicated connection when you initiate a transfer and use it if it's available.
![]()
Here's how you transfer content to the BX-4KU using WinScript Live:
-
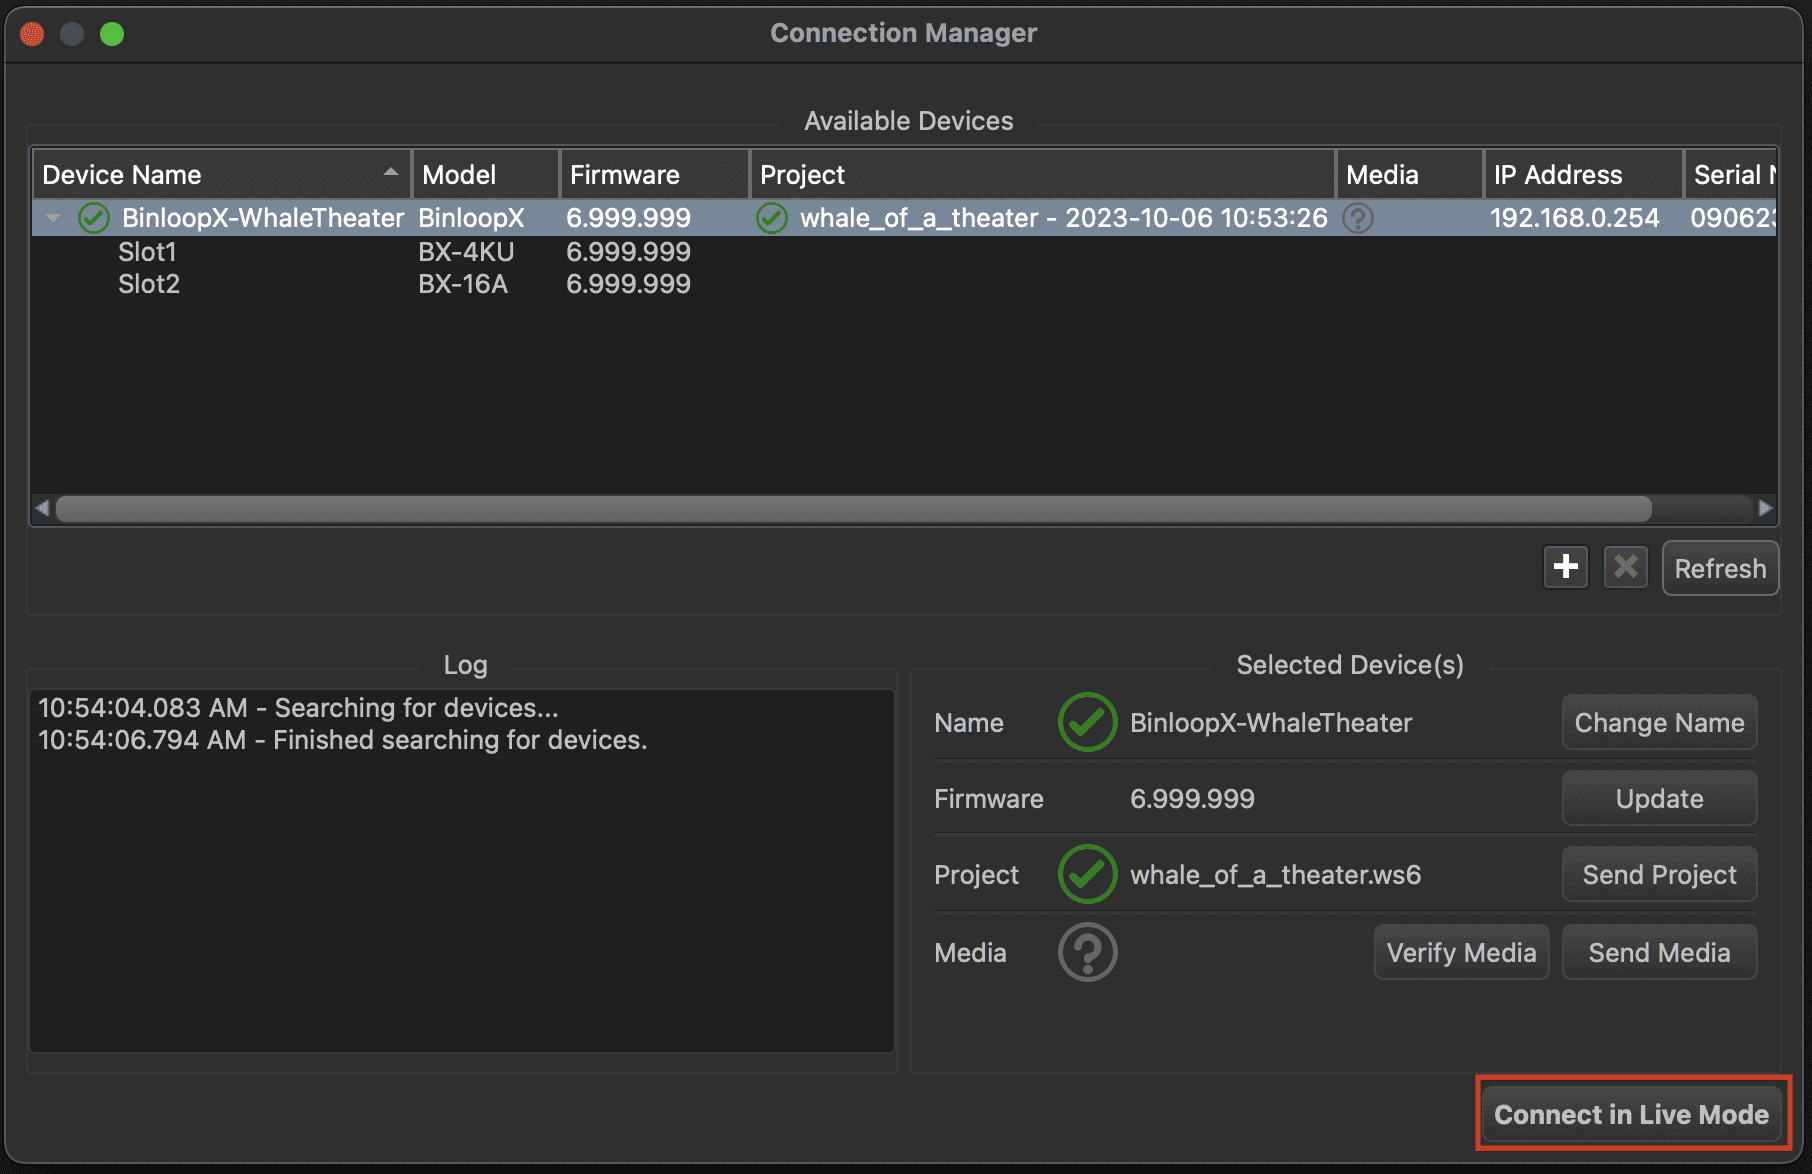
Launch WinScript Live and open your BinloopX project.
-
Connect to the BinloopX in Live Mode.
-
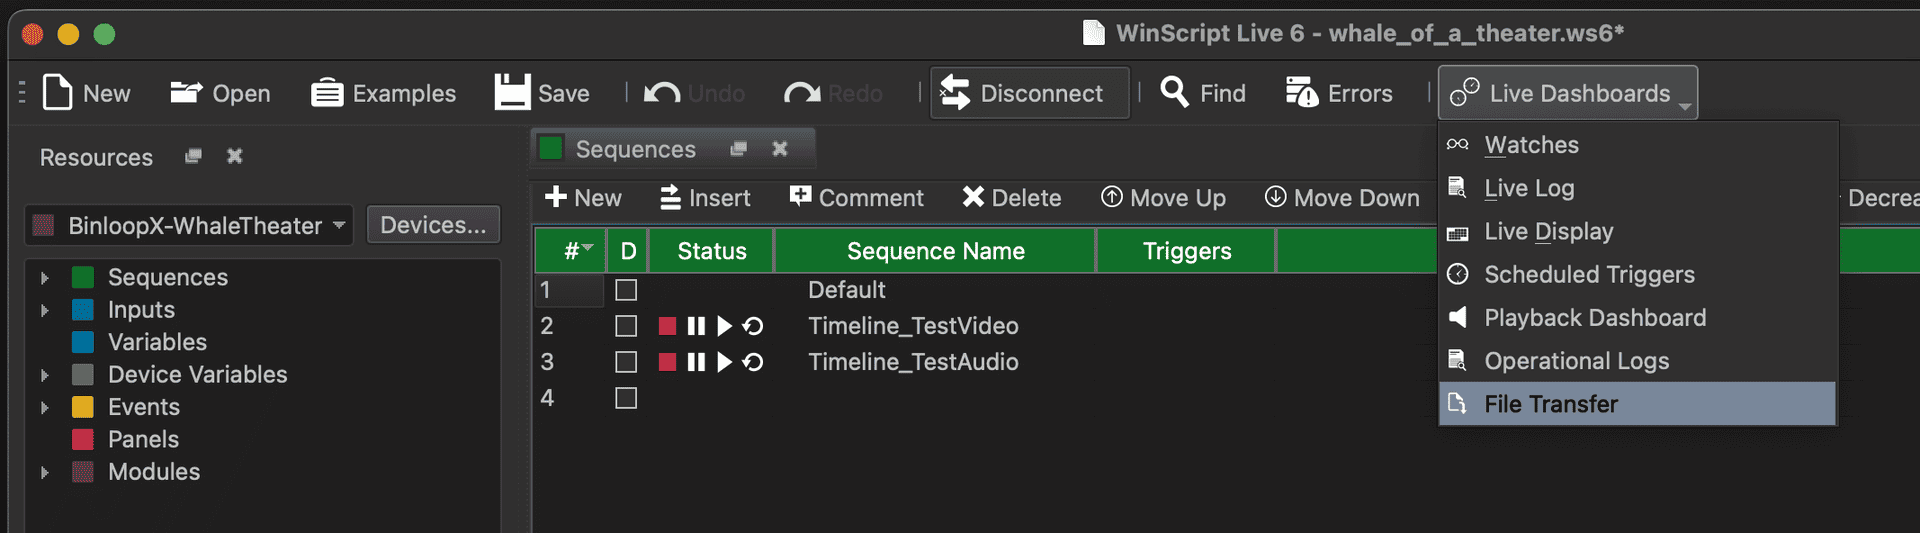
View the File Transfer screen by clicking the Live Dashboards->File Transfer in the WinScript menu bar.
-
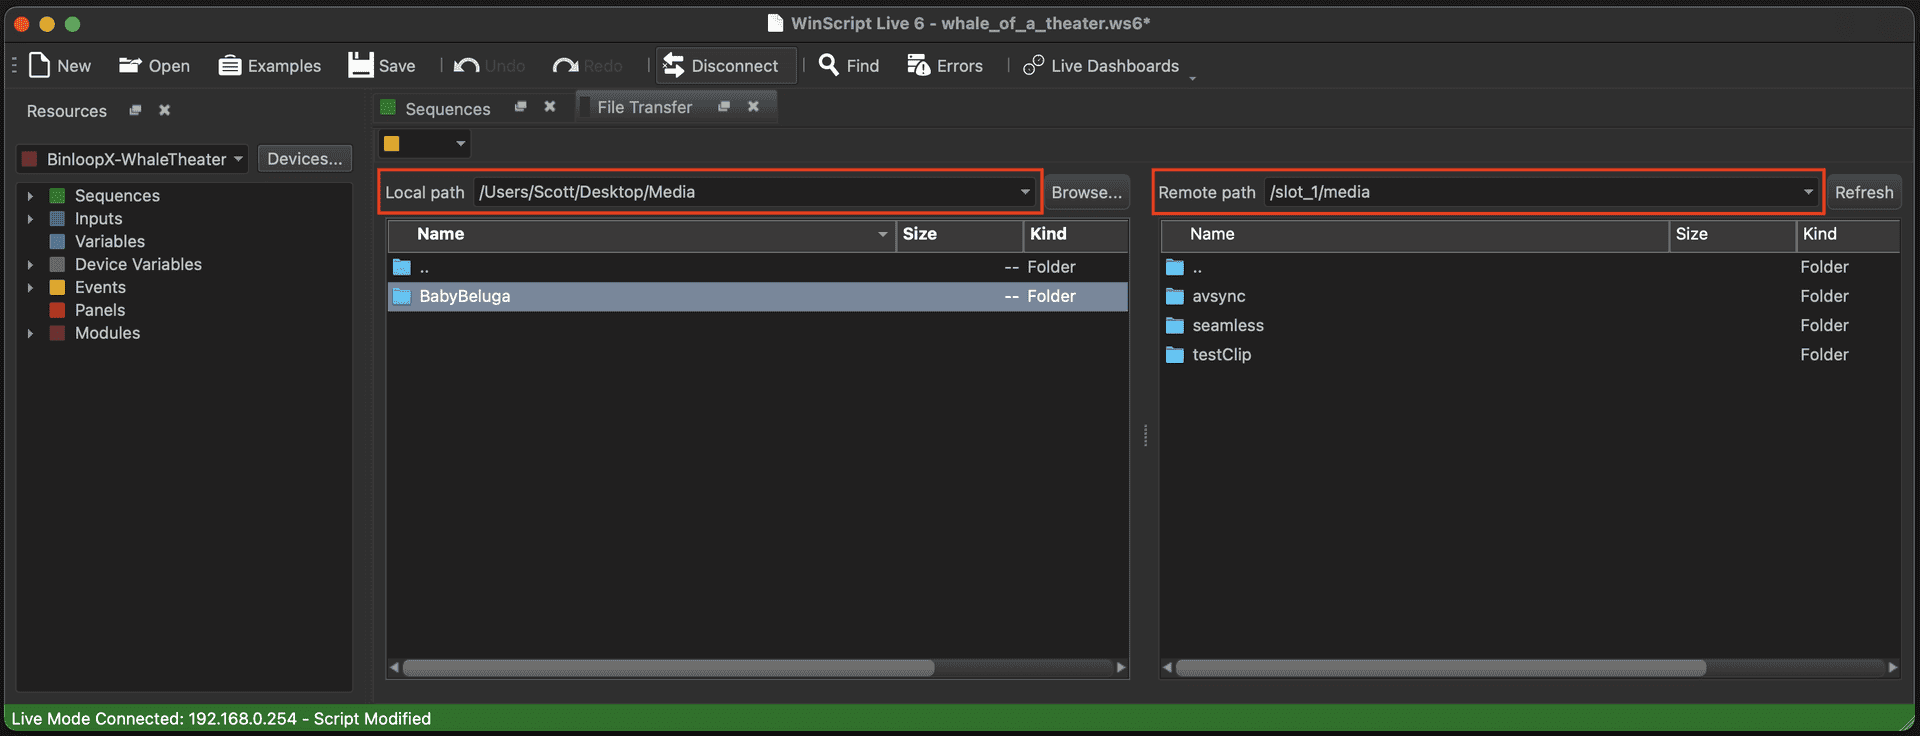
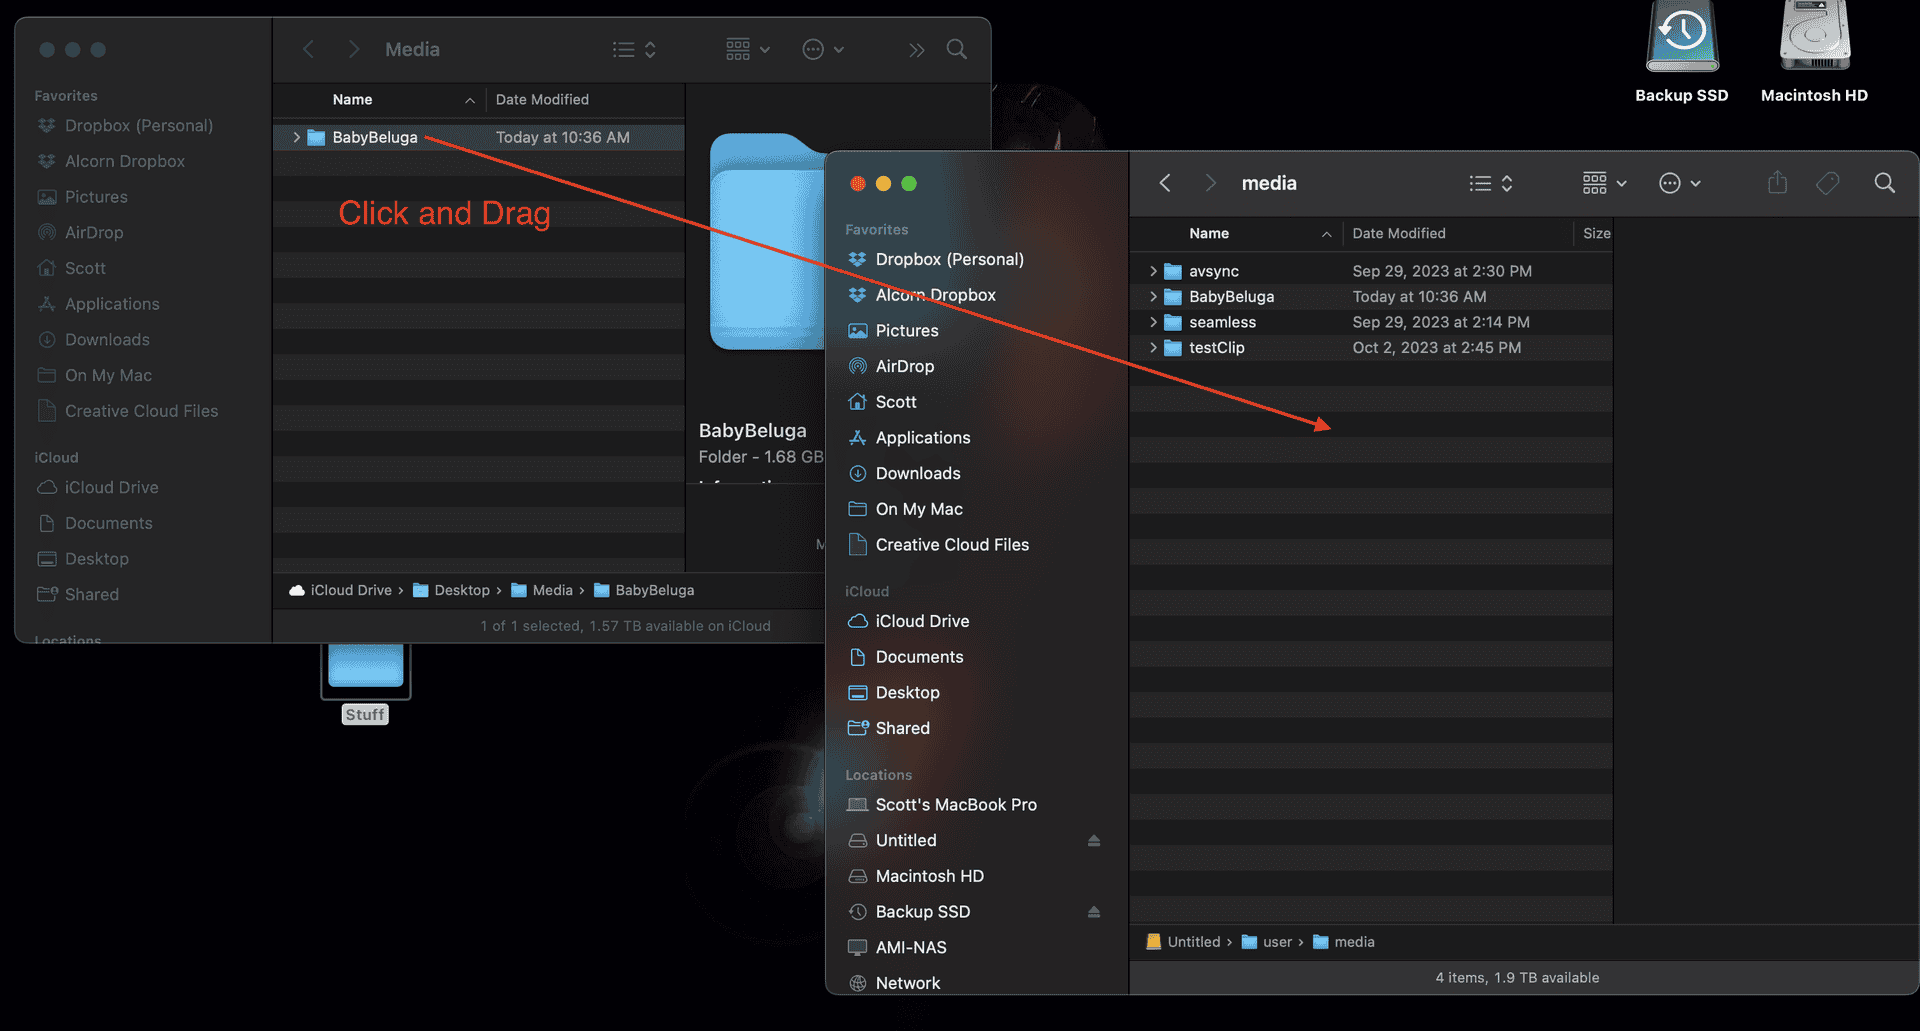
Browse to media folder that you wish to transfer content to on the right side of the File Transfer screen. Browse to the location of the source content you wish to transfer on the left side of the File Transfer screen.
-
Click and drag the source folder containing the DPX files and drag it over to the destination media folder of the BX-4KU.
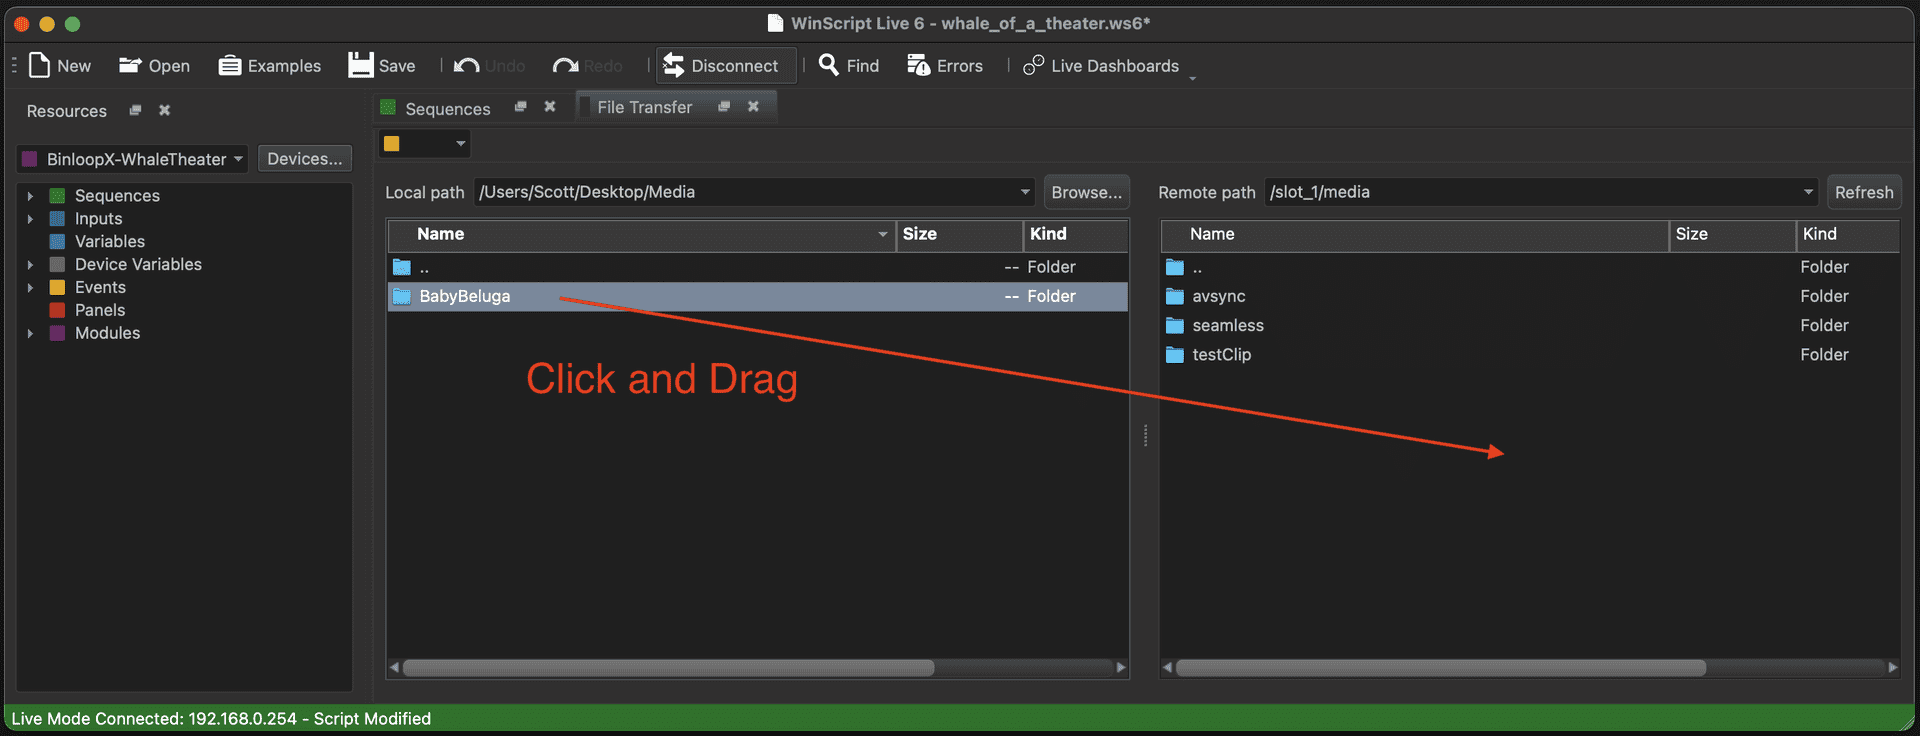
-
The transfer will begin.

-
Wait for the transfer to be complete.

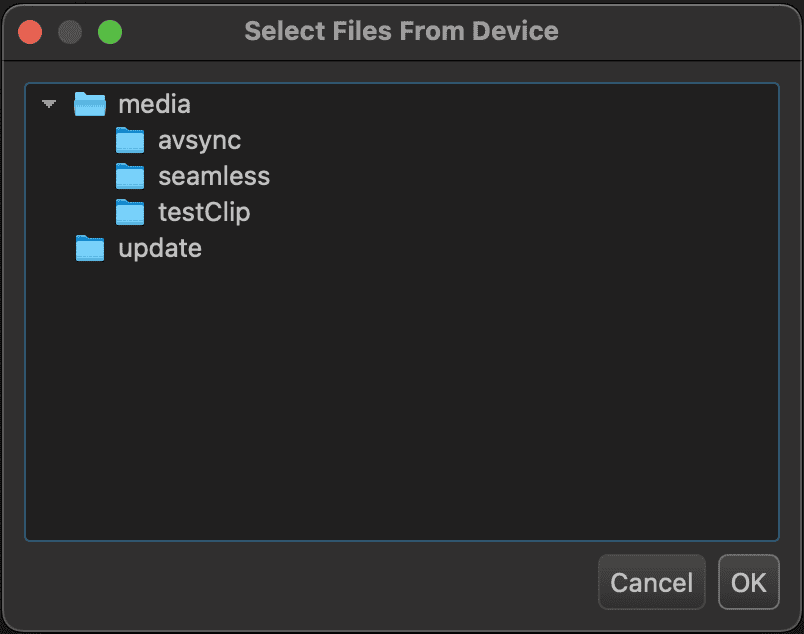
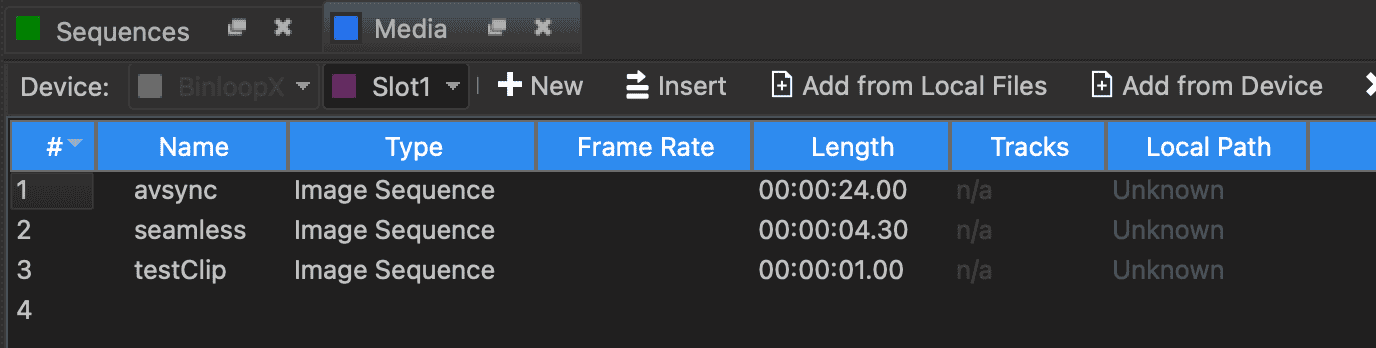
-
You can now add this new media content to your project by browsing to the Media resources screen of the BX-4KU, selecting Add from Device in the menu bar, and selecting the new clip.
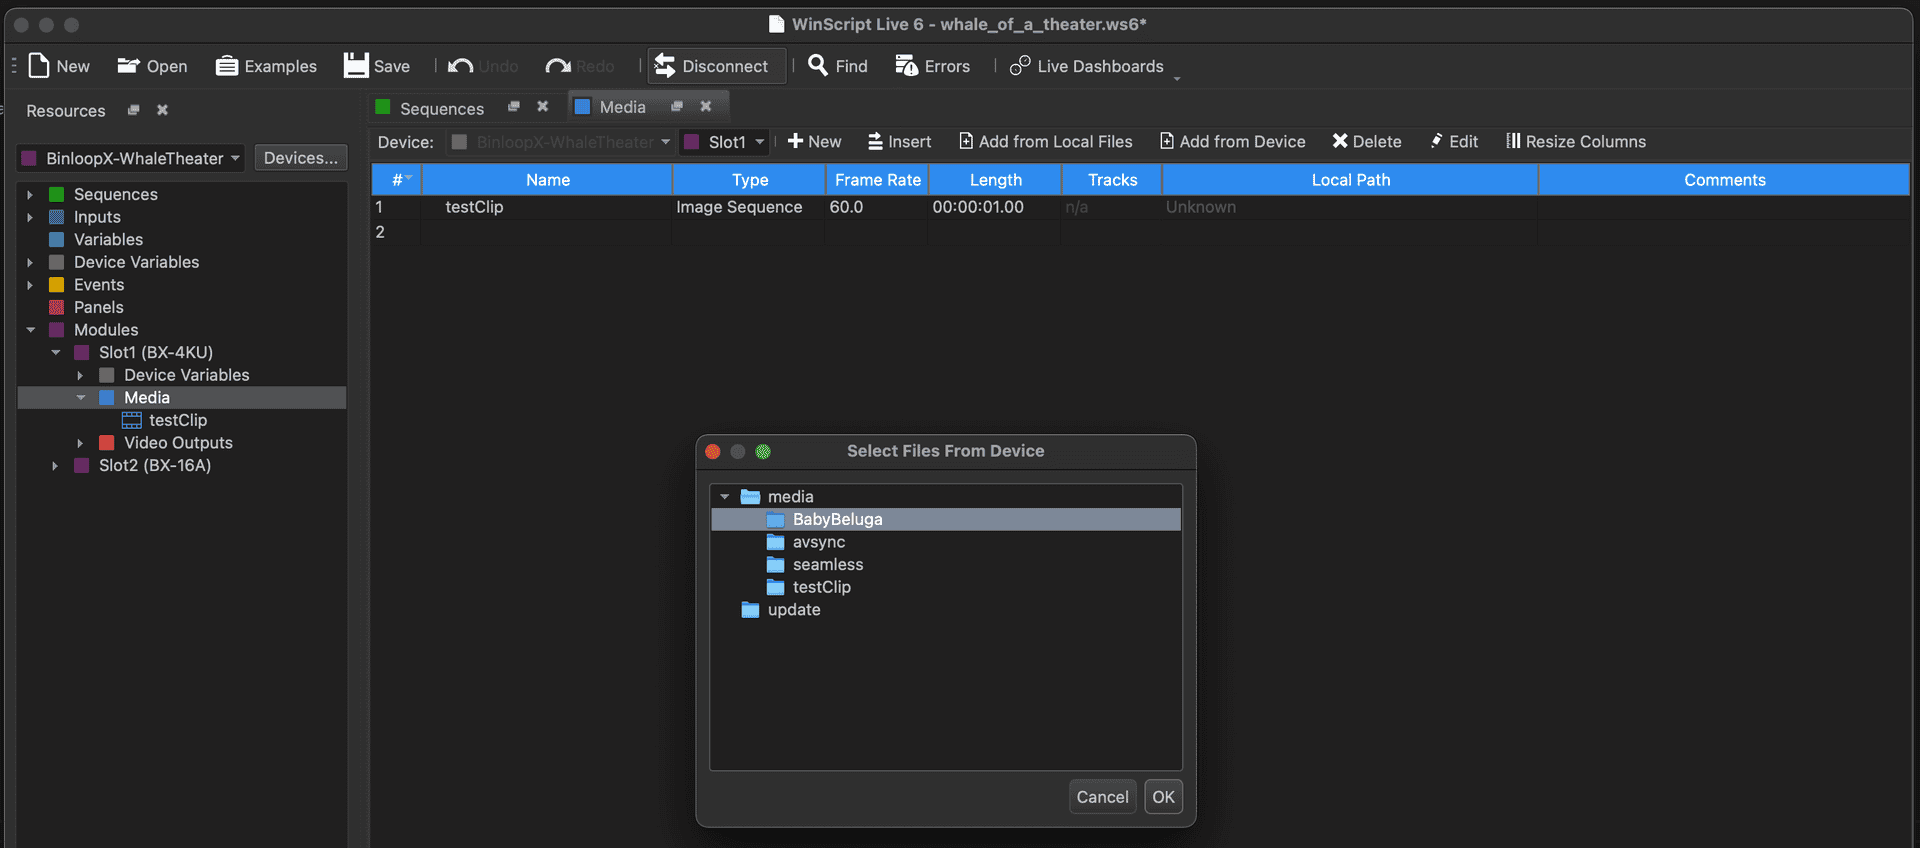
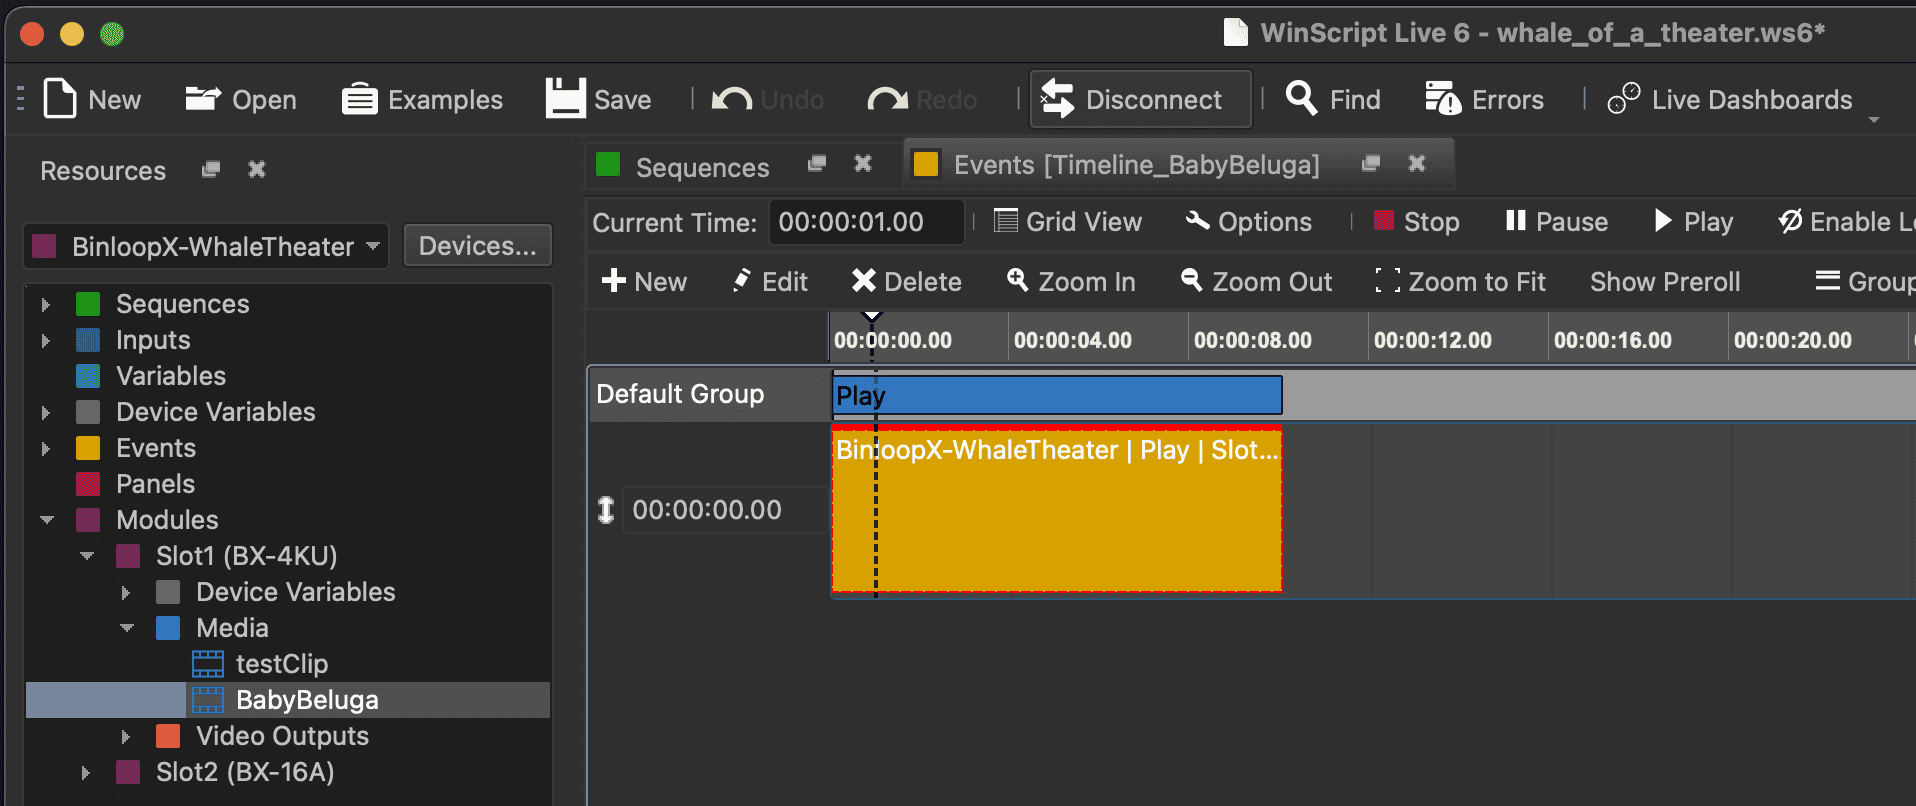
-
Once the new media clip is available as a Media resource in your project, you can drag it to any sequence to create a Play event or select it from any other event that controls media playback.
Transferring via FileZilla
FileZilla is one of the most popular applications for transferring files over networks, and is also an excellent way to load content to the BinloopX. This application is available for all computer platforms and can be downloaded directly from this website: https://filezilla-project.org/
Just like WinScript Live, this transfer can occur over the main Network port on the BX-CON1 controller card or, optionally, over the Media Network port of the BX-4KU that you are transferring to. Just make sure you know the IP address of the network interface you are connecting to.
Once FileZilla is installed and you're connected to the BinloopX on the network, follow these instructions to load new content to the BX-4KU:
-
Launch FileZilla
-
Access the Site Manager and create a new site for the BinloopX using the following parameters:
FileZilla Site Settings Protocol FTP - File Transfer Protocol Host Enter the IP address of the BinloopX BX-CON1 or BX-4KU Media Port (192.168.0.254 by default) Encryption Only use plain FTP Logon Type Normal User Enter FTP Username (admin by default) Password Enter FTP Password (password by default) 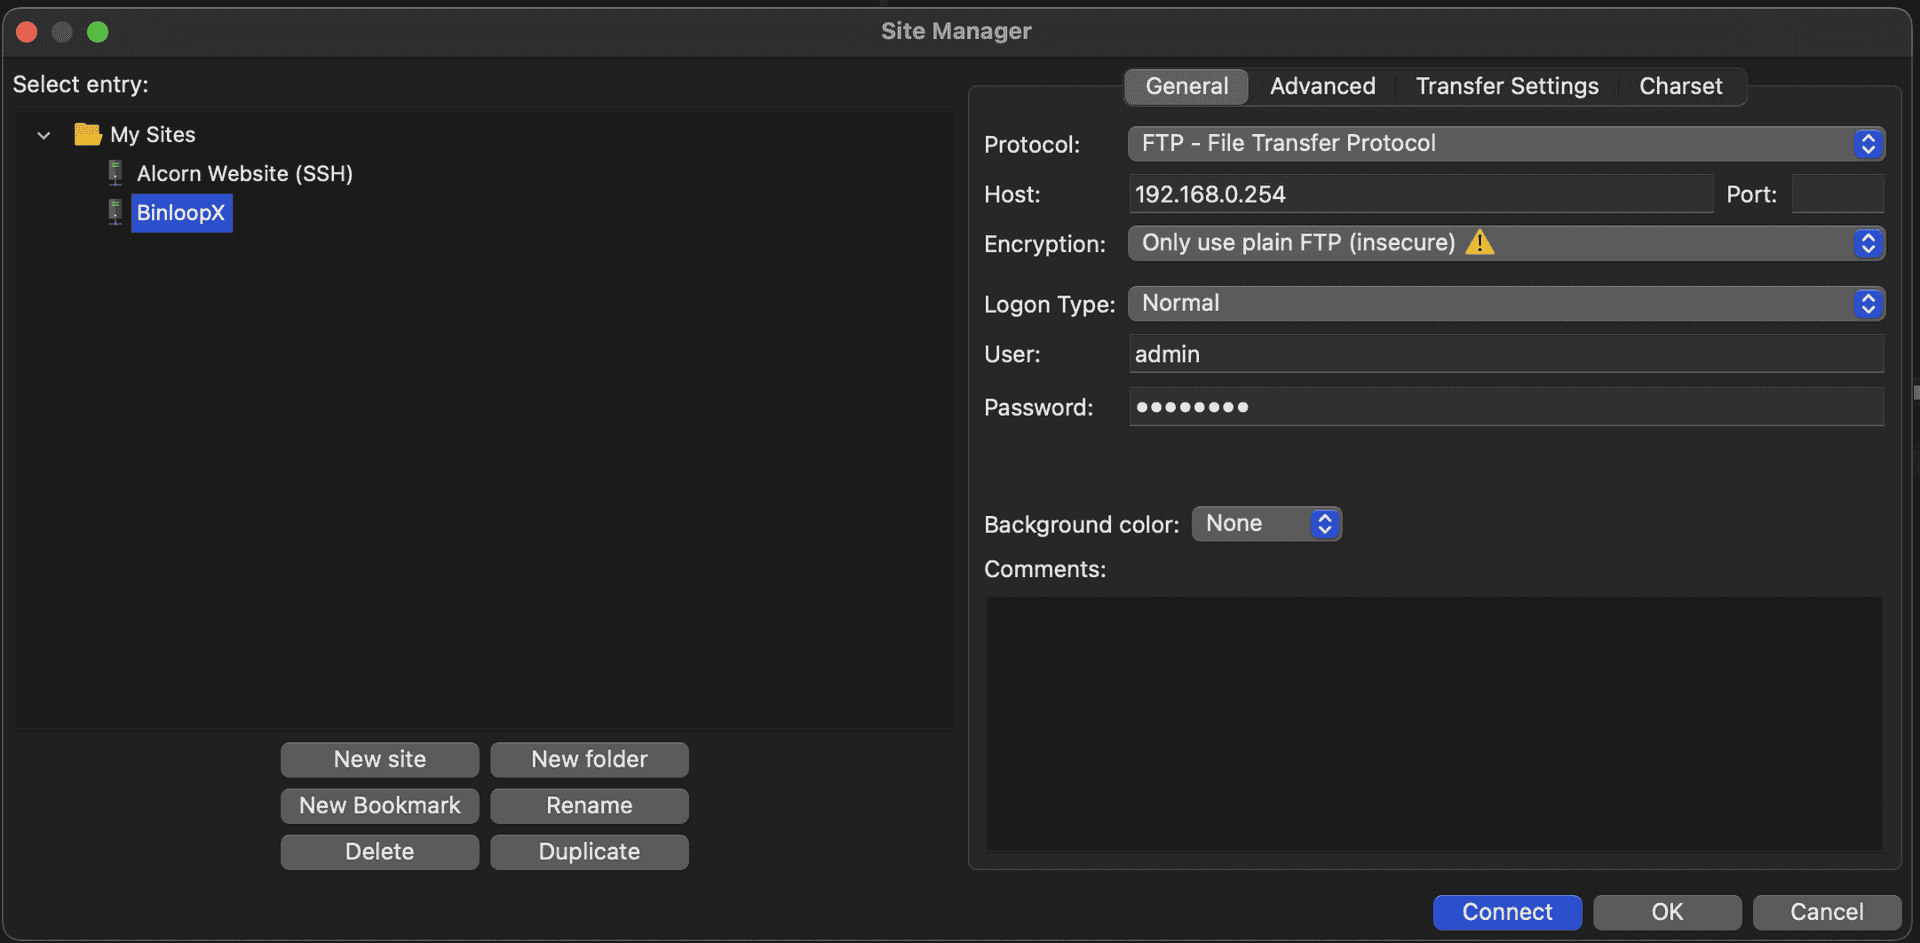
-
Click Connect
-
Once a connection is established, browse to the media folder of the BX-4KU you wish to transfer content to on the right side view of FileZilla. Browse to the source folder that contains the content you wish to transfer on the left side view.

-
Click and drag the source folder containing the DPX image sequence to the media folder of the BX-4KU to begin the transfer.
-
Wait for the transfer to complete.
-
You can now add this new media content to your project by browsing to the Media resources screen of the BX-4KU, selecting Add from Device in the menu bar, and selecting the new clip.
-
Once the new media clip is available as a Media resource in your project, you can drag it to any sequence to create a Play event or select it from any other event that controls media playback.
Transferring Directly to SSD
Although not as convenient as transferring over a network connection, directly accessing the BX-4KU's removable SSD is by far the fastest way to load content. This can be a real time-saver if you're loading a massive amount of DPX image sequences to the drive.
Before you get started, you'll need a way to interface the U.2 NVMe Solid State Drive to your computer. If you need help with this, we offer our U2AUSB adapter accessory that allows you to interface this drive directly to a USB-A or USB-C port on your computer.
Once you have the necessary hardware, simply follow these instructions to load your content:
-
Ensure that the BinloopX is powered down.
-
Remove any cables connected to the BX-4KU module that you wish to load content to.
-
Loosen the (2) thumb screws that are securing the BX-4KU module, and then use the small handle to remove the module from the A/V slot of the BinloopX.
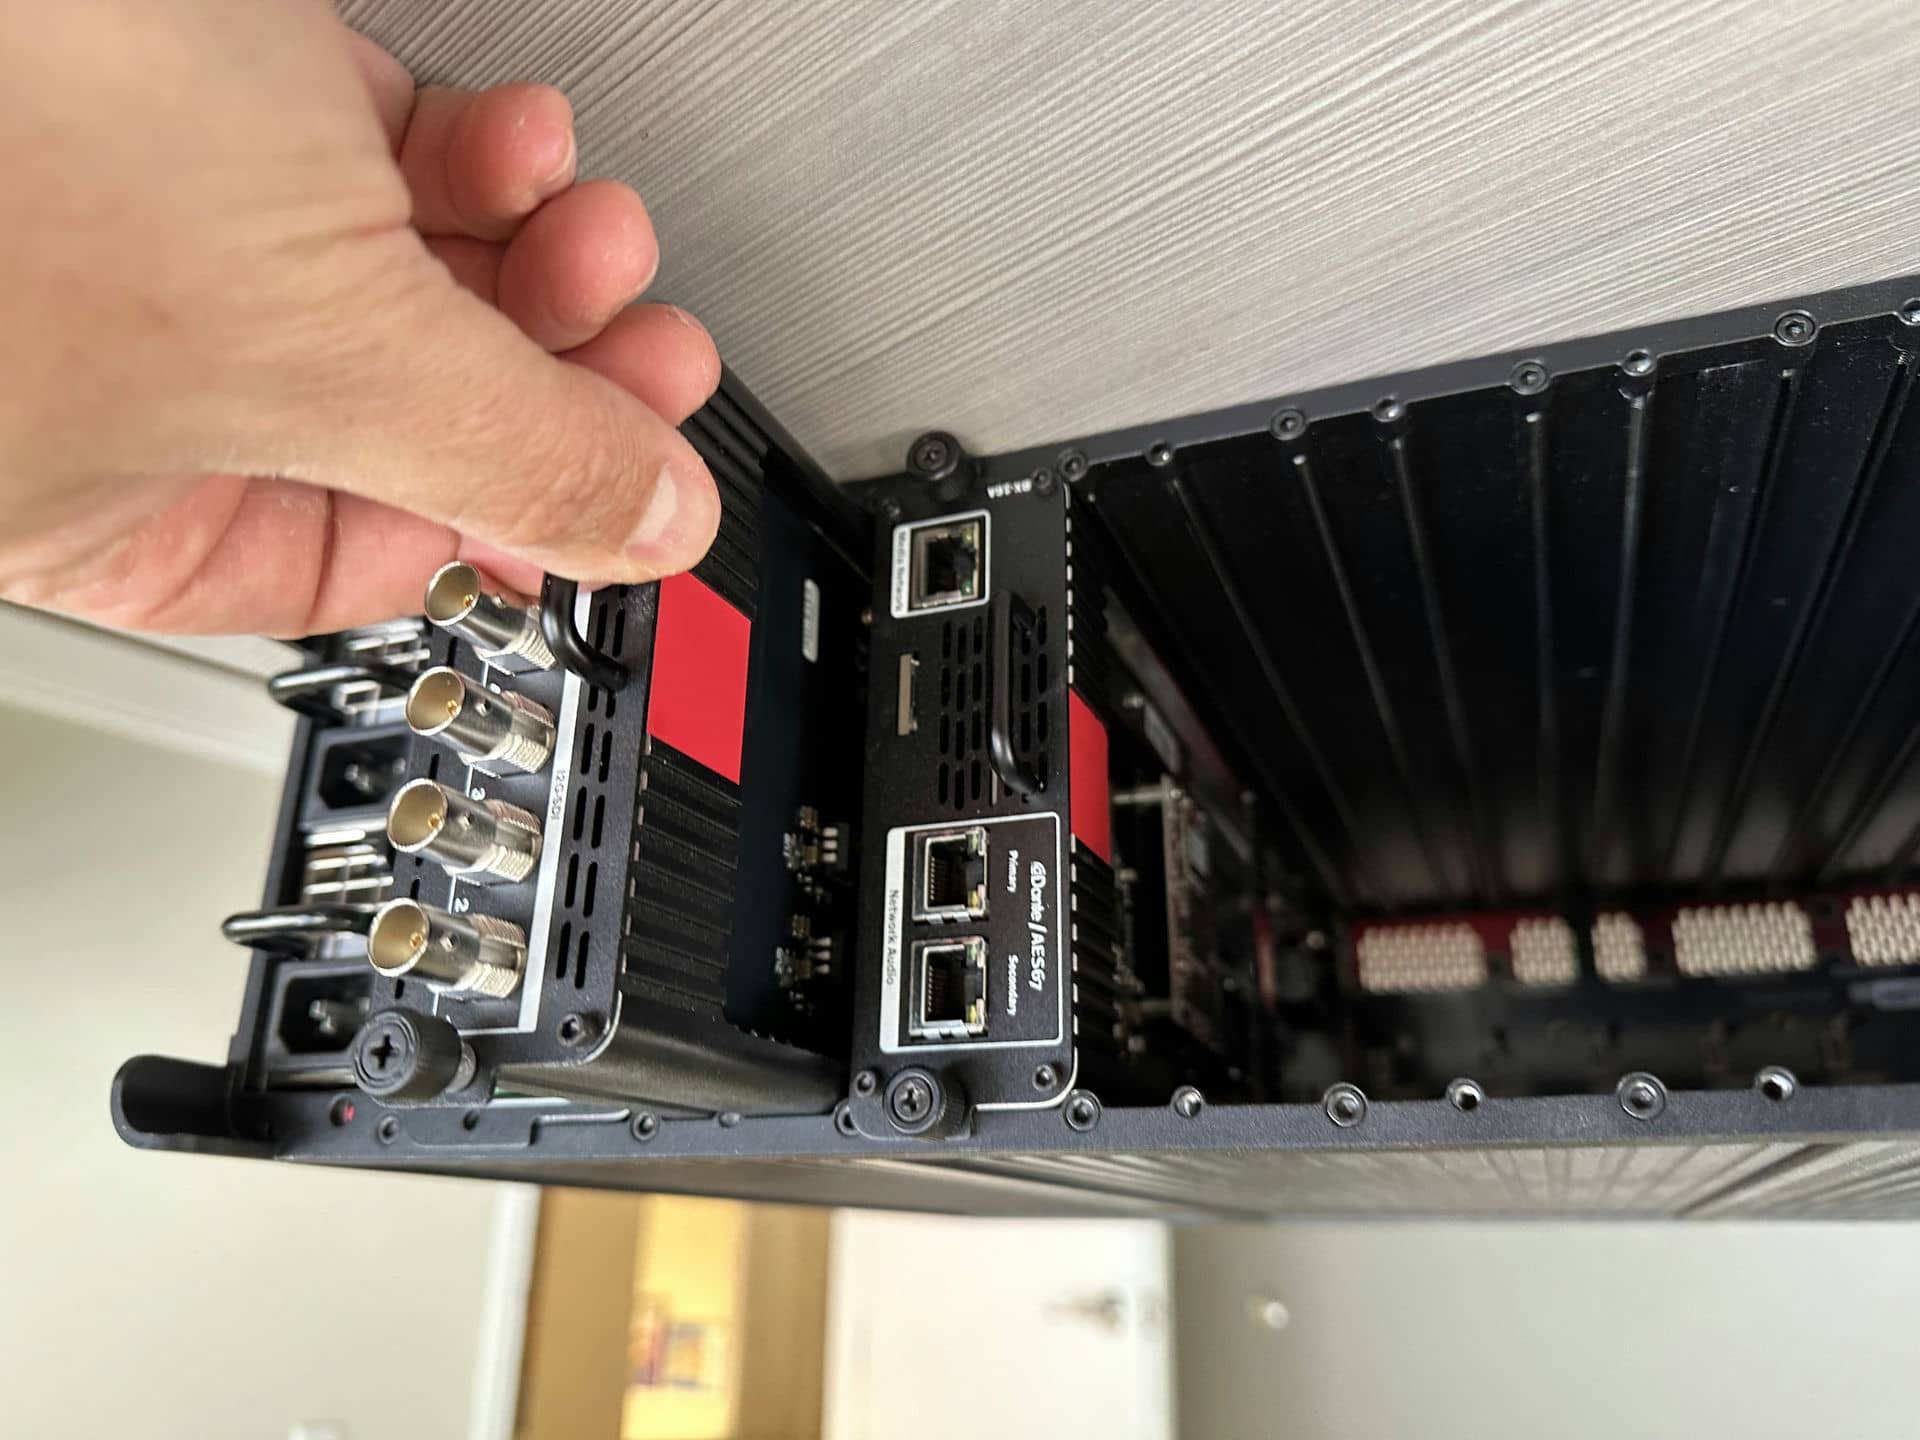
-
Carefully remove the SSD from the BX-4KU module by pushing back on the plastic drive clip while gently pulling up on the end of the drive that is held down by the clip (opposite end where the drive is connected). Once the drive has cleared the plastic clip, pull it away from the PCIe connector to disconnect.


-
Interface the SSD directly to your computer.
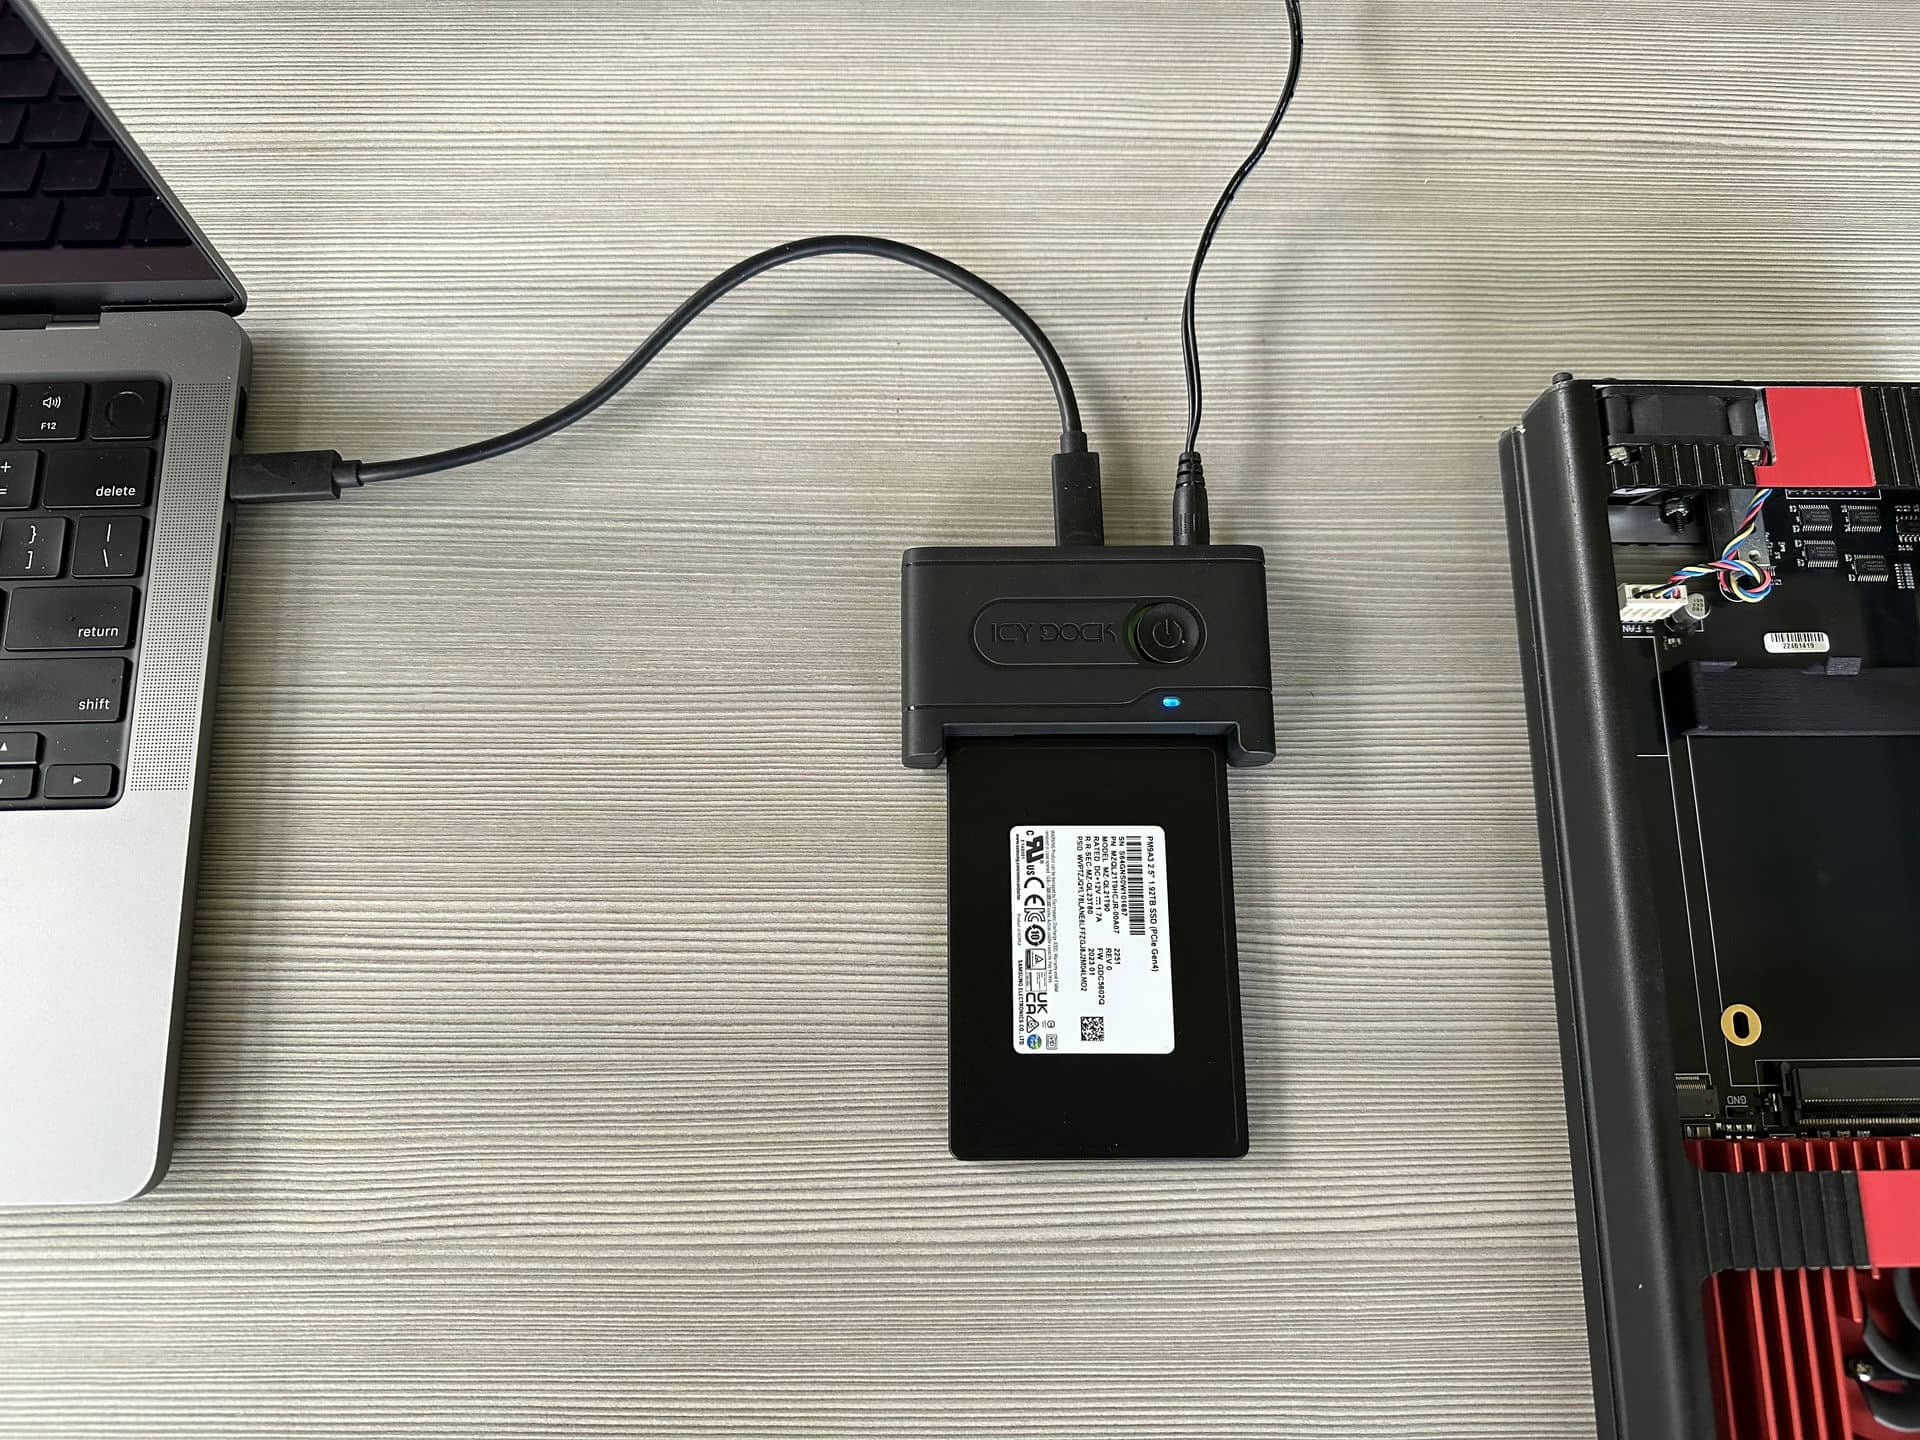
NOTE: Keep in mind that not all USB ports have equal capabilities. Ensure that you are using the fastest port your computer has available to ensure the fastest transfer speed. Ports that support USB 3.2 or Thunderbolt 4.0 are best.
-
Copy/Paste the source folder containing the DPX image sequence to the media folder of the SSD.
-
Be sure to properly eject the drive with your computer's operating system to ensure that the file transfer is 100% complete.
-
Re-insert the SSD back into the BX-4KU module

-
Re-install the BX-4KU module back into the BinloopX, tighten the thumb screws, and reconnect any cables you removed.
-
Launch WinScript Live and open your BinloopX project.
-
Connect to the BinloopX in Live Mode.
-
Add the new media content to your project by browsing to the Media resources screen of the BX-4KU, selecting Add from Device in the menu bar, and selecting the new clip.
-
Once the new media clip is available as a Media resource in your project, you can drag it to any sequence to create a Play event or select it from any other event that controls media playback.
Specifications
| Video | |
|---|---|
| Resolutions | 4096 x 2160 (4K) |
| 3840 x 2160 (UHD – 2160p) | |
| 2048 x 1080 (2K) | |
| 1920 x 1080 (1080p) | |
| 1280 x 720 (720p) | |
| Frame Rates | 60, 59.94, 48, 47.952, 30, 29.97, 25, 24, 23.976 |
| Chroma Sampling | 4:4:4 |
| 4:2:2 | |
| Color Depth | 10-bit |
| 8-bit | |
| Colorspace | Rec. 709 |
| Rec. 2020 | |
| Video Outputs | Coax 12G-SDI, 6G-SDI, 3G-SDI (4 x BNC) |
| SFP 12G-SDI (SFP Module) | |
| DisplayPort 1.4 | |
| Media Format | DPX |
| Media Network | 10/100/1000BT (RJ45) |
| Media Storage | U.2 NVMe SSD (Removable - Up to 8TB) |
| Preview Monitor | Integrated 1.8″ Monitor |
| Playback Status and Timecode | |
| Output Preview | |
| 50,000 hours to half-brightness | |
| 40-degree viewing angle |
| Synchronization | |
|---|---|
| Clock Accuracy | <1uS /w <1ppB free-run accuracy |
| Reaction Time | <1 frame (when scheduled) |
| Physical | |
|---|---|
| Power | Powered by BinloopX Chassis |
| 45W Typ, 60W Max | |
| Dimensions | 1.6"W x 14.9"L x 5.1"H (40mm x 378mm x 130mm) |
| Weight | 2 lbs (0.9 kg) |
| Environment | 0°C (32°F) to 38°C (100°F) |
| 0-90% Relative Humidity | |
| Mounting | BinloopX A/V Module Slot |
| Compliance | UL, CE, CB, WEEE, RoHS |
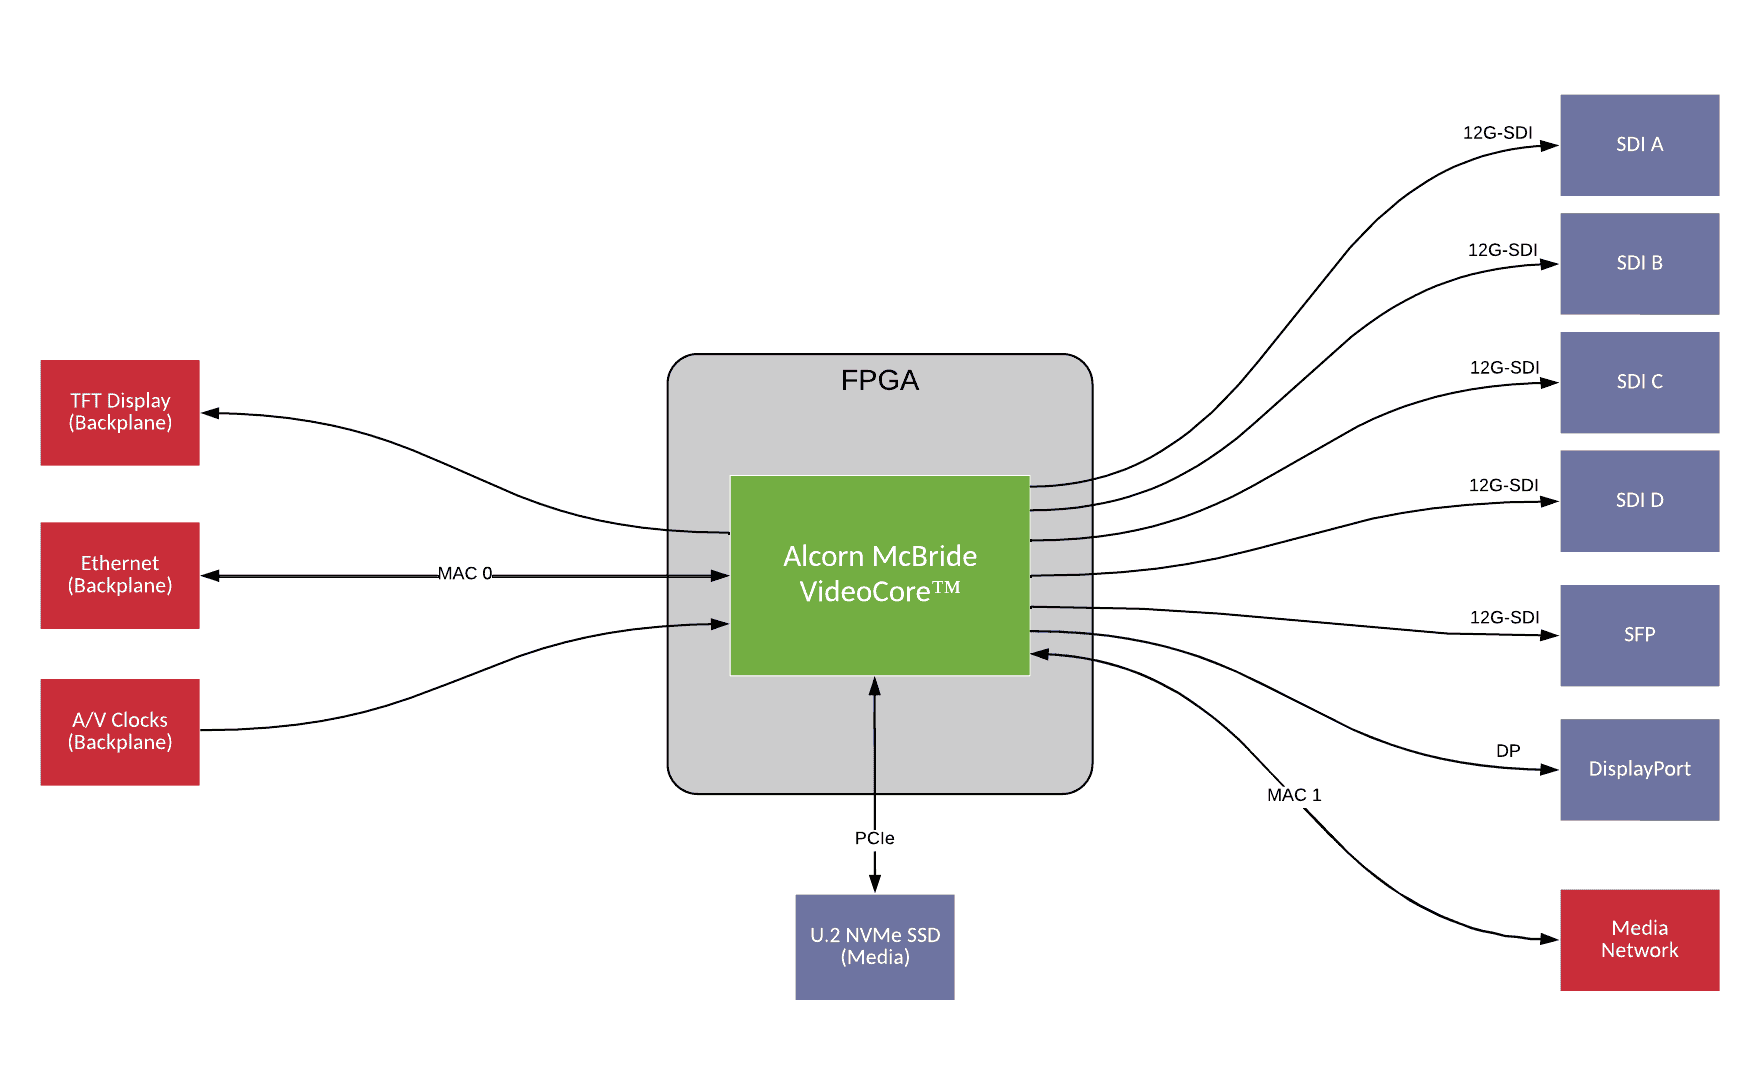
Block Diagram