Q-SYS Configuration
The V-Com communicates with a Q-SYS system to enable paging ring, configure party lines, etc. This is accomplished using both the V-Com Intercom Matrix plugin along with the V-Com Intercom Station plugin.
The V-Com Intercom Station plugin is used to configure all of the properties of a specific station, which are then transferred to the physical station when it is “Linked” to the Q-SYS Core.
The V-Com Intercom Matrix plugin is a logical block that lives within Q-SYS that is used to configure all party lines and ring zones. All party lines and zones can be given descriptive names so that each intercom station can be assigned to these groups. Once the system is active, the Intercom Matrix plugin properly routes audio from each station to the appropriate party line while also managing all ring zone control.
Note
All Dante devices use PTP for clock synchronization and require Q-SYS core's PTP config to be set to domain 0. IEEE 1588 Priority 1 is set to 249 and Priority 2 is set to 112 for BMC purposes. PTP information (domain, priorities, etc.) are not configurable in the V-Coms.
InterCom Matrix Plugin Properties
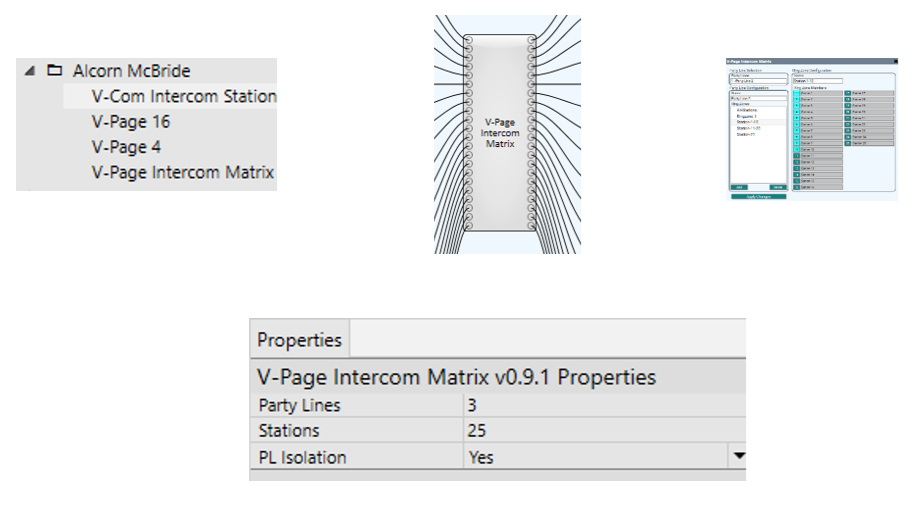
- Party Lines: Number of party lines in the system.
- Stations: Number of stations in the system.
- PL Isolation:
- Yes: Defines if the Party Line audio will be only heard on to the selected Party Line by the station or if you will be able to hear any
- No: station no matter on what Party Line the station is currently on.
Paging Station Plugin Interface
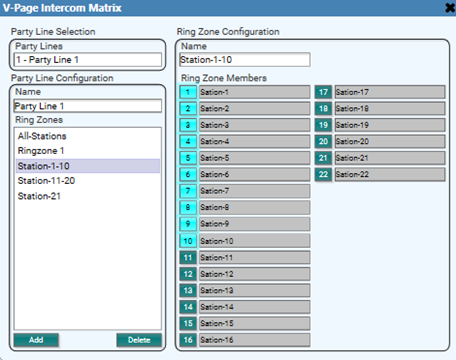
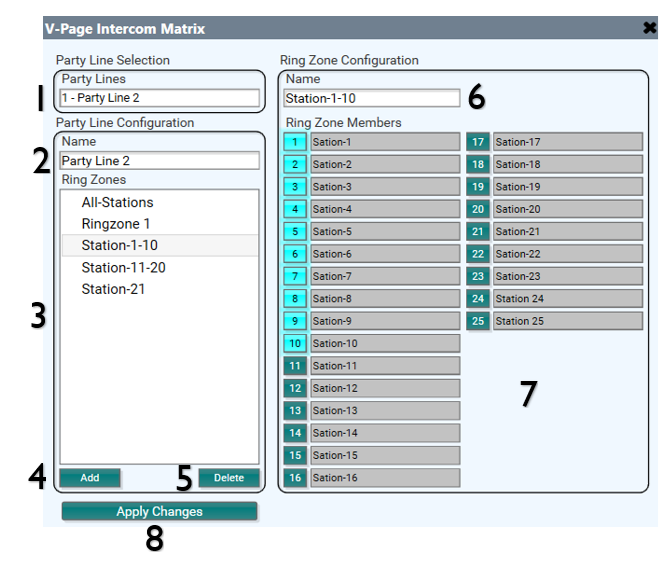
- Party Line selection: Drop-down menu shows available Party Lines. The number of available Party Lines is set in design mode under the Intercom Matrix properties.
- Party Line Name: User defined name for the party line.
- Ring Zones: Shows any Ring Zones created for the selected Party Line.
- Add: Add new Ring Zone.
- Delete: Removes the selected Ring Zone.
- Ring Zone Name: User defined name for the selected Ring Zone.
- Ring Zone Members: Assigns the selected stations to the currently selected ring zone. The station(s) that have a number light up will ring when that Ring Zone is called. The list will auto-populate from any station that has been assigned at the station plugin.
- Apply Changes: Press to save all changes.
V-Com Intercom Station Plugin Properties
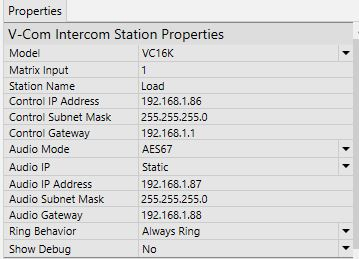
- Model: Select model number of each station.
- Matrix Input: The input number to the Intercom Matrix.
- Station Name: User defined name of each station. Allowed Characters: numbers, letters, and dashes. Do not leave blank spaces.
- Control IP Address: The IP address of the network control of the unit entered by the user or fully populated once an IP is being assigned by a switch in DHCP mode.
- Control Subnet Mask: The subnet mask of the control network of the unit.
- Control Gateway: The gateway settings of the control network.
- Audio Mode: User defined setting if hardware allows it. Can either be Dante or AES67.
- Audio IP: The IP address of the audio network of the unit entered by the user or fully populated once an IP is being assigned by a switch in DHCP mode.
- Audio Subnet Mask: The subnet mask of the audio network of the unit.
- Audio Gateway: The gateway settings of the audio network.
- Ring Behavior: Defines how when will the station ring based on the Handset state.
- Show Debug: Puts the V-Com plugin into debug mode for troubleshooting purposes.
V-Com Intercom Station Plugin Interface
This is how the V-Com Intercom Plugin user interface looks:
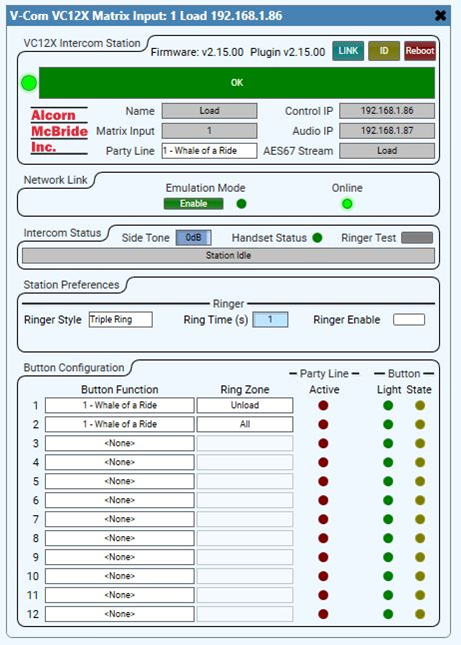


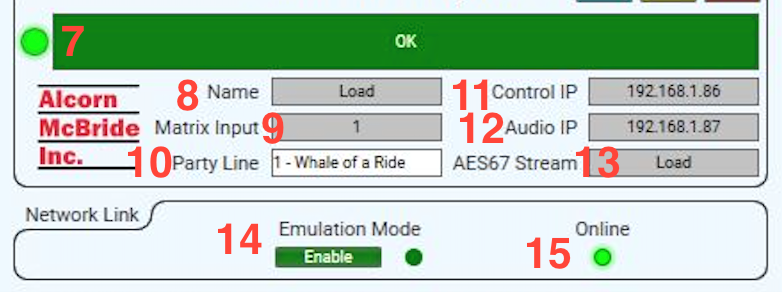
- Title Bar: Basic plugin information. A quick glance at the station type, matrix input number, and control IP address.
- Firmware: V-Com firmware version.
- Plugin: V-Com Plugin version.
- Link: Use this button to associate a V-Com with the plugin component (refer to the Connecting V-Com to Q-SYS section below).
- ID: Pressing the Link button will make the indicators of the V-Com station blink momentarily
-
Reboot: soft reboot the V-Com.
-
Status Bar: V-Com connection status:
- Red: disconnected
- Green: connected
- Will also indicate if you have a firmware/plugin mismatch
- Name: Allows naming the V-Com a unique name to differentiate from other V-Coms.
- Matrix Input: Matrix input corresponding to the V-Com number on the Intercom Matrix Router.
- Party Line: Assigns the station to a Party Line, also referred as “Home Party Line”.
- Control IP Address: The IP address of the V-Com.
- Audio IP Address: The IP address of the audio stream.
- Audio Stream Name: The type of digital audio stream used (Dante or AES67).
- Emulation Mode: Allows the plugin and V-Com to be used without a core for programing purposes.
-
Online: Indicator for when the V-Com is connected to the Core.
-
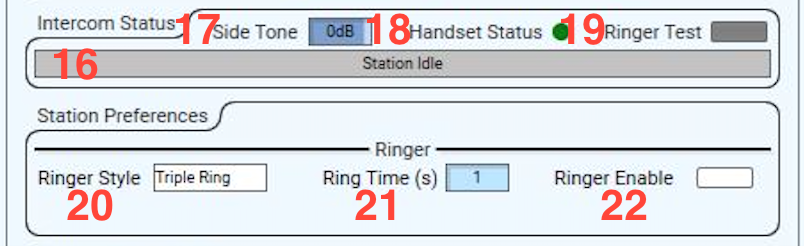
Intercom Status Bar: Indicates whether the V-Com is idle or currently in use.
- Side Tone: Set the audible level of the V-Com's microphone sent back to itself.
- Handset Status:
- On: handset is off the hook
- Off: handset is on hook
- Ringer Test: Activates the Sonalert ringer on the V-Com. Duration and style is based on selected ringer settings.
- Ringer Style: The V-Com's ring behavior when called:
- “Continuous”
- “Double Ring”
- “Triple Ring”
- Ring Time: Duration of ring (in seconds) when V-Com is called.
-
Ringer Enable: Enables or disables the V-Com’s Sonalert ringer.
-
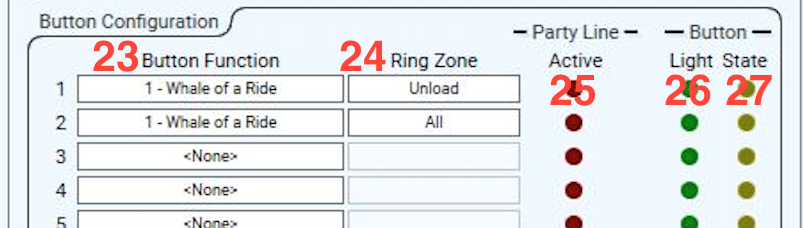
Button Function:
- None: No function assigned.
- Party Line Select: Select from the drop-down menu which Party Line you what to be on when the station’s button is pressed. Party Lines are configured through the Intercom Matrix Plugin.
- Break Away Toggle: When pressed, the control pin “LED” will toggle states. ON, OFF (01), (10). This can be used to interface to other control pins within Q-Sys like mute functions. In this mode, the button LED will represent the state of the ‘State LED’ control pin.
- Break Away Momentary: This is like the toggle mode except that the control pin “State LED” will momentarily pulse to a value of 1 and then go back to 0. In this mode, the V-Com button LED can be manually controlled using the control pin “Input LED”.
- Ring Zone: Select from the drop-down menu what stations will ring when the button is called. Stations are assigned to Ring Zones through the Intercom Matrix Plugin.
- Active: LED will light up when the Party Line is in use.
- Button Light: Will replicate the current condition of the button. In Breakaway mode, the LED is controlled by the “Light Input” Control pin.
- Button State:
- Break Away Toggle: When pressed, the control pin “LED” will toggle states. ON, OFF (01), (10). This can be used to interface to other control pins within Q-sys like mute functions. In this mode, the button LED will represent the state of the ‘State LED’ control pin.
- Break Away Momentary: This is like the toggle mode except that the control pin “State LED” will momentarily pulse to a value of 1 and then go back to 0. In this mode, the V-Com button LED can be manually controlled using the control pin “Input LED”.
Connecting V-Com to Q-SYS
Your Q-SYS design must contain at least the following elements for your V-Page to work:
- One instance of the V-Com Station plugin for each physical V-Com
- V-Com Intercom Matrix plugin
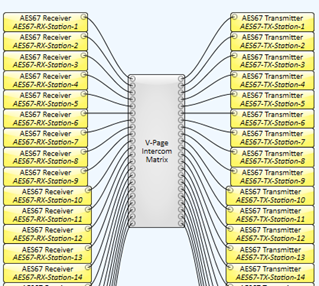
- your audio receiver(s) and transmitter(s)
A V-Com can transmit a single digital audio signal via Dante and AES67 stream.
Once your design is ready to be tested, “Save to Core and Run”. With your V-Com powered on and the zone buttons blinking, press and hold inputs 1, 2, and 4 until a continuous scan sequence starts on your V-Com. If you do not have inputs 1, 2, and 4 wired to buttons, you may instead put your V-Com into Link Mode using the ‘Link’ DIP switch. More information about Link Mode can be found in the DIP Switch 1: Link Mode section.
Congrats! Your V-Com control has been set and you should be able to test your control functions.
Adding Previously Programmed V-Pages to a New Design
If you need to reprogram a V-Com, toggle DIP Switch 2 to the “On” then “Off” position. This will reset the station into Factory Default Mode.