Getting Started
Alright, time to roll up your sleeves and get to work! This section will guide you through basic concepts that will help you get on your way with ShowTouch.

Power
Plug in the power adapter included with your ShowTouch, and then connect it to the corresponding power connector. ShowTouch will turn on Automatically.
Ethernet
ShowTouch must be connected via Ethernet to your show controller or show control network. The Ethernet connector is located on the side of the panel. You may configure the connection settings from within the ShowTouch interface (see “Changing the Network Settings”).
This completes the setup of the ShowTouch hardware. After the hardware completes its startup routine, you will be presented with an on-screen tutorial. You may step through the tutorial now or proceed immediately to the Control Panel by touching the button labeled “Finish”.
ShowTouch Software
Once your ShowTouch hardware is powered on and networked to your show controller, you should see the ShowTouch Viewer - Main Menu as shown in Figure 2.
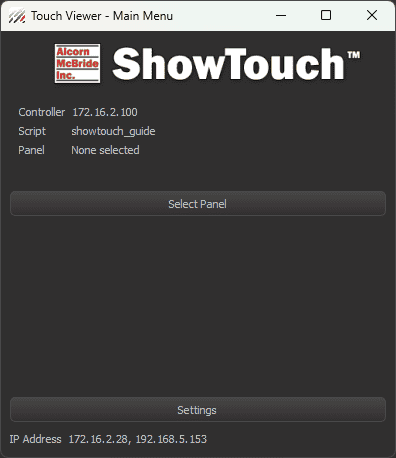
This menu displays some information:
- Controller: displays the IP address of the connected show controller
- Script: displays the name of the script loaded on the connected show controller
- Panel: displays the name of the currently selected panel to run
- Run automatically Checkbox: check this box to run the above panel automatically upon ShowTouch startup (checkbox only appears once panel has been selected)
This menu also provides some options:
- Run Now: Run the current panel from the Script of the Show Controller (only appears once panel has been selected)
- Select Panel: Select a panel to run from the Script that is uploaded to the Show Controller
- Settings: Configure the Settings of ShowTouch
To choose a Panel to display, click the Select Panel button.
Select Panel
Click the Select Panel button to display the Controller page as shown in Figure 3. This window lists all available show controllers from which to load a panel.
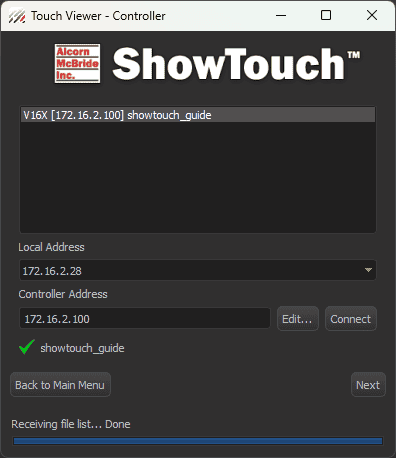
- Available Show Controllers List: At the top of the menu is a list of all the discoverable show controllers
- Local Address: displays the address of the device running ShowTouch
- Controller Address: displays the address of the show controller that is highlighted in the list
- Edit: Allows the user to modify the show controller IP address if the show controller cannot be found
- Connect: Connects ShowTouch to the selected show controller
- Status: A green check mark will appear with the script name if the script has been successfully uploaded. A red “X” will appear and text stating “Could not get Script name” if ShowTouch fails to connect.
- Back to Main Menu: Returns to the previous menu
Click Next to display the panel page as shown in Figure 4. This window lists all available panel on the selected show controller.
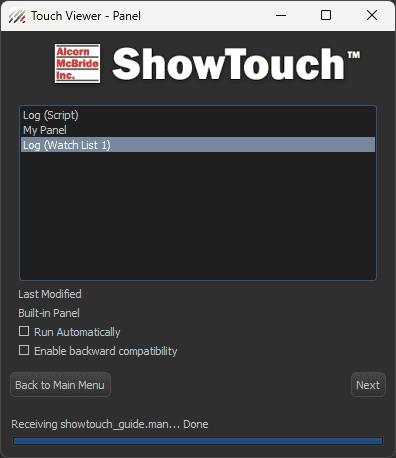
The page lists all of the panels on the selected show controller that can be run.
- Last Modified: Displays the time and date for when the panel was last modified. Will list "Built-in Panel" if the panel is a default panel.
- Run Automatically: Checking this checkbox will set the panel to run automatically when the ShowTouch hardware turns on.
- Enable backward compatibility: Checking this checkbox will enable backward compatibility.
Click Next to load the Panel.
Info
To exit a panel, long press anywhere on the the panel on the physical panel hardware. It will display the Main Menu.
Settings
Click the Settings button to display the Settings page as shown in Figure 5.
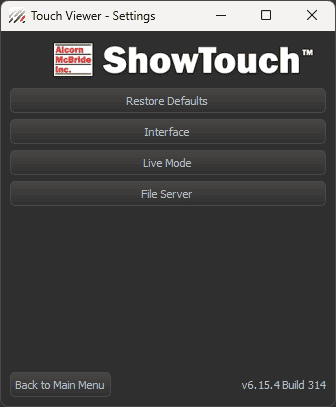
Restore Defaults
Click the Restore Defaults button to restore the ShowTouch software settings back to the default settings after a confirmation.
Interface
Click the Interface button to display the Interface page as shown in Figure 6.
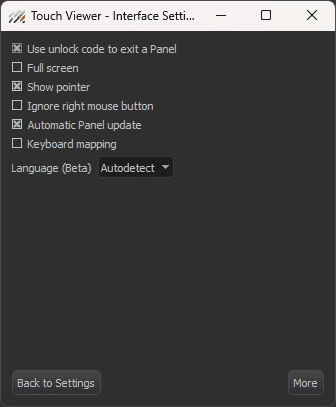
The Interface page displays a list of settings for the panel.
- Use unlock code to exit a Panel: When checked, the panel cannot be closed unless an unlock code is entered.
- Full screen: When checked, the panel will enter full screen mode.
- Show pointer: When checked, the panel shows the mouse pointer on the screen.
- Ignore right mouse button: When checked, ignores right mouse button click.
- Automatic Panel update: When checked, ShowTouch will automatically update the panel if it has been changed from the show controller.
- Keyboard mapping: When checked, allows keyboard keys programmed to panel buttons to be used. Keyboard keys can be programmed to specific actions on the panel using WinScript.
- Language (Beta): For now, the only option for this is "Autodetect".
Click the More button to display the More page as shown in Figure 7.
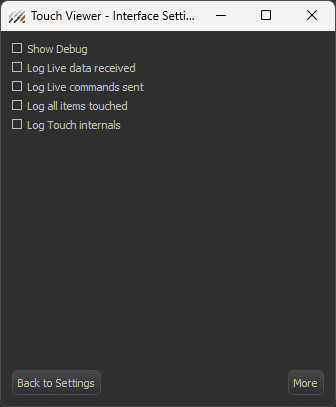
The More page displays a few more settings:
- Show Debug: when checked, shows all debug status.
- Log Live data received: when checked, logs all live data received.
- Log Live commands sent: when checked, logs all live commands sent.
- Log All items touched: when checked, logs all items interacted with.
- Log Touch internals: when checked, logs all Touch interal status and commands.
Note
These settings are typically used for debugging a misbehaving panel, and should not be needed to be used in regular operation.
Click the More button to return again to the previous page.
Live Mode
Click the Live Mode button to display the Live Mode page as shown in Figure 8.
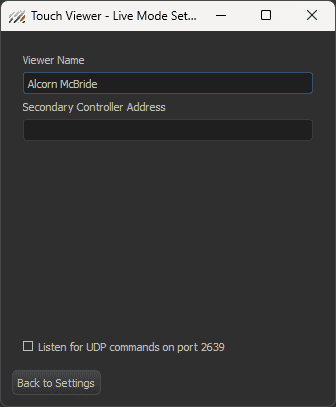
- Viewer Name: Name of the ShowTouch.
- Secondary Controller Address: If a second show controller is being used in Redundant Mode, the address of the second controller can be set here (only available in versions of WinScript Live before 6.0.0)
- Listen for UDP commands on port 2639: when checked, ShowTouch will listen for UDP commands on port 2639.
ShowTouch Hardware
ShowTouch Software running on our ShowTouch hardware has many of the same settings outlined above, but with a few more options, which are listed below.
Calibrate Touch Screen
Clicking this button will open a window called "PenMount Control Panel." Click OK to start calibration of the touch screen. After a few seconds, the ShowTouch software should display again.
Update Software
This setting will allow you to update the software and firmware of the ShowTouch hardware as shown in the following section.
Update Firmware
If necessary, the ShowTouch firmware can be updated by either sending the Firmware update from the Show Controller to ShowTouch through WinScript Live, or by downloading the firmware from the Alcorn McBride Inc. website and transferring it to ShowTouch using a USB drive.
Step-by-step tutorials for both methods are given below.
Using WinScript Live
- In WinScript Live, go to “Help > Update Panel Firmware”. The Update ShowTouch Firmware dialog box will appear as shown in Figure 9.
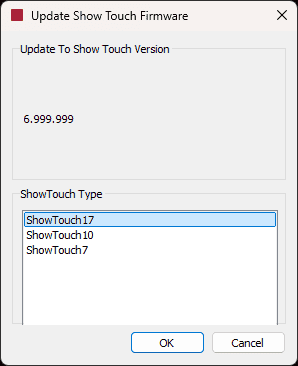
Figure 9 Update ShowTouch Firmware Dialog Box - Select which size ShowTouch you are updating, and click OK. This will open the Connection Manager dialog box.
- Select the show controller to transfer the firmware to.
- Click "Connect in Live Mode" to begin sending the firmware to the ShowTouch.
- Go to the physical ShowTouch unit and navigate to the Settings menu.
- Once there, select “Update Software” to retrieve the firmware from the controller.
Using USB Drive
- Download the latest firmware by navigating to our website.
- Save the file to a USB drive and then plug the USB drive into one of the USB ports on the ShowTouch.
- On the main menu of ShowTouch, click Exit in the bottom right corner of the screen.
- Then click Update and select the corresponding file from the USB drive.