Product File Creator
To simplify the product file creation process, we've developed our own software called Product File Creator. Product File Creator is an easy to use interface for creating and editing product files and comes free bundled with WinScript Live. You can use this tool to completely write a Product File, or to start a Product File to later edit by hand.
Warning
If you use Product File Creator to start a product file, and then later edit the product file by hand, you will no longer be able to use Product File Creator to edit the product file.
Getting Started
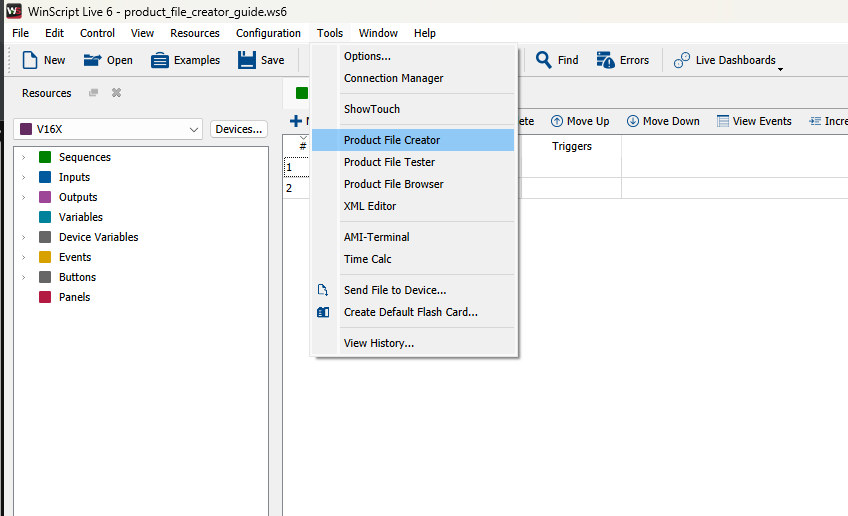
Product File Creator can be found under the Tools menu of WinScript Live.
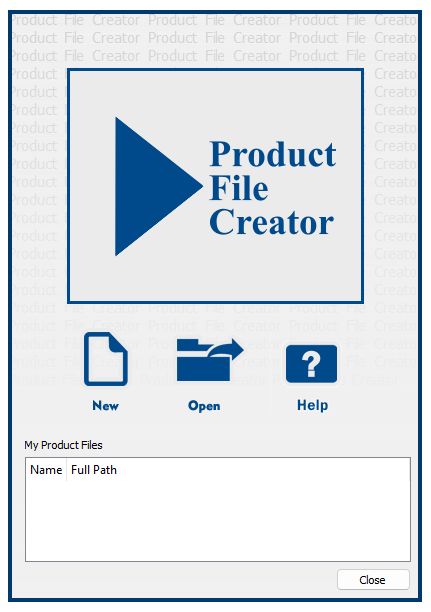
When launching Product File Creator, you will be presented with a splash screen allowing you to create a new product file or open an existing one. By default, all new Product Files created by Product File Creator are stored in "..\Documents\Alcorn McBride Inc\WinScriptLive 6\My Product Files" on your computer. For convenience, a list at the bottom of the window also shows all compatible files stored in this default directory.
Note
As a best practice, when adding information in the tool it's best to limit the user to entering only information that can be interpreted correctly by the product. For instance, if the device cannot communicate using MIDI, don't give users the option to select this as an interface during instantiation. This will keep product files clean and limit programming errors.
Device Information
When you first open Product File Creator, you will see the Product File Creator dialog box, open to the Device Information tab. This tab is where you will enter information about the product for which you are making the product file. This info is what WinScript Live will use to identify and differentiate between different product files.
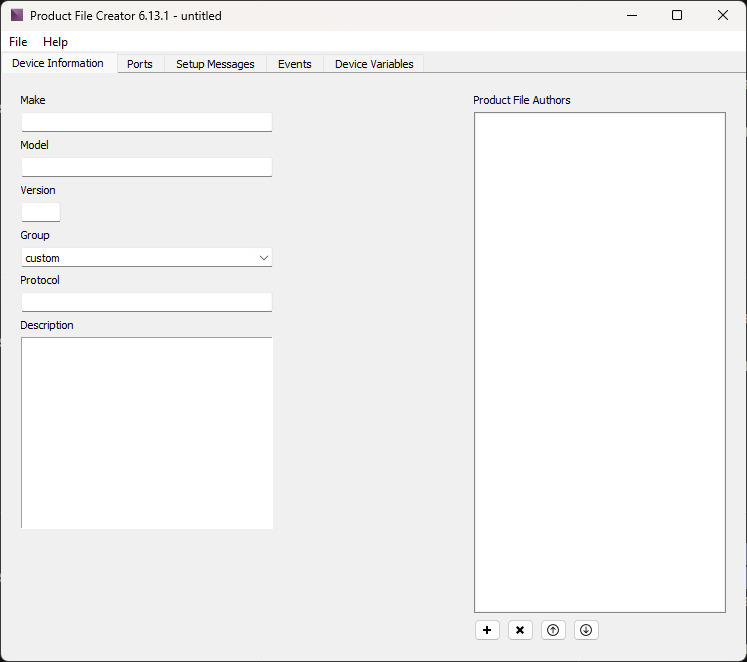
Make, Model and Group
In the Make field, enter the product manufacturer. In the Model field, enter the name of the product. In the Group field, select whichever device type for which you are creating your Product File. The Group field is mainly used for grouping events on a timelines: by default, events are sorted into groups according to this Group field.
Version
In the Version field, enter a number you want to designate as the version of this product file. The version number is used to differentiate between different versions of a particular product file. This number does not update itself atuomatically so be sure to update it every time you want to update the product file.
We suggest a default numbering of X.0 versions for major versions, with 0.X used for minor revisions.
Protocol, Description, and Product File Authors
The Protocol, Description and Product File Authors fields are only used as information about the product file. You can realistically enter any information into these fields, but it's probably best to use these to give users more information about the device.
Ports
The Ports tab is where you define which ports and protocols over which your device will communicate.
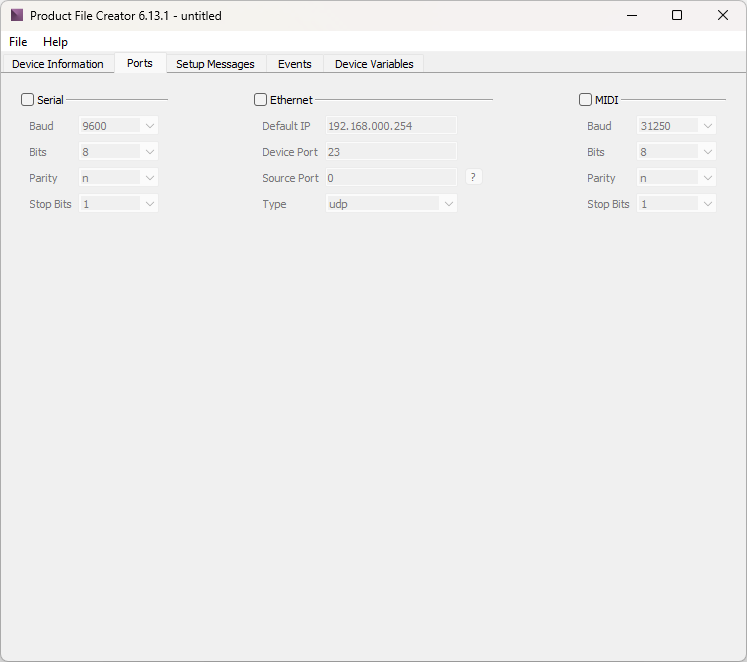
For each port you wish your device to use, check the box next to the port name. Once checked, the additional options for each port will become editable. The ports available for your device to use to communicate are Serial, Ethernet, and MIDI.
Serial
- Baud: set the baud rate to use from 1200, 2400, 4800, 9600, 19200, 38400, 57600, or 115200 (default 9600)
- Bits: set the number of data bits to use from 7, 8, or 9 (default 8)
- Parity: set the parity to use from n (none), even, odd, low, or high (default n (none))
- Stop Bits: set the number of stop bits to use from 1 or 2 (default 1)
Ethernet
- Default IP*: set the default IP address of the device (default 192.168.0.254)
- Device Port*: set the device port (default 23)
- Source Port: set the port where the device will recieve incoming messages. Enter 0 for a random port to be selected at run time (default 0)
- Type: set the type of the ethernet connection from udp, tcp_client, tcp_server, tcp/telnet (tcp_client and tcp_server are from the perspective of this device)(default udp)
Note
* The device IP and device port number can be changed once an instance of the device is instantiated in a script. Setting those options in this dialog only sets the defaults.
MIDI
- Baud: set the baud rate to use (default 9600)
- Bits: set the number of data bits to use (default 8)
- Parity: set the parity to use (default n (none))
- Stop Bits: set the number of stop bits to use (default 1)
Note
All MIDI options have only one option to select from as defined by the MIDI specification.
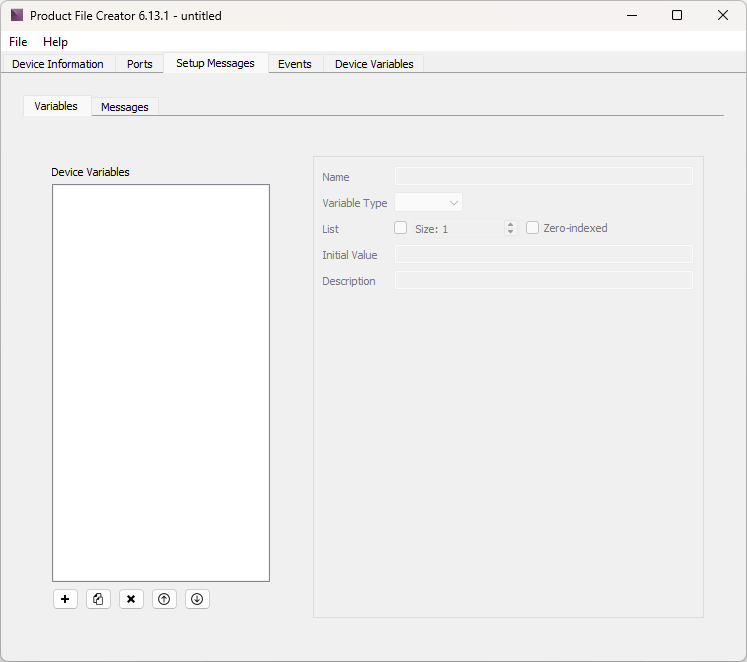
Setup Messages
The Setup Messages tab is used to define any messages that need to be sent or received to successfully configure communication with a show controller. There are two tabs: Variables and Messages.
Note
The Variables in the Variables tab of the Setup Messages tab are not the same as the Device Variables defined on the Device Variables tab. The variables used here are only used when sending or receiving Setup Messages.
Variables
This is where you define variables used in setup messages.
The white area lists all the variables already defined. Beneath this area are options to Add New Variable (➕), Duplicate Variable (📄), Delete Current Variable (✖️), Move Variable Up (⬆️), and Move Variable Down (⬇️).
Clicking the Add New Variable (➕) button adds a new variable to the list. Selecting this variable enables you to define the parameters of this variable:
- Name: set the name of the variable
- Variable Type: set the type from integer, decimal, string, bool, datetime, timecode, or percent
- List: check this box to set this variable to be a list, set the size (default 1), and check the box next to Zero-indexed if you want the list to start at 0 (as opposed to 1)
- Initial Value: set the value which the variable takes intially
- Description: write a description to help in using this variable
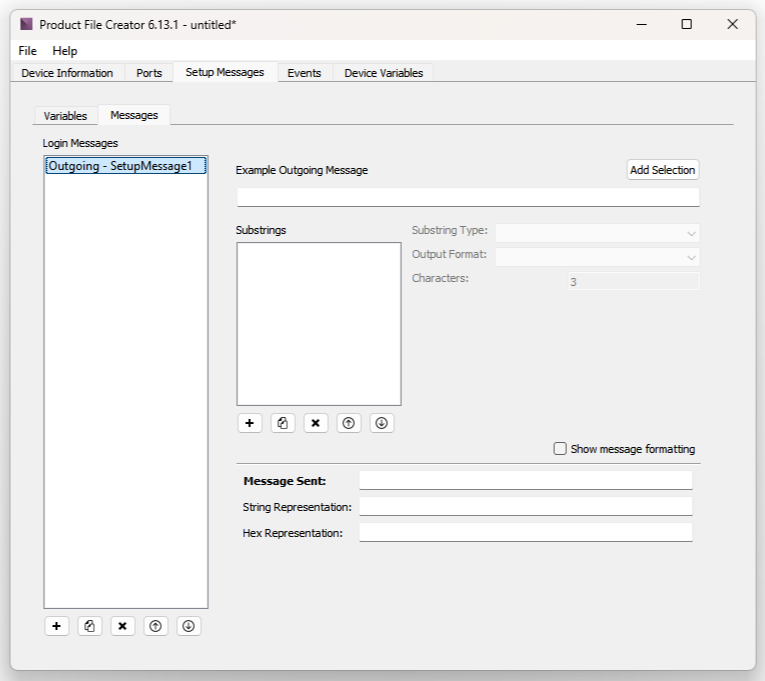
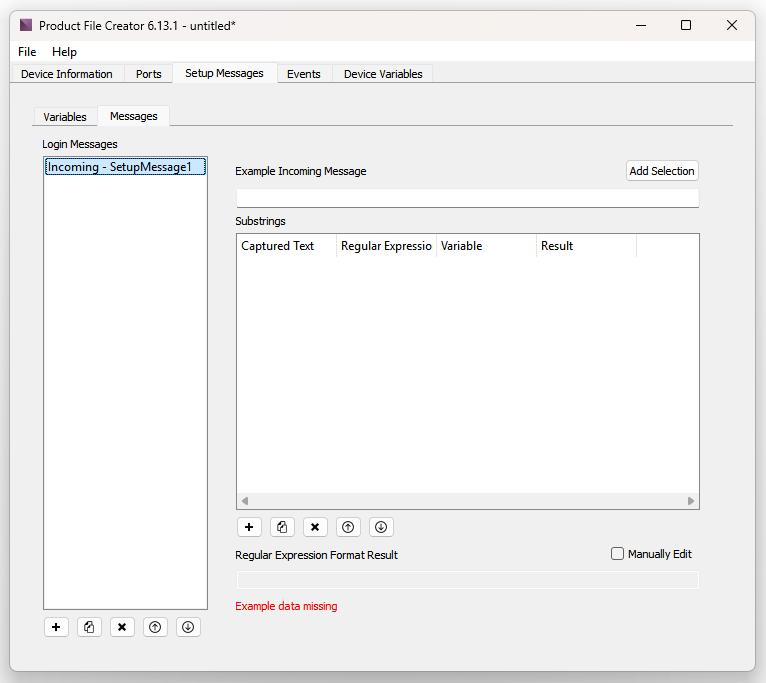
Messages
This tab is where you use the variables created above to develop Outgoing and Incoming setup messages.
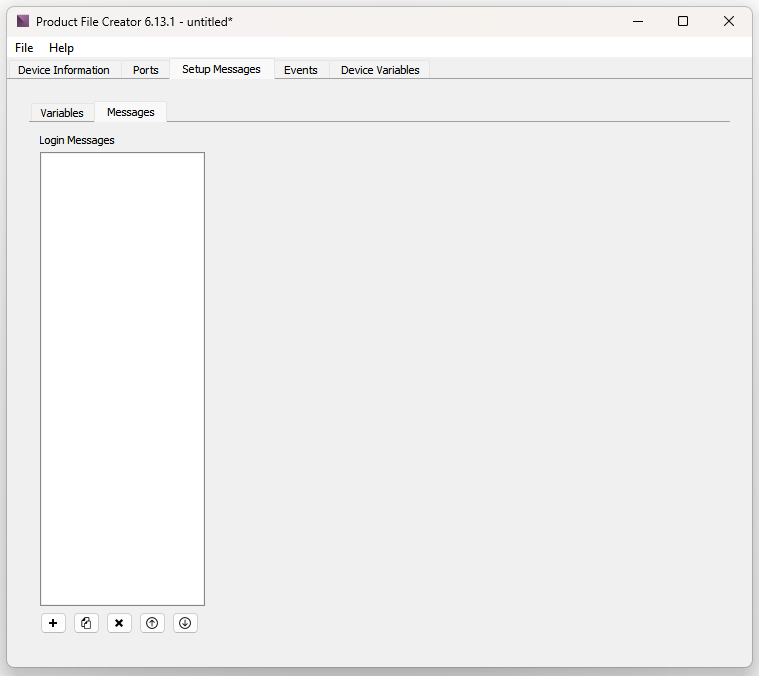
The white area lists all the variables already defined. Beneath this area are options to Add New Message (➕), Duplicate Message (📄), Delete Current Message (✖️), Move Message Up (⬆️), and Move Message Down (⬇️).
Clicking the Add New Message button opens the Add Setup Message dialog box.
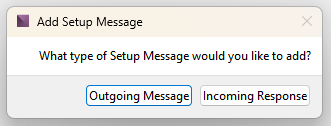
From here, you can add either an Outgoing Message or an Incoming Response.
Adding an Outgoing Setup Message presents the following options.
Adding an Incoming Setup Message presents the following options.
All options for both Outgoing and Incoming messages are described in the Sent Message and the Incoming Response sections below.
Device Variables
The Device Variables tab is used to define variables that can be used by the product file and in WinScript Live. To learn more about device variables please see this article.
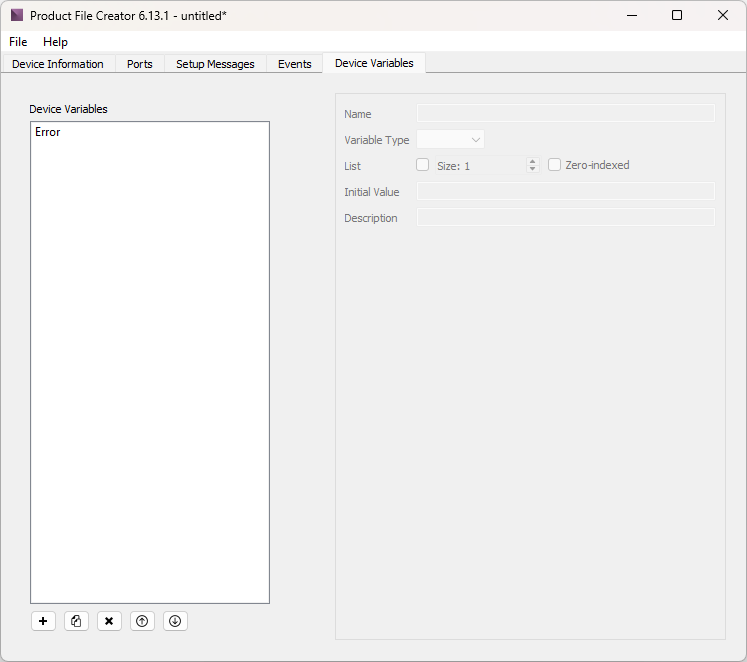
The white area lists all the device variables already defined. Beneath this area are options to Add New Variable (➕), Duplicate Variable (📄), Delete Current Variable (✖️), Move Variable Up (⬆️), and Move Variable Down (⬇️).
By default, a device variable called Error of type bool is already defined.
Once a device variable has been created, the options for that variable become editable:
- Name: set the name of the variable
- Variable Type: set the type from integer, decimal, string, bool, datetime, timecode, or percent
- List: check this box to set this variable to be a list, set the size (default 1), and check the box next to Zero-indexed if you want the list to start at 0 (as opposed to 1)
- Initial Value: set the value which the variable takes intially
- Description: write a description to help in using this variable
Events
The Events tab is used to add the custom events a device can execute. These custom events show up in as Event resources in WinScript Live when specifying which action you want the device to perform.
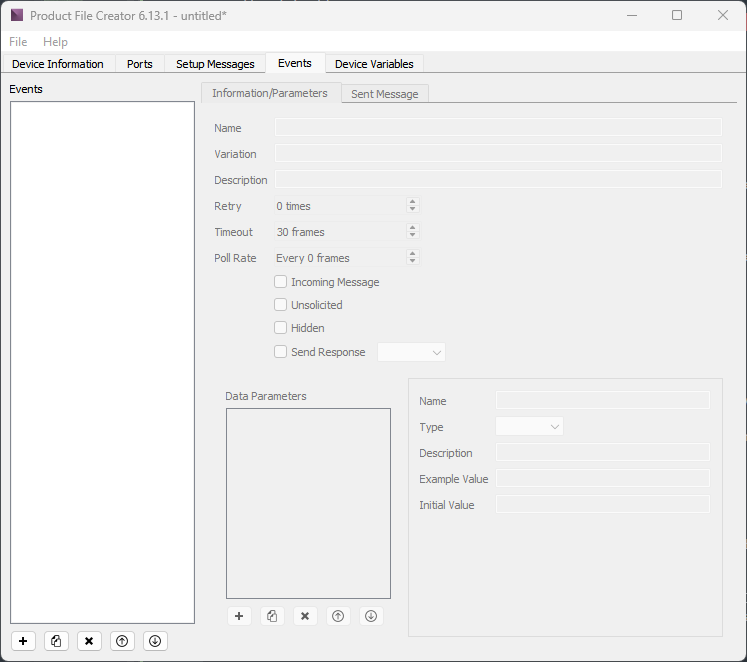
The white area lists all the events already defined. Beneath this area are options to Add New Event (➕), Duplicate Event (📄), Delete Current Event (✖️), Move Event Up (⬆️), and Move Event Down (⬇️).
Information/Parameters
This tab is used to set the basic information for the event.
Information
- Name: set the name of the event
- Variation: set the name of the variation for the event if multiple versions of the event are needed
- Description: set a description of the event to help users as they step through the event wizard in WinScript Live
- Retry: set how many times the product file will attempt to send the sent message after a first failed attempt (default 0)
- Timeout: set how long the product file should wait in between retry attempts (default 30 frames)
- Poll Rate: if you're making a command that's designed to poll the value of some device variable there's an add polling sequence option in Winscript's device variables view that will automatically generate a new sequence that executes to command at the specified rate. (default Every 0 frames)
- Incoming Message: check this box to set your product file to expect a response message for any outgoing messages to ensure the outgoing message was sent and received correctly. Checking this box causses the Incoming Response tab to appear, which is where you define the incoming message. Unchecking this box causes the Incoming Response tab to disappear (default checked)
- Unsolicited: check this box if you want your event to occur whenever a recieved message matches the regular expression written for the event without the show controller initiating the transaction. Checking this box causes the Outgoing Message tab to disappear (default unchecked)
- Hidden: check this box if you want this event to be unselectable to the user when creating a sequence in WinScript Live. This option is usually used in conjunction with the unsolicited check box because if an event is unsolicited there would never be a reason you'd want to run the event from a sequence (default unchecked)
- Send Response: check this box to tell the controller to send out a different event's outgoing message after receiving this events incoming message. For example if we received message A from the external device, respond to it with message B from our product files events (default unchecked)
Data Parameters
The Data Parameters section is where you'll create event parameters that then can be used in the outgoing message tab and has a similar configuration as the Events section above it. These parameters show up in WinScript Live as you're adding the event in a sequence. Think of this as a type of variable you are asking the WinScript user to fill in to customize your outgoing message.
The white area lists all the parameters already defined. Beneath this area are options to Add New Parameter (➕), Duplicate Parameter (📄), Delete Current Parameter (✖️), Move Parameter Up (⬆️), and Move Parameter Down (⬇️).
- Name: set the name of the parameter
- Type: set the type from integer, decimal, string, bool, datetime, timecode, percent or option. Setting any option here will populate the Example Value and the Initial Value fields with default data.
- Integer or decimal: setting this to interger or decimal will display fields for Minimum and Maximum value this parameter can take
- String: setting this to string will display a String regexp (optional) field
- Option: setting this to option will allow you to define a list of options that the user can select when creating this event. Choosing option will display a new button below the other options. Clicking this button will open the Parameter Options dialog box. This dialog box has a similar to configuration, with an Add New Option (➕), Duplicate Option (📄), and Delete Current Option (✖️). Creating an option here will allow you to name it using the Match field, and populating the Replace (optional) field will allow you to choose a different name to be used by the device behind the scenes.
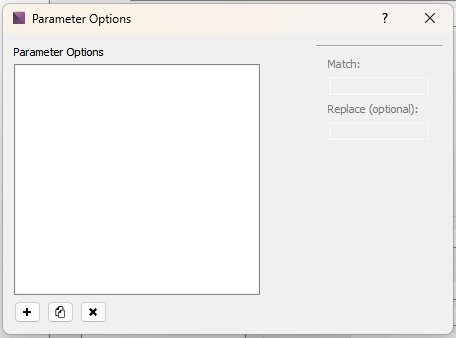
Figure 12 Parameter Options Dialog Box
- Description: write a description to help in using this parameter
- Example Value: set the value which the variable takes intially
- Initial Value: set the value which the parameter takes intially
Sent Message
The Sent Message tab is used to define the message that is sent when the event is executed. Some of these messages are complicated combinations of Device Variables, data parameters, and even unprintable characters. For this reason, the Sent Message tab allows you to build a message as a combination of substrings.
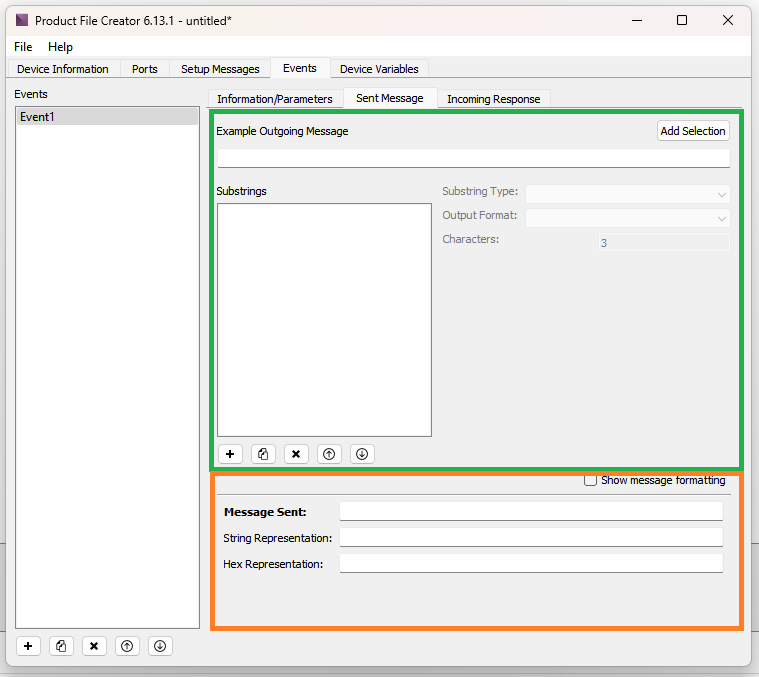
The Sent Message tab is composed of two sections:
- Compose (in green area above): here you can use the Example Outgoing Message field and the Substrings section to compose the outgoing message
- Resulting Message (in orange above): this section displays how the resulting outgoing message will appear
Once you have created your substrings, you can use the Add Selection button to add them to the Message Sent.
Substrings
Substrings are a way to easily build a message from text, constants, variables, and other values. You can create substrings in two different ways. The first way is to use the Example Outgoing Message field at the top of this section. You can use this field and the Add Selection Button to type and directly add whatever string you type as a Substring.
Below this is a different way to create Substrings. The white area lists all the parameters already defined. Beneath this area are options to Add Substring Parameter (➕), Duplicate Substring (📄), Delete Current Substring (✖️), Move Substring Up (⬆️), and Move Substring Down (⬇️).
In either case, the substrings can be of type Parameter, Variable, Local, Constant or Checksum. Creating a new substring gives the following options, depending on the type of substring created.
Parameter
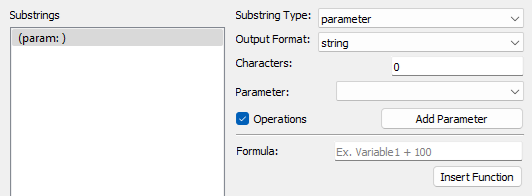
- Output Format: set the format of the parameter output from string, ascii integer, ascii decimal, ascii hex, ascii hex (uppercase), value, or none (default is string)
- Characters: set the number of characters for your parameter
- Parameter: dropdown select for any available parameters
- Add Parameter button: clicking this button will show the Add Parameter dialog box, where you can set the name, type, description, example value, and intial value of the parameter
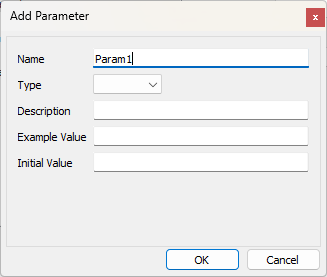
Figure 15 Add Parameter Dialog Box - Operations check box: checking this box will reveal a Formula field, were you can define a formula for your parameter using simple or complex functions. Clicking the Insert Function button opens the Insert Function dialog box. The list of operations are listed in Operations.
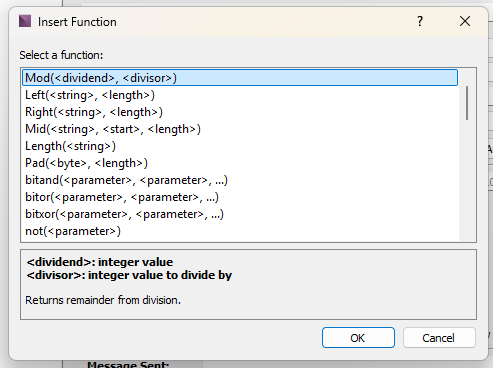
Figure 16 Insert Function Dialog Box
Variable
- Output Format: set the format of the variable output from string, ascii integer, ascii decimal, ascii hex, ascii hex (uppercase), value, or none (default is string)
- Characters: set the number of characters for your variable
- Variable: dropdown select for any available variables
- Add Parameter button: clicking this button will show the Add Parameter dialog box, where you can set the name, type, description, example value, and intial value of the parameter
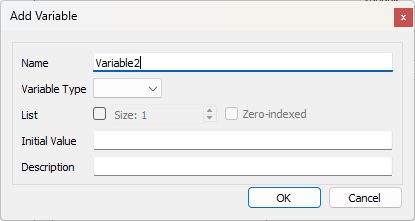
Figure 18 Add Variable Dialog Box
Local
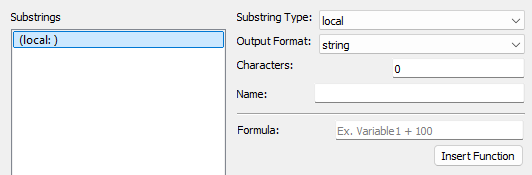
- Output Format: set the format of the local output from string, ascii integer, ascii decimal, ascii hex, ascii hex (uppercase), value, or none (default is string)
- Characters: set the number of characters for your local
- Name: name your local substring
- Formula: define a formula for your local using simple or complex functions. Clicking the Insert Function button opens the Insert Function dialog box. The list of operations are listed in Operations.
Constant
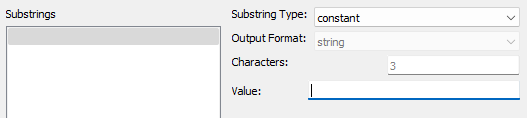
- Output Format: constants can only be strings
- Characters: set the number of characters for your constant
- Value: set the value of the constant
Checksum
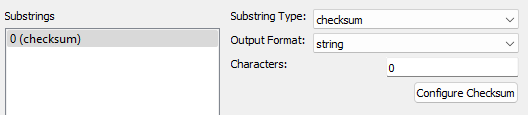
- Output Format: set the format of the checksum output from string, ascii integer, ascii decimal, ascii hex, ascii hex (uppercase), value, or none (default is string)
- Characters: set the number of characters for your constant
- Configure Checksum button: clicking this button opens the Configure Checksum dialog box.
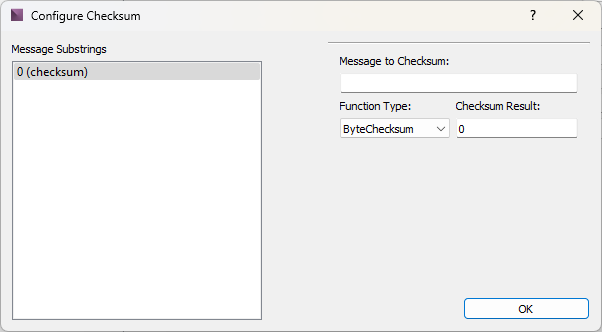
Figure 22 Configure Checksum Dialog Box - Message Substrings: lists all the substrings already defined to select from
- Message to Checksum: shows the selected substring for which to calculate the checksum
- Function Type: set the function type from Checksum, ByteChecksum, AMINetChecksum, BCC, XOR, MD5, or Length (default Checksum)
- Checksum Result: resulting checksum
Operations
List of Operations:
- Mod (dividend, divisor): returns remainder from division
- dividend: integer value
- divisor: integer value to divide by
- Left (string, length): returns the first (or leftmost) character or characters in a text string.
- length: number of characters to return
- Right (string, length): returns the last (or rightmost) character in a text string
- length: number of characters to return
- Mid (string, start, length): returns a specific number of characters from a text string starting at the specified position
- start: the zero-indexed starting point
- length: number
- Length (string): returns the number of characters in a text string
- Pad (byte, length): Returns a string consisting of byte repeated length times
- byte: integer or hex byte to duplicate
- length: total length of string
- bitand (parameter, parameter...): returns the bitwise "and" of all the parameters.
- parameter: parameter name or integer value
- bitor (parameter, parameter...): returns the bitwise "or" of all the parameters.
- parameter: parameter name or integer value
- bitxor (parameter, parameter...): returns the bitwise "xor" of all the parameters.
- parameter: parameter name or integer value
- not (parameter): Returns the inverse of a logical argument.
- parameter: logical argument
- compl (parameter): Returns the bitwise complement of a value.
- parameter: parameter name or integer value
- atoi (string): Converts ASCII text to an integer and returns the numerical value.
- string: an ASCII string such as "1234"
- btoi (string, length): Converts a big-endian string into an integer and returns the numerical value.
- string: a big-endian sequence of up to four bytes
- length: the length of the byte sequence
- ltoi (string, length): Converts a little-endian string into an integer and returns the numerical value.
- string: a little-endian sequence of up to four bytes
- length: the length of the byte sequence
- ByteChecksum (parameter): Returns the least significant byte of the checksum for all of the characters in the parameter.
- parameter: a string of ASCII characters or other bytes
- Checksum (parameter): Returns a bytewise checksum (up for four bytes in size) for all of the characters in the parameter.
- parameter: a string of ASCII characters or other bytes
- AMINetChecksum (parameter): Returns an AMI Net checksum for all of the characters in the parameter.
- parameter: a string of ASCII characters or other bytes
- MD5 (string): Returns the 32-byte MD5 sum for string.
- string: a string of charactersof any length
- BCC (string): Returns the one-byte BCC checksum (the result of XORing all individual bytes) for string
- string: a string of charactersof any length
- XOR (string): Returns the one-byte XOR checksum (the result of XORing all individual bytes) for string
- string: a string of charactersof any length
- LSB (integer): Returns the least significant byte of integer.
- integer: a four-byte integer value or variable
- MSB (integer): Returns the most significant byte of integer.
- integer: a four-byte integer value or variable
- GetByte (integer, index): Returns a single byte within integer.
- integer: a four-byte integer value or variable
- index: the index of a single byte (1 = least significant, 4 = most significant)
- Byte (integer): Returns the least significant byte of integer.
- integer: an integer of up to four bytes
- Word (integer): Returns the two least significant bytes of integer.
- integer: an integer of up to four bytes
- sprintf (format, param, param, ...): Returns a formatted string with the parameters substituted as needed. The following placeholders are supported:
- %s: string print
- %d: integer print
- %f: decimal print
- %x: hex print
- %p: vaue print (for non-ASCII values)
- format: a C-style format string
- param: a string, integer, or floating-point value
- Hours (timecode): Returns an integer representing the hours portion of the timecode.
- a string timecode or parameter in the format 00:00:00:00.01
- Minutes (timecode): Returns an integer representing the minutes portion of the timecode.
- a string timecode or parameter in the format 00:00:00:00.01
- Seconds (timecode): Returns an integer representing the seconds portion of the timecode.
- a string timecode or parameter in the format 00:00:00:00.01
- Frames (timecode): Returns an integer representing the frames portion of the timecode.
- a string timecode or parameter in the format 00:00:00:00.01
- TotalFrames (timecode): Returns an integer representing the total amount of frames equivalent to the timecode.
- a string timecode of parameter in the format 00:00:00:00.01
- BER (string): Returns the binary string neeeded for outgoing messages such as SNMP.
- string: an Object ID string in the form "1.3.6.1.2.3.5.4.45.4"
- Replace (string, find, replace): Returns a string with each instance of "find" in string replaced with replace. Spaces are required between parameters when using this function.
- ScanList (value, length, list variable, size, endian): Takes a stream of data (ie: 00239102) and parses words (or bytes) of data into a list (array) WinScript Live variable. ie: for ScanArray(00239102, 4, myList, 2 "little") the result would be: myList[0]=00, myList[1]=23, myList[2]=91, myList[3]=02
- value: value to parse and store
- length: total length to store
- list variable: destination list (array) variable
- size: number of bytes per array element
- endian: either "big" or "little" in quotes
- PrintList (length, list variable, size, endian): Outputs a stream data (not ASCII) using a list (array) WinScript Live variable.
- length: total length to print
- list variable: list (array) variable
- size: number of butes per array element
- endian: either "big" or "little" in quotes
- GetAt (list variable, index): Returns the value of a particular position in a list (array) WinScript Live variable.
- list variable: list
- index: position in list
- SetAt (list variable, index, value): Sets the value of a particular position in a list (array) WinScript Live variable.
- list variable: list to set
- index: position in list
- value: value to set
- If (logical test, value if true, value if false): Returns one of the two values based on the results of a logical test. This statement can be nested, ie: if (myVar=1, "varIsOne", if (myVar=2, "varIsTwo", 'unknown'))
- logical test: test statment such as 'myVar = "1"'
- CRC16ARC (data): Returns the 16-bit CRC of the data using CRC-16/ARC.
- data to calculate the CRC-16/ARC checksum of
- CRC16BUYPASS (data): Returns the 16-bit CRC of the data using CRC-16/Buypass.
- data to calculate the CRC-16/Buypass checksum of
Message Sent
The Message Sent section shows the message that is composed with the above substrings.
- Message Sent: shows the message that will be sent when this event is executed
- String Representation: shows a string representation of the message sent
- Hex Representation: shows a hex representation of the message sent
- Show message formatting checkbox: checking this checkbox reveals the actual function that sends the message (sprintf) along with the argument it's sending (the message). Clicking the Manual Edit button allows you to directly edit the sprintf command arguments.

Figure 23 Show Message Formatting and Manual Edit
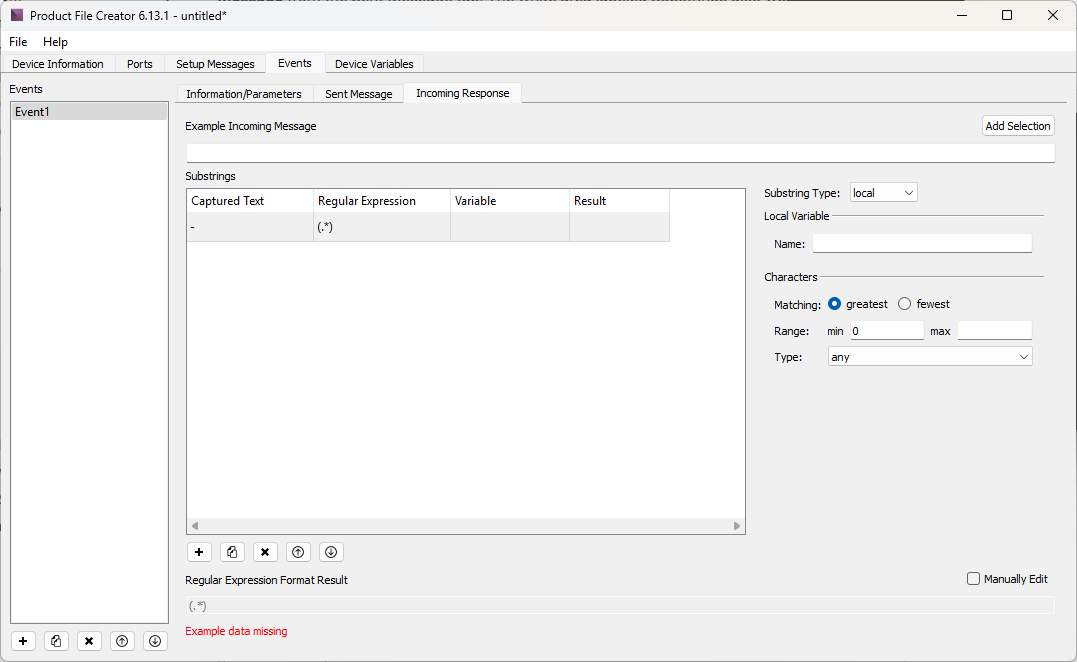
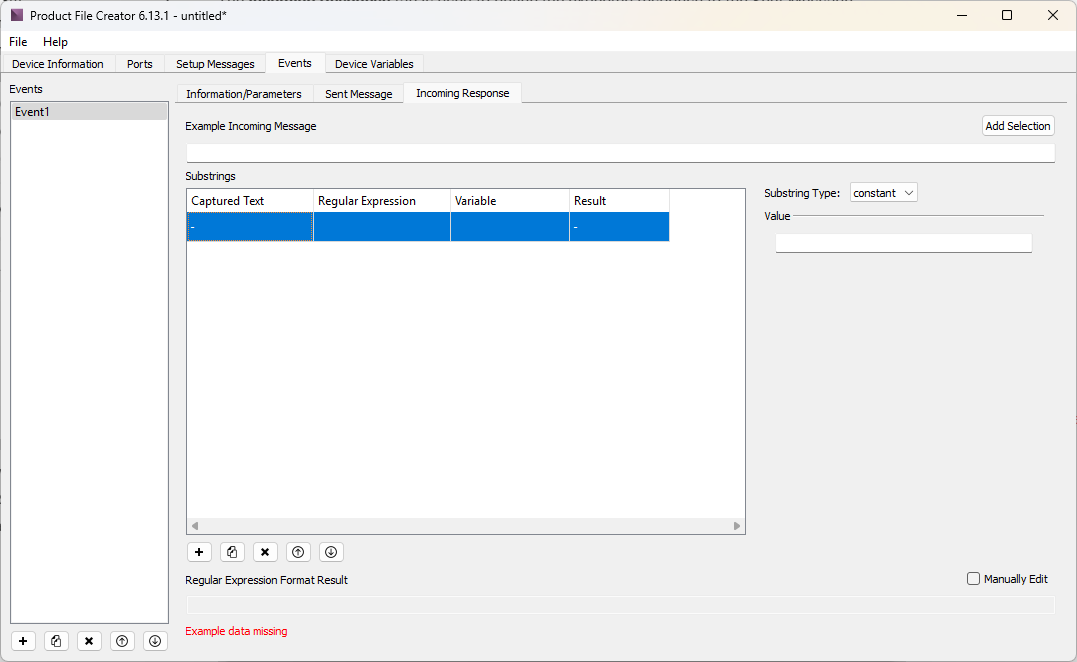
Incoming Response
The Incoming Response tab is used to define the expected response to the Sent Message defined in the previous section.
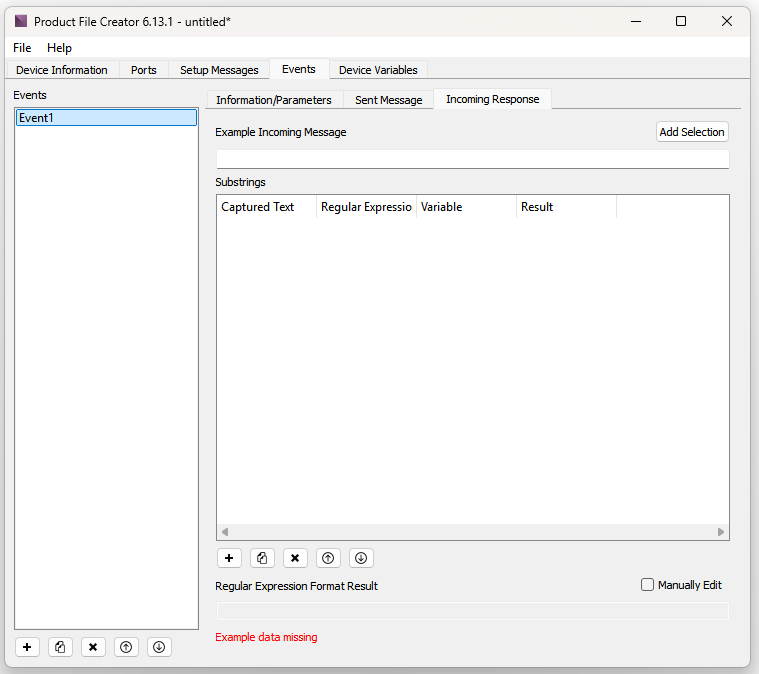
The area at the top near the label Example Incoming Message works like the Example Outgoing Message from the Sent Message tab. The white area labeled Substrings also works like the Substrings section of the Sent Message tab. Each Substring will have a Captured Text, Regular Expression, Variable, and Result. The Subtrings section can be resized for ease of use.
Beneath this area are options to Create New Substring (➕), Duplicate Substring (📄), Delete Current Substring (✖️), Move Substring Up (⬆️), and Move Substring Down (⬇️). Clicking the Create New Substring button brings up the Add Substring dialog box. Substrings can be Constants, Wildcards, Variables, or Locals.
Constant
A Constantsubstring includes a field for value. This value is a string and can containt letters, numbers, and symbols.
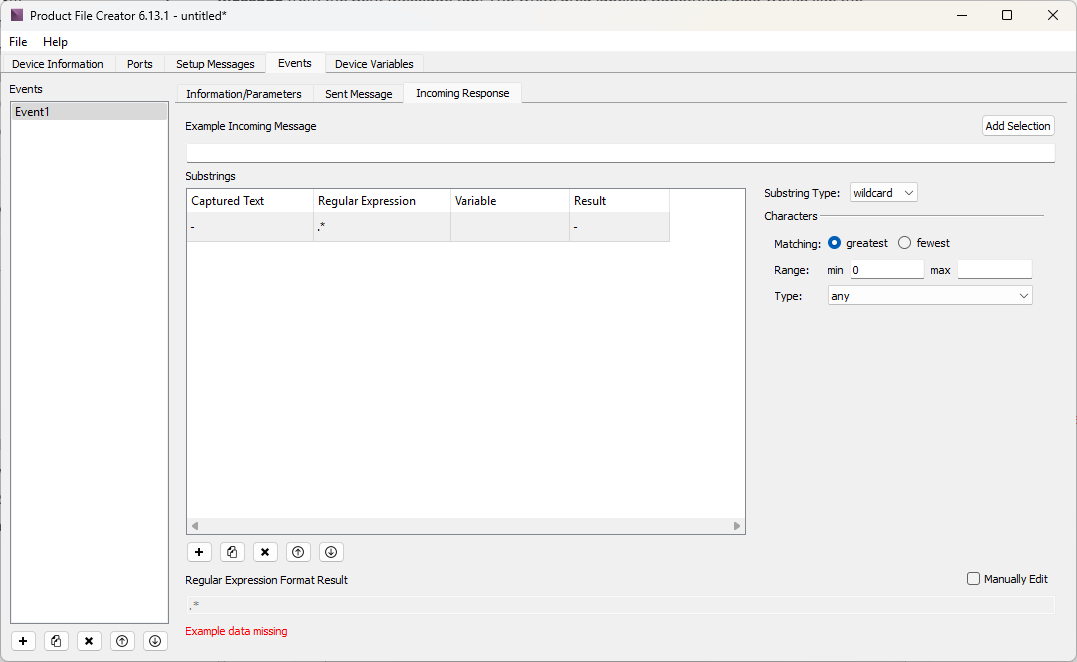
Wildcard
A Wildcard substring has a Characters section which allows you to build a wildcard to match a regular expression using the following options:
- Matching: set either greatest or fewest matching characters
- Range: set how many characters to match. Setting both to zero will match any number of characters
- Type: set the type of wildcard, from any, digits only, letters only, or none (default any)
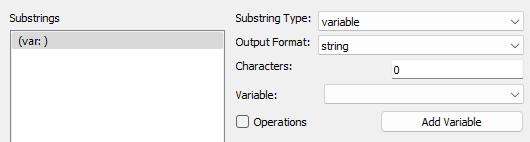
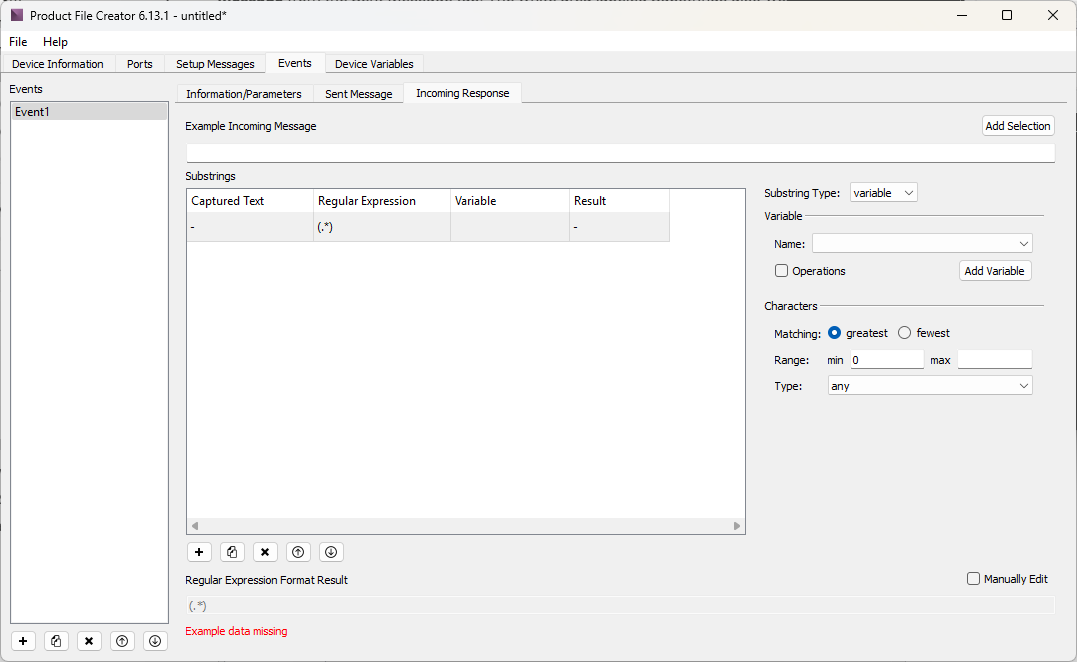
Variable
A Variable substring gives options to select a variable from a dropdown, provides a Characters section that works just like in the Wildcard substring described above, has an Add Variable button to create a new variable, and an Operations checkbox. Checking the Operations checkbox will reveal an Operations field, an Insert Function button with functions detailed above, and Result field that shows the resulting operation.
Local
The Local substring option allows you to create a local variable with a name, and provides a Characters section that works just like in the Wildcard substring described above.